
Introduction
The elderberry bush gives you a beautiful shrub and medicinal berries in one plant. Each summer it fills your garden with white flower clusters 4 to 10 inches wide. Then it loads up with dark berries that make great syrups and wines. Home gardens across North America now grow this dual purpose plant more than ever.
I started growing elderberries about 8 years ago. I was tired of paying high prices for store bought elderberry syrup. My first Sambucus canadensis plants took off fast once I got the soil and sun right. Within 2 seasons my pair of bushes gave me enough berries for a full year of syrup.
You might want a privacy hedge or a pollinator magnet. Maybe you want your own supply of immune boosting berries. The elderberry plant gives you all three. This native shrub grows across most of the U.S. Its flower clusters hold several hundred blooms that draw bees and butterflies to your space.
Most elderberry guides online give you basic gardening tips without real data to back them up. This guide pairs university extension data with real growing advice. You'll get tested facts on varieties, planting, pruning, and harvesting. Growing elderberries gets much easier when you know what works.
The elderberry supplement market keeps growing as more people want to make their own syrups and tinctures at home. In my experience, neighbors often start their own bushes after seeing the results in my yard. A good elderberry plant gives you landscape beauty and a useful harvest from the same spot.
8 Best Elderberry Varieties
Picking the right elderberry varieties makes a big difference in what you get from your garden. I split them into 2 groups. The first 4 are best for fruit production if you want berries for syrup, wine, or jam. The last 4 are best for ornamental value if you want a showpiece shrub.
Most elderberry cultivars reach 6 to 8 feet tall and wide. You need at least 2 different cultivars within 60 feet of each other for cross pollination. This goes for both American and European types.
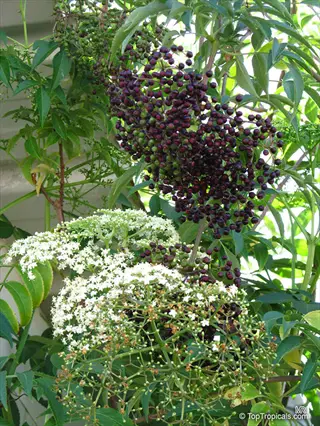
Adams 2 Elderberry
- Species: American elderberry (Sambucus canadensis) bred for heavy fruit production with dense berry clusters that ripen in late August.
- Height: Grows 6 to 8 feet (1.8 to 2.4 meters) tall with an equal spread, forming a rounded multi-stemmed shrub shape.
- Hardiness: Thrives in USDA zones 3 through 9 and handles cold winters without special protection or mulching.
- Best Use: Produces large, dense fruit clusters ideal for making elderberry syrup, jam, wine, and juice at home.
- Pollination: Pair with York or Nova for cross-pollination and plant within 60 feet (18.3 meters) for best results.
- Flavor: Berries have a mild, sweet-tart flavor that works well in both cooked preserves and dried berry blends.
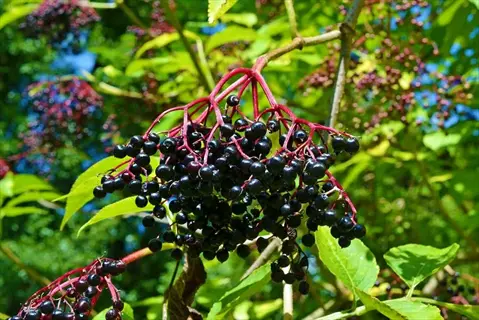
York Elderberry
- Species: American elderberry cultivar known for producing the largest individual berries among common elderberry varieties available today.
- Height: Reaches 6 to 8 feet (1.8 to 2.4 meters) in height and width, creating a full hedge-like screen when planted in rows.
- Hardiness: Performs well in USDA zones 3 through 9 and tolerates both summer heat and harsh winter freezes.
- Best Use: Favored for commercial juice and wine production because of its high juice yield per berry and consistent flavor.
- Pollination: Cross-pollinates effectively with Adams 2 or Nova when planted within the recommended 60-foot (18.3-meter) distance.
- Harvest: Ripens about two weeks later than Adams, extending the overall harvest window when both varieties are grown together.
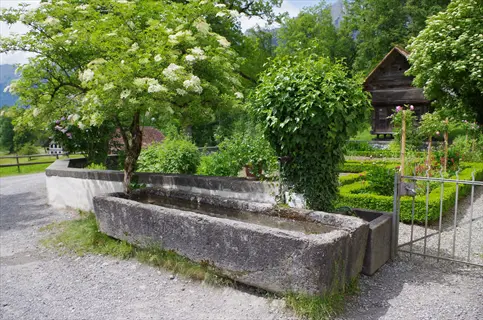
Nova Elderberry
- Species: Canadian-bred American elderberry cultivar developed for improved cold tolerance and reliable fruit production in northern climates.
- Height: Compact growth reaching 5 to 6 feet (1.5 to 1.8 meters) tall, making it suitable for smaller garden spaces and containers.
- Hardiness: Extra cold hardy in USDA zones 3 through 8, performing well even in regions with harsh winters below minus 30 degrees Fahrenheit (minus 34 degrees Celsius).
- Best Use: Excellent choice for homemade elderberry syrup and preserves with berries that have a balanced sweet-tart flavor profile.
- Pollination: Pairs well with York or Adams 2 as a pollination partner and produces heavier fruit loads when cross-pollinated.
- Growth Rate: Establishes fast and often produces a small first harvest by the second growing season after planting.
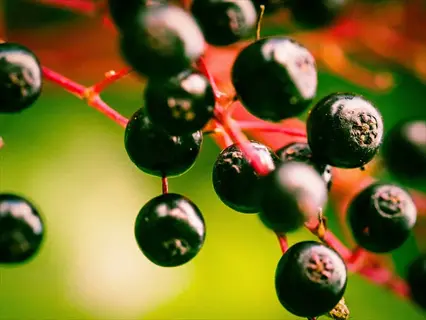
Wyldewood Elderberry
- Species: American elderberry cultivar selected from wild populations in Oklahoma, bred for commercial berry production and processing.
- Height: Grows 6 to 8 feet (1.8 to 2.4 meters) tall and wide with vigorous upright growth that responds well to annual pruning.
- Hardiness: Adapted to USDA zones 4 through 9 with strong heat tolerance that makes it popular in southern and midwestern growing regions.
- Best Use: Top choice for commercial elderberry operations due to its high and consistent berry yields season after season.
- Pollination: Requires a different cultivar nearby for pollination and pairs best with Adams 2 or Bob Gordon.
- Production: University of Missouri research highlights Wyldewood as one of the best American elderberry cultivars for reliable commercial fruit production.
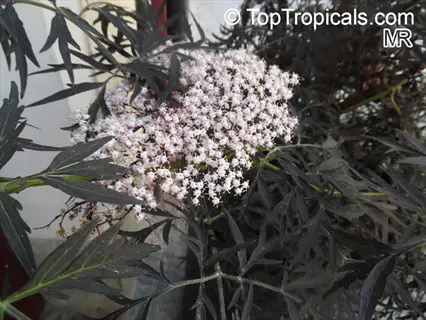
Black Lace Elderberry
- Species: European elderberry (Sambucus nigra) cultivar prized for its deep cut, dark purple black foliage that resembles Japanese maple leaves.
- Height: Grows 6 to 8 feet (1.8 to 2.4 meters) tall with an arching form that creates a dramatic focal point in landscape designs.
- Hardiness: Suited for USDA zones 4 through 7 and may struggle in extreme heat or humidity found in southern growing regions.
- Best Use: An ornamental specimen plant first and foremost, though it does produce small edible berries when paired with another Sambucus nigra cultivar.
- Foliage: Finely dissected leaves emerge dark burgundy in spring and deepen to near-black by midsummer, creating a bold contrast with pink flowers.
- Landscape Value: Works as a standalone accent shrub, mixed border focal point, or dramatic container plant on patios and decks.
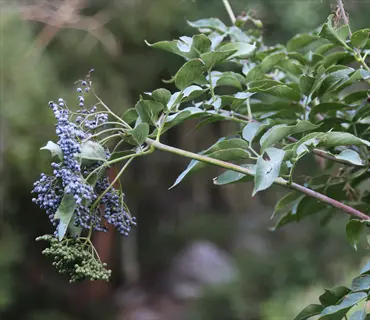
Black Beauty Elderberry
- Species: European elderberry cultivar with broad, uncut dark purple leaves and large clusters of pink flowers that appear in early summer.
- Height: Reaches 8 to 12 feet (2.4 to 3.7 meters) tall and wide, creating a substantial screen or background planting in larger landscapes.
- Hardiness: Grows in USDA zones 4 through 7 and prefers cooler climates where its dark foliage color develops its best color.
- Best Use: Outstanding ornamental shrub that provides three-season interest with purple foliage, pink blooms, and dark berry clusters.
- Flowers: Produces large flat-topped clusters of lemon-scented pink flowers that attract butterflies, bees, and hummingbirds to the garden.
- Contrast: The dark foliage creates striking combinations when planted alongside yellow-leaved shrubs, silver grasses, or white-flowering perennials.
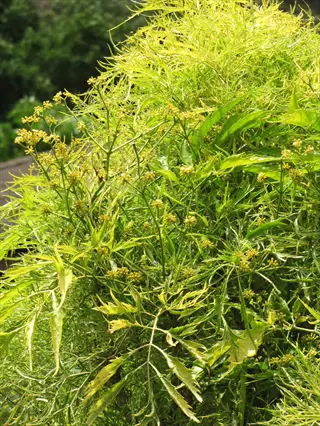
Lemony Lace Elderberry
- Species: European elderberry cultivar with chartreuse-gold finely cut foliage that brightens shady borders and mixed perennial plantings.
- Height: Compact grower reaching 3 to 5 feet (0.9 to 1.5 meters) tall, making it the best choice for small gardens and container growing.
- Hardiness: Thrives in USDA zones 3 through 7 and is one of the most cold-tolerant ornamental elderberry cultivars on the market.
- Best Use: Strict ornamental variety grown for its bright feathery foliage rather than fruit production in home garden settings.
- Foliage: Leaves emerge bright gold with red-tinged edges in spring, then mature to lime green through summer before turning yellow in fall.
- Maintenance: Requires minimal pruning beyond removing dead wood and responds well to a hard cutback every two to three years for rejuvenation.
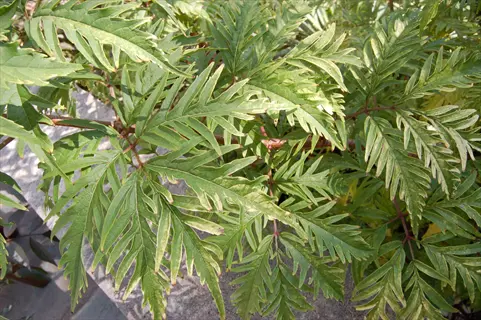
Aurea Elderberry
- Species: American elderberry cultivar selected for its golden-yellow foliage and unique red fruit that adds unusual color to the edible garden.
- Height: Grows 6 to 10 feet (1.8 to 3 meters) tall with a spreading habit that fills in fast to form a bright informal hedge.
- Hardiness: Grows in USDA zones 4 through 9 and performs best when given afternoon shade in hot climates to prevent leaf scorch.
- Best Use: Dual-purpose variety offering both ornamental golden foliage and edible red berries for adventurous jam and jelly makers.
- Fruit Color: Produces red berries instead of the typical dark purple, creating a visually distinct option noted by UF/IFAS Extension.
- Sun Needs: Foliage color is brightest in partial sun; full shade turns leaves green, while intense full sun may cause brown leaf edges.
The Adams elderberry and York pair is the most popular combo I've seen among home growers. Black Lace elderberry steals the show if you care more about looks than fruit. Match your pick to your main goal and you'll be happy with the results.
Planting and Site Selection
Think of site selection as a 3 part checklist. You need the right sunlight, good drainage, and proper elderberry spacing. Get all 3 right and your elderberry bush will reward you for decades. Miss even one and you'll struggle with weak growth or poor fruit set.
Elderberry sun requirements are easy to meet. Your plants need at least 6 hours of direct sun each day to set a full crop of berries. I've grown elderberries in partial shade and they survive fine but produce far fewer flowers. Full sun wins every time if fruit is your goal.
The elderberry soil pH sweet spot falls between 5.5 and 6.5 based on NC State Extension data. Elderberry tolerates clay, loam, silt, sand, and soils rich in organic matter. If your soil sits above pH 7.0 you risk iron chlorosis, which shows up as yellow leaves with green veins. USU Extension flags this as a real concern for certain cultivars in alkaline regions.
When planting elderberry, space your bushes 6 to 8 feet apart in rows set about 10 feet from each other. Bare root elderberry plants go in the ground in early spring before new growth starts. Dig your hole twice as wide as the root ball and set the plant at the same depth it grew before. These shrubs grow 5 to 12 feet tall with a spread up to 12 feet, so give them room.
Elderberry plants have shallow roots that don't go deep at all. Don't dig or till around your bushes after planting. Instead, add a 2 to 3 inch layer of mulch to hold moisture and keep weeds down. I learned this the hard way when I damaged roots with a hoe during my first year of growing.
Clay soil works fine for elderberry as long as water drains through and doesn't pool. Sandy soil dries out fast, so you'll need to water more often and add compost each spring. In my experience, loam with good organic matter gives the best results for strong root growth and heavy fruit set.
Watering, Feeding, and Pruning
Good elderberry care follows a seasonal pattern that I've used for years on my own plants. Once you learn the rhythm, you'll spend less than an hour per month on your patch. The key is to do the right task at the right time of year.
The biggest mistake I see is bad timing on elderberry pruning tasks. You want to remove 3-year-old canes in late winter before the buds break. Rejuvenation pruning works great for bushes that look rough and need a fresh start. Cut the whole plant to the ground in February and let it grow back. Elderberry watering is most critical in the hot summer months when roots dry out fast. And elderberry fertilizing should wait until your plants get set up in the soil, so skip it at planting time.
I tested fish emulsion and composted chicken manure on my own elderberry rows. Both gave my second year plants a strong push of growth in early spring. The seasonal guide below spells out each step so you know what to do and when to do it.
Late Winter Pruning
- When: Prune in February or March before new growth begins, while canes are still dormant and easy to evaluate for age and health.
- What to Remove: Cut out all canes that are three years old or older, along with any dead, damaged, or crossing branches that restrict airflow.
- Rejuvenation Option: For neglected bushes, cut the entire plant to the ground in late winter and allow it to regrow from the roots over the following season.
- Bee Habitat Tip: NC State Extension recommends cutting dead stems to 12 to 24 inches (30.5 to 61 centimeters) tall and leaving them standing to support stem-nesting native bees.
Early Spring Fertilizing
- First Year: Do not fertilize at planting time, as fresh fertilizer can burn the root system of new elderberry bushes.
- After Two Months: Apply one-quarter cup of ammonium sulfate per plant in a ring around the base, keeping the fertilizer 6 inches (15.2 centimeters) from the stems.
- Established Plants: Apply composted chicken manure or fish emulsion in early spring once plants are two or more years old for a slow release nitrogen boost.
- Soil Test: Test soil pH each year because elderberry performs best at 5.5 to 6.5 and alkaline drift above 7.0 causes iron chlorosis visible as yellowing leaves.
Summer Watering Schedule
- Weekly Amount: Provide 1 to 2 inches (2.5 to 5 centimeters) of water per week during summer heat, adjusting based on rainfall and soil moisture levels.
- Root Depth: Elderberry roots sit near the surface, so consistent moisture matters more than deep soaking to prevent stress and leaf wilting.
- Mulch Layer: Maintain 2 to 3 inches (5 to 7.6 centimeters) of organic mulch around the base to retain moisture, regulate soil temperature, and suppress weeds.
- Drip Irrigation: Use drip lines or soaker hoses rather than overhead sprinklers to keep foliage dry and reduce the risk of powdery mildew and leaf spot diseases.
Fall Preparation Steps
- Stop Fertilizing: Cease all fertilizer applications by late summer to avoid stimulating tender new growth that cannot harden off before the first frost.
- Final Watering: Continue watering until the ground freezes to help roots store moisture for winter dormancy and reduce cold weather stress on the plant.
- Mulch Refresh: Add a fresh layer of mulch after leaf drop to insulate roots through winter, and this step matters most in zones 3 and 4 where soil freezes deep.
- Clean Up Debris: Remove fallen leaves and old berry clusters from around the base to reduce overwintering habitat for fungal spores and insect pests.
Propagation Methods
Elderberry propagation lets you grow new plants for free from the bushes you have now. I've used all 4 methods listed below and each one works in a different season. Most guides skip hardwood cuttings and root division. USU Extension lists both as proven ways to grow elderberry from cuttings.
If you're new to this, start with softwood cuttings in June since they root the fastest. Hardwood cuttings need less work but take longer to get going. You can also grow elderberry from seed, but that's the slowest path by far. The guide below helps you pick the method that fits your skill level and timing.
Softwood Cuttings in Summer
- Timing: Take softwood cuttings in June or early July when new growth is flexible but has started to firm up at the base of the stem.
- How To: Cut 4 to 6 inch (10 to 15 centimeter) stem sections with at least two leaf nodes, remove lower leaves, and dip cut ends in rooting hormone.
- Rooting Medium: Insert elderberry cuttings into a mix of perlite and peat moss, keep moist at all times, and provide indirect light until roots form in 4 to 6 weeks.
- Success Rate: Softwood cuttings have the highest success rate of all elderberry propagation methods when kept in humid conditions with bottom warmth.
Hardwood Cuttings in Fall
- Timing: Collect hardwood cuttings in late November or December after leaves have dropped and canes are dormant for the winter season.
- How To: Cut 8 to 10 inch (20 to 25 centimeter) sections of first year wood, bundle them, and store in damp sand in a cool spot over winter.
- Spring Planting: Set stored cuttings outdoors in prepared beds in early spring with two thirds of the cutting buried and one bud showing above soil.
- Advantage: Hardwood cuttings need less daily care than softwood because they root during cool weather when moisture loss through evaporation is low.
Root Division in Spring
- Timing: Divide established elderberry plants in early spring before new growth begins by digging up root suckers that have formed around the parent bush.
- How To: Use a sharp spade to cut suckers with attached roots from the main plant, making sure each division has at least one strong root section and dormant buds.
- Replanting: Plant divisions right away in prepared holes at the same depth they were growing and water well to settle the soil around the roots.
- Best Candidates: Choose suckers growing at least 12 inches (30.5 centimeters) from the parent trunk that have built their own root systems.
Growing from Seed
- Timing: Collect ripe berries in August or September, clean the seeds from the pulp, and get them ready for the cold treatment they need to sprout.
- Cold Treatment: Elderberry from seed needs 60 to 90 days of cold moist storage at 33 to 41°F (1 to 5°C) before the seeds will sprout.
- Sprouting: Sow treated seeds in flats indoors in late winter and expect slow, uneven sprouting over 2 to 8 weeks under warm moist conditions.
- Drawback: Seed grown elderberries don't match the parent variety and take 3 to 4 years to produce their first fruit, making this the slowest method.
Pests and Disease Management
Elderberry pests and elderberry diseases are the top reasons mature bushes start to fade. Most guides skip this topic, which leaves you guessing when your plants look sick. I've had aphids on elderberry leaves more than once. I've cut out elderberry borers from stems too. Powdery mildew elderberry issues hit my rows last summer as well.
The table below covers the 6 most common problems I've seen and what to do about each one. Both NC State and UF/IFAS back organic pest management elderberry fans can use at home. Spot the signs early and you can save your plants before real damage sets in.
UF/IFAS says you should apply neutral copper fungicide in the wet months to stop problems before they start. I spray mine twice in spring and once more in late summer. That routine has kept my elderberry rows free of leaf spot and mildew for 3 seasons straight now.
Harvesting and Processing
Knowing when to harvest elderberries saves you from wasting a whole season of growth. I lost my first crop because I picked too soon and the berries were still part green. Elderberry harvest time falls between mid August and late September. Each bush ripens over a 3 week window, so you'll make several trips to your plants.
Mature plants give you 2 to 3 pounds of fruit each based on USU Extension data. That's enough from just 2 bushes to make a big batch of elderberry syrup or a round of elderberry wine. The steps below show you how harvesting elderberries works from start to finish.
Check Berry Ripeness
- Color Test: Wait until every berry in the cluster has turned deep purple black with no green or red berries left, as unripe berries contain higher levels of toxic compounds.
- Squeeze Test: Press a ripe berry between your fingers and look for deep purple juice that stains your skin, which confirms full ripeness and sugar content.
- Timing Window: Most American elderberry types ripen from mid August through September, with each bush producing ripe clusters over a 3 week rolling harvest period.
Cut and Collect Clusters
- Tool: Use sharp garden scissors or pruning shears to cut entire flower clusters at the stem base rather than picking single berries by hand.
- Container: Place cut clusters into flat baskets or trays in a single layer to avoid crushing berries and starting early fermentation.
- Quick Processing: Get your harvested clusters into the fridge within 2 hours of picking or process them right away to keep the flavor and avoid pest damage.
Remove Berries from Stems
- Freeze Method: Freeze elderberries by placing entire clusters in the freezer for at least 4 hours, then roll frozen clusters between your hands over a bowl to snap berries free from stems.
- Hardware Cloth Method: Rub fresh clusters across a piece of hardware cloth with quarter inch mesh set over a bucket, letting berries fall through while stems stay on top.
- Stem Warning: Remove all green stems, leaves, and unripe berries from your harvest because these plant parts contain toxic compounds even after cooking.
Storage and Cooking Safety
- Freezer Storage: Spread cleaned berries on a baking sheet in a single layer, freeze until solid, then move to freezer bags where they keep for up to 12 months.
- Cooking Rule: Cook elderberries before eating by heating them to at least 185°F (85°C) for at least 15 minutes to break down toxic compounds in the fruit.
- Common Products: Cooked elderberries make great syrups, jams, jellies, wines, and dried berry blends that keep their health value all year long.
I freeze elderberries from every harvest and use them through the winter for syrup batches. The freeze method makes stem removal 10 times faster than trying to pick berries off fresh clusters by hand.
5 Common Myths
All elderberries are poisonous and should never be eaten under any circumstances by anyone.
Ripe elderberries from Sambucus canadensis and Sambucus nigra are safe and nutritious after proper cooking, which breaks down the cyanogenic glycosides.
You only need one elderberry bush to get a full harvest of berries each growing season.
Elderberry bushes require cross-pollination from a different cultivar planted within 60 feet (18.3 meters) for reliable and abundant fruit production.
Elderberry bushes need full shade because they naturally grow along shaded forest edges and stream banks.
While elderberry tolerates partial shade, it produces the most flowers and fruit when planted in full sun with at least six hours of direct light daily.
Elderberry bushes are invasive weeds that will take over your entire yard and garden within a few years.
Elderberry spreads through root suckers but is easily managed with annual pruning and can be contained with root barriers or regular sucker removal.
Fresh elderberries picked straight from the bush taste sweet like blueberries and can be eaten as a raw snack.
Raw elderberries taste tart and astringent, and they contain compounds that cause nausea and vomiting unless the berries are cooked or dried first.
Conclusion
Growing elderberries comes down to 3 key steps. First, pick the right variety for your goal. Second, plant at least 2 different cultivars near each other for cross pollination. Third, cook your berries before you eat them. Get those 3 things right and your elderberry bush will serve you well for years.
USU Extension data shows that mature plants make 2 to 3 pounds of fruit each. That means just 2 bushes can give you enough berries for a year of homemade syrup. When I first started, I made enough syrup from my 2 bushes to last the whole winter. The savings add up fast once your plants get going.
No other shrub gives you this kind of triple value. Your elderberry plant adds beauty to your yard, feeds birds and bees, and puts food on your table from one easy care planting. In my experience, elderberry harvesting gets simpler each season as you learn your plants' rhythm and timing.
A pair of elderberry bushes planted this spring will produce their first harvest by next summer. They'll keep giving you berries for decades with very little work on your part. You now have all the knowledge you need to grow a thriving elderberry patch at home.
External Sources
Frequently Asked Questions
Is it safe to eat elderberries off the bush?
Raw elderberries contain cyanogenic glycosides that can cause nausea, vomiting, and diarrhea, so they must be cooked before eating.
Where do elderberry bushes grow best?
Elderberry bushes grow best in USDA zones 3 through 9 in full sun with moist, slightly acidic soil at a pH of 5.5 to 6.5.
What are elderberry bushes good for?
Elderberry bushes produce berries rich in vitamins A and C used for syrups, jams, and wines, while also supporting pollinators and wildlife.
Does elderberry help sinuses?
Studies show elderberry extracts have anti-inflammatory properties that may reduce sinus swelling and upper respiratory symptoms.
Are European elderberries edible?
European elderberries from Sambucus nigra are edible when fully ripe and properly cooked to break down cyanogenic glycosides.
Who should not eat elderberries?
Pregnant or breastfeeding women, young children, and people with autoimmune conditions should avoid elderberry without medical guidance.
What illness do elderberries prevent?
Research suggests elderberry supplementation may reduce the duration and severity of upper respiratory infections including colds and flu.
Does elderberry grow back every year?
Elderberry is a deciduous perennial shrub that dies back in winter and regrows each spring from its established root system.
Why is elderberry so powerful?
Elderberries contain high concentrations of anthocyanins, flavonoids, and vitamins A and C that provide strong antioxidant and anti-inflammatory effects.
When not to use elderberry?
Avoid elderberry if you take immunosuppressants, diuretics, or diabetes medication, and never consume raw or unripe berries.