
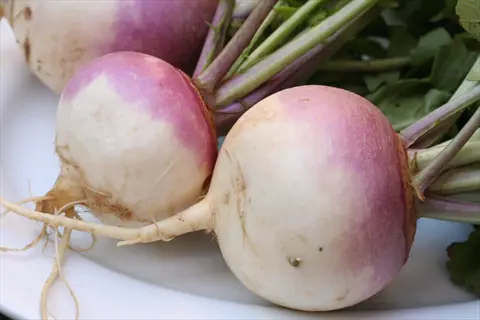
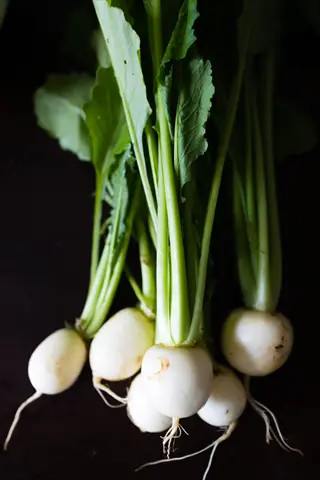
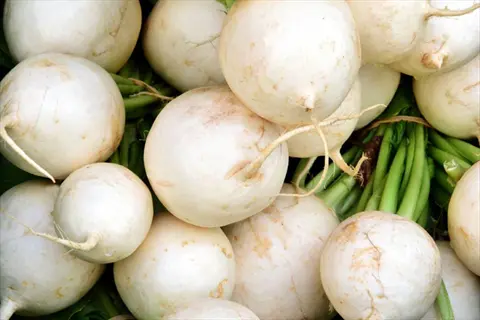
Knowing precisely when to plant turnips will put your garden on the right track. These vegetables tolerate frost and like cool conditions. You can benefit from their roots and leafy greens! Turnips are a fast-growing crop that requires minimal maintenance. They are also adaptable to various climates, making them friendly for beginning gardeners.
The timing of planting has a direct impact on the flavor and texture of the roots. Planting in early spring or late summer won't expose roots to heat stress. Exposure to frost actually sweetens roots. I check my frost dates very regularly (and the weather) for my area. The climate of your area is always ideal for your window planting.
Turnips provide functional benefits in addition to taste. They are resilient to light frosts. They can be grown in containers if you have limited space. Six weeks from seed to harvest. This quick cycle allows you to reap several harvests in a single season.
Choosing Turnip Varieties
Harvest success begins with the variety of your turnips. Cool weather varieties, such as Hakurei, are best suited for growth in spring, developing sweet and mild roots that also work well in salads. They should be spaced 4 inches apart to allow sufficient root development. Ensure proper drainage by planting in well-drained soil to prevent basal rotting, which they are prone to. I've discovered these white turnips are slow to bolt despite some warm spells before harvest.
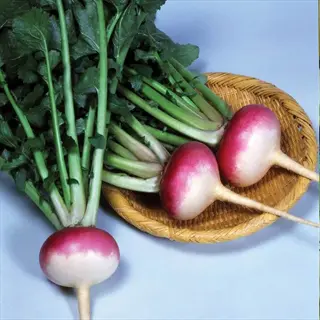
For fall planting, choose frost-tolerant varieties like Purple Top Milan. These produce larger roots that grow to 3-inch diameter. Upon frost, their flavor becomes nutty. Grow these 6 inches apart to maximize leaf and root production. I like the dual-purpose roots and leaves. They can tolerate down to 25°F.
Be aware of your harvest objectives when choosing varieties. The Tokyo Cross is a great choice for quick turnaround at 35-day maturity. The Scarlet Queen has colorful roots that are crispy. When harvesting, be sure to measure the roots at a 2-3 inch diameter for the best flavor. Follow the instructions on the packet and space them as needed. I like to include both early-season and late-season varieties in my garden each year.
Soil preparation is always important, regardless of the variety you grow. Turnips will thrive planted in loose, well-draining beds. Amend clay soils with compost before planting. To test drainage, dig a 12-inch hole. Fill it with water <check back after 4 hours>. It should empty within four hours.
Purple Top Milan
- Reliable heirloom variety with distinctive purple crown and white base
- Grows best in cool weather with soil temperatures around 60°F (15.5°C)
- Reaches optimal size of 3 inches (7.6 cm) diameter in 50-60 days
- Ideal for cooking methods like roasting or mashing due to firm texture
- Plant seeds 2 inches (5 cm) apart in rows 18-30 inches (46-76 cm) apart
- Requires well-drained soil with pH between 6.0 and 7.5
Snowball
- Pure white variety known for its early maturity and mild flavor
- Thrives in spring planting 4 weeks before last frost date
- Best harvested young at 2 inch (5 cm) diameter for raw salads
- Requires consistent moisture to prevent woody texture development
- Grows well in containers with minimum 10 inch (25.4 cm) soil depth
- Space plants 4 inches (10 cm) apart after thinning seedlings
Hakurei
- Japanese variety prized for crisp texture and sweet, mild flavor
- Performs best in cool fall weather with light frost exposure
- Maintains sweet flavor when harvested small at 2 inch (5 cm) diameter
- Requires regular watering to prevent bitterness in roots
- Sow seeds ¼ inch (0.6 cm) deep in raised beds or garden rows
- Prefers loose soil amended with compost for optimal growth
Scarlet Queen
- Vibrant red-skinned variety with cold-tolerant growth habit
- Suitable for late summer planting in northern climates
- Develops sweet flavor after exposure to light frost conditions
- Needs well-drained soil to prevent root rot in wet seasons
- Thin seedlings to 6 inch (15 cm) spacing for proper root development
- Harvest when roots reach 3 inch (7.6 cm) diameter for best quality

Golden Ball
- Yellow-fleshed heritage variety with sweet, nutty flavor profile
- Excels in fall planting schedules with maturity in 70 days
- Reaches ideal harvest size at 4 inches (10 cm) diameter
- Tolerates light frost which enhances its natural sweetness
- Plant seeds 1 inch (2.5 cm) deep in fertile garden soil
- Space plants 6 inches (15 cm) apart in rows 24 inches (61 cm) apart

Tokyo Cross
- Fast-growing hybrid ready for harvest in just 35 days
- Perfect for succession planting throughout the growing season
- Produces uniform white roots at 2-3 inches (5-7.6 cm) diameter
- Maintains mild flavor even during warmer growing periods
- Thin to 3 inch (7.6 cm) spacing after seedlings emerge
- Prefers consistent moisture and full sun exposure
White Egg
- Oval-shaped variety resembling eggs with tender white skin
- Best planted in late summer for autumn harvest period
- Harvest at 3-4 inch (7.6-10 cm) length for premium texture
- Exceptionally cold-hardy, surviving temperatures down to 20°F (-6.7°C)
- Sow seeds ½ inch (1.3 cm) deep in well-prepared garden beds
- Allow 5 inch (12.7 cm) spacing between mature plants
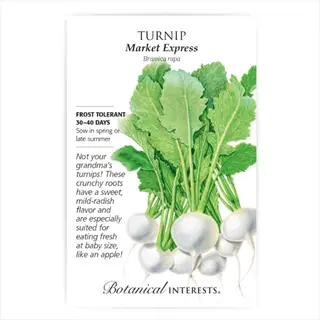
Market Express
- Early-maturing variety producing roots in just 38 days
- Ideal for quick spring crops before summer heat arrives
- Globe-shaped roots reach 3 inch (7.6 cm) diameter at maturity
- Tolerant of various soil types including heavier clay soils
- Plant in rows 18 inches (46 cm) apart with 4 inch (10 cm) spacing
- Water deeply once per week for optimal root development
Just Right
- Consistent performer with smooth white roots and mild taste
- Adaptable to both spring and fall planting schedules
- Best harvested at 3-4 inch (7.6-10 cm) diameter size
- Resists bolting in warmer temperatures better than most varieties
- Sow seeds ¼ inch (0.6 cm) deep in fertile garden soil
- Thin seedlings to 5 inch (12.7 cm) spacing for full growth
Royal Crown
- Large purple-top variety storing well through winter months
- Requires 65-day growing season, ideal for fall harvest
- Reaches impressive 5 inch (12.7 cm) diameter at maturity
- Develops sweeter flavor after exposure to multiple frosts
- Plant in rows 30 inches (76 cm) apart with 8 inch (20 cm) spacing
- Needs deep, loose soil for proper root formation
Soil Preparation Essentials
Preparing soil in advance of planting provides the groundwork for healthy turnips. Turnips thrive in well-drained soil with good structure. Four weeks before planting, also test your soil pH levels. Think of it as checking your car's oil before a trip. If you skip this step, you are risking underwhelming growth and harvests.
Amendments are very different for sandy and clay soils. Sandy soils require organic matter, such as compost, to retain moisture effectively. Clay soils utilize coarse sand to help with drainage. When I work with heavy clay, I also incorporate peat moss to help mitigate moisture issues caused by root rot.
Neglecting pH and drainage can create significant issues. Acidic soils (pH < 6.0) will cause stunted growth. Alkaline conditions (>pH 7.5) will sequester nutrients. Poor drainage will lead to fungal diseases. Roots will be deformed and bitter. Always check drainage by digging a hole and filling it with water to ensure proper flow. The water should drain within 4 hours.
Turnips require loose soil with depth to at least 8 inches. Remove stones larger than one inch that interfere with roots. Compost at least two weeks in advance of planting. This oxygen feeds beneficial microbes. Do not use fresh manure; it can burn the roots. It could add pathogens; your plants will thank you!
Soil Testing
- Collect samples from multiple garden areas at 6-8 inch (15-20 cm) depth
- Analyze pH, NPK levels, and organic matter content
- Testing should occur 4-6 weeks before planting season begins
pH Adjustment
- For acidic soils (pH <6.0): Add agricultural lime at 5 lbs/100 sq ft (2.3 kg/9.3 m²)
- For alkaline soils (pH >7.5): Incorporate sulfur at 1 lb/100 sq ft (0.45 kg/9.3 m²)
- Retest after 3-4 weeks to verify correction before planting
Organic Amendments
- Spread 3-4 inch (7.6-10 cm) layer of well-rotted manure or compost
- Incorporate thoroughly to 8-10 inch (20-25 cm) depth using garden fork
- Never use fresh manure: Can burn roots and introduce pathogens
- Allow 2 weeks for microbial activity before planting seeds
Drainage Improvement
- For clay soils: Mix in coarse sand at 30% volume and peat moss
- For sandy soils: Add organic matter to increase water retention
- Create raised beds 8-12 inches (20-30 cm) high in poorly draining areas
- Slope planting rows slightly to prevent water pooling
Final Preparation
- Rake soil to fine tilth, removing stones larger than 1 inch (2.5 cm)
- Verify soil temperature reaches 40°F (4.4°C) for planting
- Pre-water bed 24 hours before sowing seeds for moisture uniformity
- Apply starter fertilizer if recommended by soil test results
Planting and Care Guide
Proper spacing is essential for turnip plant growth. Turnips have loose roots that require spacing to grow properly. Turnips can be planted in rows, with *12 inches* between the two rows. Turnips should be sown, *1/4 inch deep*, to a depth. When seedlings grow to a height of *2 inches tall*, thin them to *4 inches apart*, for square spacing. I always use a string to help with row spacing and straight lines when planting.
Care requirements change significantly from one season to the next. In the growing season, sandy soils need watering every 2 days. Clay soils need deep watering every week. Plantings in spring need protection from pests (i.e., row covers). You may benefit from light frosts on fall crops. Seasonal temperature changes will guide care.
Implement physical barriers as part of your pest management system and avoid direct chemical triggers to prevent pest infestations. Use floating row covers immediately after planting (but remove them by the time the plants are larger than the floating row covers)! Hand-pick caterpillars during the morning inspection. Use diatomaceous earth for flea beetles. I use yellow sticky traps to monitor the presence of insects. These pest management strategies enable plants to grow without damage and allow beneficial insects to avoid issues.
Watering needs rely entirely on your type of soil. Sandy soils require 1 inch of water every three days; clay soils every week. Check for moisture depth by pushing a trowel into the soil. It should feel moist 6 inches down. Roots will dry more quickly in hot weather.
Water Management
- Provide 1 inch (2.5 cm) water weekly through growing season
- Sandy soils: Water 2-3 times weekly to maintain moisture
- Clay soils: Water deeply once weekly to avoid waterlogging
- Use trowel to check moisture depth (should reach 6-8 inches/15-20 cm)
- Morning watering reduces evaporation and fungal risks
Fertilization Schedule
- Pre-plant: Incorporate compost into top 6 inches (15 cm) of soil
- 4 weeks after planting: Apply balanced fertilizer (10-10-10) if needed
- Avoid high-nitrogen formulas that promote leafy growth over roots
- Side-dress rutabagas only with 46-0-0 fertilizer
- Stop fertilization 30 days before expected harvest
Pest Control
- Install floating row covers immediately after sowing
- For flea beetles: Apply diatomaceous earth on dry leaves
- Aphid management: Spray insecticidal soap weekly
- Root maggot prevention: Rotate crops annually
- Handpick caterpillars during early morning inspections
Weed Management
- Shallow cultivation (under 1 inch/2.5 cm) around seedlings
- Apply 3-4 inch (7.6-10 cm) straw mulch after thinning
- Hand-pull weeds near roots to avoid damage
- Avoid herbicides near edible root crops
- Weed weekly during first 6 weeks of growing season
Environmental Protection
- Use cloches for spring planting if temperatures drop below 40°F (4.4°C)
- Provide shade cloth during summer heat waves above 85°F (29.4°C)
- Harvest before heavy autumn rains to prevent rot
- For fall crops: Allow light frost exposure to enhance sweetness
- Cover crops with frost blankets during hard freezes below 25°F (-3.9°C)
Best Time to Plant Turnips
The optimal timing for planting turnips clearly relates to your local last frost date. For spring planting, seeds should be planted 4 weeks before this date, once the soil temperature reaches 40°F. The fall planting will occur 8-10 weeks before the anticipated first frost date. Turnips prefer to grow in cooler temperatures and want to avoid summer heat as much as possible. I use USDA zones as a guide to my planting schedule for the year.
Spring planting yields quicker harvests before the heat arrives, fall planting benefits from reduced pest pressure and enhanced sweetness. If you're in zones 3-4, the best planting time is May. If you're in zones 7-8, March is the time to plant. I prefer fall planting because I find that fall-planted roots tend to produce sweeter roots than spring-planted roots. If you're in a warmer climate, you could even leave roots in the ground until December.
Frost changes the flavor of turnips through plant biochemistry. Chilling between 28°F and 32°F catalyzes the conversion of starch to sugar. Enzymes catalyze the breakdown of starch into glucose and fructose. This process of sweetening makes the roots taste milder. I always let my fall crop endure a few light frosts before I harvest it.
Regional differences play a major role in success. Gardeners living on the coast need to realize that summers are often cooler. If you are farming in the mountains, you may need to provide additional frost protection. Urban heat islands enable an extended growing season. Monitor the soil temperature using a probe thermometer, and plant when the temperature remains steady above 40°F for 3 consecutive days.
Spring Planting Protocol
- Start 4 weeks before average last frost date in your region
- Ensure soil temperature reaches minimum 40°F (4.4°C)
- Use cold frames or cloches if nights drop below 35°F (1.7°C)
- Prioritize quick-maturing varieties like Tokyo Cross (35 days)
- Harvest before daily temperatures exceed 75°F (23.9°C)
Fall Planting Advantages
- Sow 8-10 weeks before first expected frost date
- Cooler temperatures prevent woody texture development
- Light frost exposure increases sugar content in roots
- Fewer pest pressures compared to spring cultivation
- Extend harvest by leaving roots in ground until December
Soil Readiness Indicators
- Soil crumbles easily when squeezed (not muddy or dusty)
- Morning soil temperature consistently above 40°F (4.4°C)
- Earthworms active in top 6 inches (15 cm) of soil
- Previous crop residue decomposed completely
- Weed seedlings emerging (indicates biological activity)
Microclimate Considerations
- South-facing slopes: Plant 1-2 weeks earlier in spring
- Low-lying areas: Delay planting until frost risk passes
- Urban gardens: Utilize heat-retaining surfaces for extended season
- Coastal zones: Account for cooler summer temperatures
- Mountain regions: Prioritize frost-tolerant varieties
Succession Planting Strategy
- For continuous harvest: Sow new rows every 2-3 weeks
- Spring-summer transition: Switch to heat-tolerant varieties
- Summer-fall transition: Increase seeding density by 20%
- Final fall planting: Use cold-hardy types like Purple Top
- Record planting dates annually to refine timing
Harvesting and Storing
Turning up the roots should happen when 2-3 inches between the shoulders of the individual roots of the turnips and the soil surface. For greens, I harvest the outer leaves when they are 4-6 inches tall and leave the crown to produce more leaves in the center. They will become woody if they are too big. I check the dates on the seed packets and use a ruler for the level of accuracy.
Root harvest techniques differ from those used for greens. For roots, gently twist the root while pulling straight up to avoid breakage. For greens, you utilize scissors and cut 1 inch above the crown. Harvesting in the morning will help preserve the crispness of the produce. I usually harvest the greens every week and leave the roots to grow fully underground.
"Cold Hardy" varieties are ground-tolerant until December in zones 5-8. Use straw mulch 6 inches thick after the first frost. Row fabric cover below 20°F. Soil serves as some insulation. I let my Purple Top Milan get sweet with some light frosts.
Cellar storage relies on scientific parameters. Maintain a temperature of 32-40°F (95% humidity). Store in wet sand boxes to slow respiration. Avoid ethylene producers, like apples. Under this condition, turnips last about 4 months. I have hygrometers that measure humidity levels daily.
Frost initiates an enzymatic process that converts bioactive starch into sugars. In fact, when temperatures range from 28 to 32°F, glucose and fructose levels increase. This biochemical process also reduces glucosinolates that create bitterness. Two light frosts are preferred to develop flavor. Personally, I harvest once the cold snap has passed, as this yields the best sweetness at harvest.
Refrigerator Storage
- Remove greens immediately to prevent moisture loss from roots
- Place unwashed roots in perforated plastic bags for humidity control
- Maintain 32-40°F (0-4.4°C) with 90-95% humidity
- Maximum storage duration: 2 weeks for turnips, 1 month for rutabagas
- Check weekly for soft spots or mold development
Root Cellar Storage
- Bury roots in damp sand or sawdust within wooden crates
- Maintain 32-40°F (0-4.4°C) with 95% humidity
- Avoid storing near ethylene-producing fruits like apples
- Turnips last 3-4 months; rutabagas 4-5 months in ideal conditions
- Inspect monthly and remove any decaying roots immediately
In-Ground Storage
- Leave cold-hardy varieties in soil until December in zones 5-8
- Apply 6-12 inch (15-30 cm) straw mulch after first light frost
- Cover with row cover during hard freezes below 20°F (-6.7°C)
- Harvest during winter thaws when soil is workable
- Maximum duration: 2 months post-maturity for quality retention
Freezing Preparation
- Blanch cubed roots for 3 minutes in boiling water
- Cool immediately in ice water for texture preservation
- Pat dry and spread on trays for flash-freezing
- Store in airtight containers at 0°F (-18°C) for 8-10 months
- Frozen turnips best used in cooked dishes like soups
Greens Preservation
- Rinse thoroughly to remove soil and insects
- Blanch for 2 minutes in boiling water with lemon juice
- Squeeze out excess water before freezing in portions
- Store in vacuum-sealed bags for 6-8 months at 0°F (-18°C)
- Use frozen greens directly in cooked dishes without thawing
5 Common Myths
It is commonly accepted by gardeners that turnips need heavy clay soils to encourage larger, healthier roots
However, turnips actually thrive best on well-drained, loose soil, rather than heavy clay soils. The issues with clays soils are poor rooting development and increased risk of root rot caused by water retention. The ideal conditions for turnip cultivation would be either a sandy loam soil, with organic matter, or even a clay loam soil amended with organic matter - both soil types would allow turnips to establish well-formed roots rather than deformed ones. Additionally, proper drainage is an essential requirement for nutrient acquisition and the overall health of the turnip plant, and which makes well-aerated soils superior for turnip cultivation.
Many people mistakenly think of planting turnips only in the fall for successful growth
Turnips thrive during a spring or fall planting schedule as long as temperatures are mild and there's not extreme heat. Planting in spring allows people to harvest before summer heat causes the plant to bolt. Fall planting takes advantage when pests are less prevalent as well as enhances winter storage with frost exposure for sweeter roots. Successive planting will provide harvest periods in both seasons and yield more crop without compromising the quality of the roots or development of flavor during each season.
There is a common misconception that every turnip variety will be bitter no matter how it is treated
Bitterness typically happens as a result of stress from the environment or failing to harvest at the right time and is not an characteristic of the plant. Young turnips that are harvested when they are 2-3 inch (5-7.6 cm) in diameter cultured before stress or frost would develop natural sugars that taste sweet and counteract the bitterness of mature turnips. The sweetness could also be accomplished by growing sweet varieties like Hakurei and by applying consistent moisture during growing to prevent compounds from developing that contribute to flavoriness and harsh tastes. When grown properly, turnips will be very crisp and mild tasting.
Some people mistakenly consider turnip greens inedible and discard them after root harvest
Turnip greens are highly nutritious leafy vegetables containing vitamins A, C, K, calcium, and antioxidants. They can be sauted, added to soups, or used raw in salads when young and tender. Blanching before cooking neutralizes any slight bitterness while preserving nutrients. Discarding them wastes valuable food sources that complement the roots nutritionally and culinarily.
A widespread myth claims frost damages turnips irreparably, ruining crops entirely
Light frost exposure actually enhances turnip flavor by converting starches into sugars through cold-induced enzymatic processes. While temperatures below 25°F (-3.9C) can damage cells, moderate frost improves taste without harming roots. Protective measures like row covers allow growers to leverage cold benefits while preventing freeze damage, making frost a desirable factor for quality development.
Conclusion
Timing of planting is still critical for flavor and quality of turnips. Spring planting after last frost takes advantage of cool weather benefits. Fall planting, done ahead of the first frost, utilizes natural cold enhancement techniques. Both times have their own benefits. I recommend noting local frost dates to be precise. This will result in roots developing the best texture and sweetness.
Three key practices guide successful cultivation. Prepare well-drained soil with good pH testing. Select varieties that are suitable for your climate, seasons, and goals. Utilize frost exposure to naturally develop flavor. I alternate between spring Hakurei and fall Purple Top Milan to expand my harvest window.
Explore both planting schedules to see which you prefer. Spring crops can skip some of the summer pests. Fall crops can build cold hardiness and deeper sweetness. Consider planting later crops every three weeks for succession. I found that I had ongoing harvests from May to November. Record keeping will help you navigate your process.
Turnips can be enjoyed as little nutritional powerhouses. The roots provide vitamin C and fiber. The greens offer calcium and vitamin K. You can eat them both raw in salads or cooked in soups. I find blending greens into smoothies a great way to obtain the same nutritional benefits in a more concentrated form. The versatile vegetable deserves a place in everyone's garden.
External Sources
Frequently Asked Questions
When should I plant turnips for optimal growth?
The best time to plant turnips depends on your climate and seasonal goals. For spring planting, sow seeds 4 weeks before your area's last frost date when soil reaches 40°F (4.4°C). For fall harvests, plant 8-10 weeks before first expected frost to leverage cool weather benefits.
Can turnips survive winter conditions?
Turnips tolerate light frost but have specific winter limits. Cold-hardy varieties survive brief periods at 20°F (-6.7°C) with protection like straw mulch or row covers. However, extended freezing below 15°F (-9.4°C) damages roots permanently. Winter viability depends on:
- Variety selection (Purple Top Milan and Scarlet Queen handle cold best)
- Mulch depth (minimum 6 inches/15 cm insulation)
- Duration of sub-freezing temperatures
- Soil drainage to prevent ice formation around roots
What companion plants should be avoided near turnips?
Turnips compete poorly with certain plants due to nutrient demands and pest attraction. Avoid planting near:
- Other brassicas like cabbage or kale (shared pest vulnerabilities)
- Pole beans (nutrient competition and shade issues)
- Potatoes (mutual susceptibility to fungal diseases)
- Mustard greens (attracts flea beetles that damage turnips)
How can I accelerate turnip growth?
Optimize growth speed through soil management and variety selection. Key acceleration techniques include:
- Amending soil with compost for immediate nutrient access
- Choosing fast-maturing varieties like Tokyo Cross (35 days)
- Maintaining consistent soil moisture without waterlogging
- Applying balanced fertilizer during seedling stage
- Ensuring full sun exposure (6+ hours daily)
Is indoor seed starting recommended for turnips?
Direct sowing is generally preferable due to turnips' sensitive root systems. Indoor starting risks transplant shock which stunts root development. If starting early is necessary:
- Use biodegradable pots to avoid root disturbance
- Limit indoor time to 3 weeks maximum
- Harden off seedlings gradually before transplanting
- Plant during cool evening hours to reduce stress
- Prioritize varieties with higher transplant tolerance
What soil conditions do turnips require?
Turnips need specific soil properties for healthy development. Ideal conditions include:
- Well-drained loamy soil preventing waterlogging
- pH range between 6.0-7.5 for nutrient uptake
- Loose texture allowing unobstructed root expansion
- Organic matter content exceeding 4% for fertility
- Avoidance of fresh manure to prevent root deformities
How does frost affect turnip flavor?
Light frost exposure improves turnip taste through biochemical changes. Cold temperatures between 28-32°F (-2 to 0°C) trigger:
- Starch-to-sugar conversion in root tissues
- Reduced bitterness compounds like glucosinolates
- Enhanced sweetness in cold-hardy varieties
- Crisp texture preservation when harvested promptly
- Flavor development peaks after 2-3 light frosts
Can I plant turnips successively for continuous harvest?
Successive planting maximizes yield throughout growing seasons. Effective strategies include:
- Sowing new rows every 2-3 weeks in spring/fall
- Switching to heat-tolerant varieties in summer
- Increasing seed density by 20% for late crops
- Utilizing shade cloth during peak summer heat
- Tracking maturity dates for optimal succession timing
What are the key differences between turnips and rutabagas?
While both are root vegetables, they differ significantly in:
- Growth period (turnips: 35-60 days, rutabagas: 90+ days)
- Cold tolerance (rutabagas withstand harder freezes)
- Appearance (rutabagas have yellow flesh and waxy skin)
- Flavor profile (rutabagas are sweeter but earthier)
- Storage longevity (rutabagas last 2-3 months longer)
How should turnip seeds be prepared before planting?
Seed preparation enhances germination without compromising viability. Recommended practices include:
- Avoiding soaking to prevent seed coat damage
- Mixing with sand for even distribution in rows
- Planting at shallow ¼-½ inch (0.6-1.3 cm) depth
- Pre-moistening soil before sowing seeds
- Using fresh seeds (germination rates drop after 2 years)