
If you want to dramatically change your gardening outcomes, understanding when to plant kale is key. This nutritional superstar provides vitamins A, K, and C, as well as useful antioxidants. Providing a significant health boost, your garden's oversized potential will tank without proper timing. It can also impact the quality of flavors. If you pick healthy plants, this is a tough decision.
I will explain regional planting windows reflecting climate zones. We will also talk about the differences between seed starting and seedling methods. You will notice all the seasonal care adjustments that lead to year-round success. Based on years of experience growing kale, my advice is grounded in science-supporting growing methods that yield predictable and reliable results.
Timing your planting correctly can avoid much trouble. Frost damage in the early stages can be fatal to young plants. Summer heat can cause the leaves to be bitter. I remember losing my first crop well because I planted it too late. Please don't repeat my mistakes. Use these proven methods instead.
Growing Kale in Containers
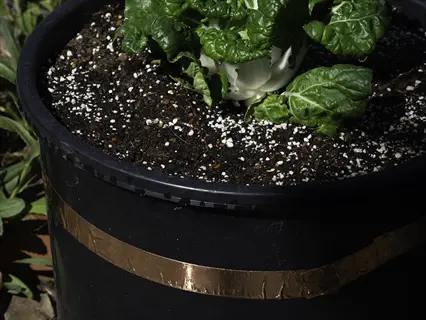
Growing kale in containers is a great way to circumvent space constraints. Be sure to use minimum 12-inch pots to allow healthy root development. If you use a smaller pot, it may lead to an early bolting situation. I've seen this action in my own balcony garden. Size will also assure plenty of plant vigor and an ongoing harvest.
An ideal soil would be 70% potting mix and 30% compost. This mixture provides drainage and nutrition. Kale does not like soggy roots. My plants also perform exceptionally well with this mix, and it effectively prevents root rot. Fertilize monthly with organic fish emulsion for optimal results.
Select dwarf varieties bred for containers. 'Dwarf Green Curled' keeps short and compact, while 'Redbor F1' provides colorful and ornamental leaves. Each of these bred types should produce plenty of harvest for limited space. Do not use standard varieties. They become root-bound quickly. Select varieties that have been specifically bred for container growing.
Containers provide microclimate control. Keep plants away from pests such as cabbage worms. Change locations during a heat wave. I like to rotate mine to get maximum sun exposure. This mobility protects against the elements. It can dramatically increase your growing season.
Watering System
- Daily monitoring: Check soil moisture depth daily during warm seasons by inserting finger 2 inches deep
- Deep watering technique: Saturate until water drains from bottom holes to ensure complete root hydration
- Morning schedule: Water before 10am to reduce evaporation losses during peak sunlight hours
- Drip irrigation option: Install micro-tubing for consistent moisture control in larger container setups
- Mulch application: Apply 1-inch straw layer to retain soil moisture and regulate temperature extremes
- Drainage check: Ensure containers never sit in water-filled saucers to prevent root rot issues
Nutrient Management
- Monthly feeding: Apply liquid seaweed fertilizer every 4 weeks during active growth periods
- Compost refresh: Top-dress with 1-inch compost every 60 days to replenish organic nutrients
- pH monitoring: Maintain 6.0-7.0 range with lime/sulfur adjustments using soil testing kits
- Deficiency signs: Yellow leaves indicate nitrogen needs requiring immediate fertilizer application
- Organic options: Fish emulsion as nitrogen-rich supplement mixed at 1 tablespoon per gallon ratio
- Winter pause: Suspend fertilizing during dormancy periods when plant growth naturally slows
Sunlight Optimization
- Daily requirements: Position containers to receive 4-6 hours sunlight minimum for proper growth
- Rotation practice: Turn containers 90 degrees daily to ensure even sun exposure on all sides
- Reflective surfaces: Use white walls or foil to bounce light onto plants in shaded locations
- Seasonal adjustment: Move containers to south-facing positions during winter for maximum light
- Shade solutions: Employ 30% shade cloth during summer heatwaves above 85°F (29°C)
- Artificial lighting: Supplement with LED grow lights during short winter daylight periods
Pest Prevention
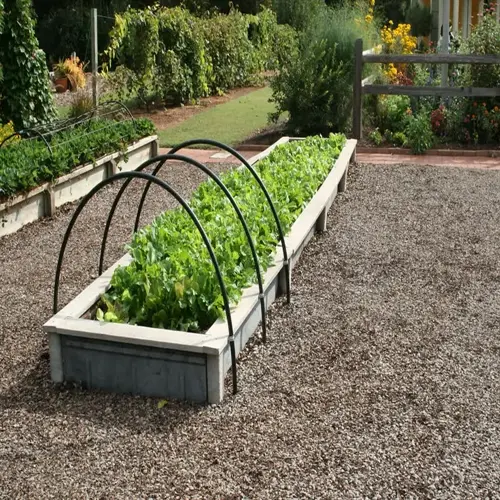
- Physical barriers: Install fine mesh netting secured with hoops to block flying insects
- Companion plants: Grow basil or mint in adjacent containers to deter common pests naturally
- Weekly inspection: Examine leaf undersides for eggs or larvae during early morning hours
- Organic sprays: Apply neem oil solution at first sign of infestation following label directions
- Beneficial insects: Introduce ladybugs or lacewings to control aphid populations organically
- Sanitation routine: Remove fallen leaves promptly to eliminate pest breeding grounds
Seasonal Transition
- Spring preparation: Gradually increase sun exposure over 7 days after winter protection
- Summer protection: Move containers to afternoon shade when temperatures exceed 80°F (27°C)
- Fall preparation: Begin reducing water frequency as temperatures cool below 60°F (15°C)
- Winter protection: Wrap containers with bubble wrap or burlap during freezing conditions
- Microclimate creation: Cluster containers together to create protective thermal mass effect
- Growth monitoring: Adjust care routines based on seasonal growth rate observations
Dwarf Green Curled
- Compact size: Matures at 12-14 inches (30-35 cm) height making it perfect for limited spaces
- Cold tolerance: Survives temperatures down to 20°F (-7°C) with proper winter protection measures
- Harvest period: 55 days to first harvest from planting with continuous production for months
- Leaf texture: Tightly curled leaves resist pest infestation better than flat-leaf varieties
- Yield potential: Produces 4-6 ounces (113-170g) weekly when maintained with proper nutrition
- Space efficiency: Thrives in 12-inch (30 cm) containers placed on balconies or patios
Redbor F1 Hybrid
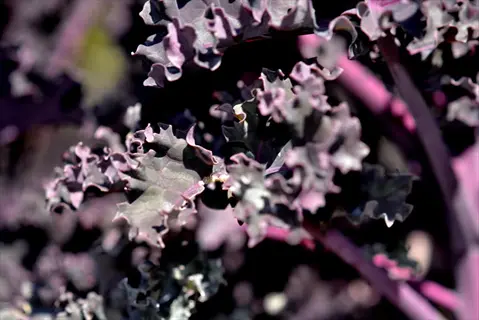
- Color display: Deep purple leaves intensify in cool weather creating ornamental garden value
- Container size: Requires 14-inch (35 cm) minimum diameter for proper root development space
- Growth habit: Semi-dwarf form reaches 18 inches (45 cm) with upright growth minimizing sprawl
- Temperature range: Optimal between 45-75°F (7-24°C) requiring shade above 80°F (27°C)
- Disease resistance: High tolerance to mildew and rot common in humid container environments
- Harvest method: Continuous outer leaf harvesting extends production season significantly

Lacinato Nano
- Compact dinosaur: Miniature version of Tuscan kale ideal for container cultivation systems
- Container fit: Grows well in 12-inch (30 cm) pots placed on decks or windowsills
- Leaf structure: Blue-green savoyed leaves with texture that withstands windy conditions
- Flavor profile: Sweeter than standard Lacinato variety especially after light frost exposure
- Pest resistance: Tight leaf formation deters insects from accessing inner plant parts
- Shade tolerance: Performs in 4-hour daily sunlight making it versatile for urban settings
Prizm Hybrid
- Space-saving design: Grows 12 inches (30 cm) tall with compact footprint for tight spaces
- Continuous production: Self-harvesting leaf structure allows for perpetual harvest method
- Heat tolerance: Performs well in warm conditions up to 85°F (29°C) with adequate watering
- Disease package: Resistant to downy mildew strain common in container gardening systems
- Nutritional value: Higher vitamin K concentration compared to other kale varieties available
- Container versatility: Suitable for hanging baskets due to its compact growth characteristics
Winterbor Hybrid
- Cold performance: Survives temperatures down to 10°F (-12°C) with minimal protection needed
- Container adaptation: Maintains productivity in pots as small as 10-inch (25 cm) diameter
- Leaf quality: Frilly blue-green leaves maintain texture and flavor through winter months
- Growth rate: Moderate growth habit prevents overcrowding in container garden arrangements
- Pest resilience: Natural resistance to cabbage worms reduces need for chemical treatments
- Harvest window: Provides fresh greens throughout winter when grown in protected locations
Essential Care for Healthy Kale
For optimal growth, water kale thoroughly with 1 - 2 inches every week. A soaker hose is recommended to water deeply to the root zone. Plants will become weak if watered shallowly. During summer heat above 85°F, water should be at least 3 inches deep. Check the moisture in your container each day by feeling the top two inches of soil.
Fertilize kale every 4-6 weeks with a nitrogen-rich organic fertilizer. Fish emulsion is extremely effective here. I mix 1 tbsp per gallon of water. Compost tea has also yielded great results. I use both once per month when I'm in the garden. This way, I'm ensuring my kale has the nitrogen it needs and minimizing "pale leaves" that indicate weaknesses in the plants.
Manage cabbage worms and aphids organically. Check the undersides of your leaves once a week. Handpick any green caterpillars in the morning. Use a neem oil solution for aphids. I personally use a mixture of 2 teaspoons per quart of water. Neem oil can be sprayed every 7 days on the affected area. Use floating row covers to stop moths from laying their eggs.
Seasonal adjustments to temperature extremes. Use 30% shade cloth during summer heat. Mulch heavily before winter frosts. Cover plants with burlap whenever the temperature is below 25°F. I protect my kale with cloches. It will extend my harvests through the winter months.
Watering System
- Frequency: Provide 1-2 inches (2.5-5 cm) of water weekly through deep soaking sessions
- Method: Use drip irrigation or soaker hoses to deliver water directly to root zones
- Timing: Water early morning to reduce evaporation losses during peak sunlight hours
- Drought response: Increase to 3 inches (7.5 cm) weekly during temperatures above 85°F (29°C)
- Container care: Check soil moisture daily in pots by inserting finger 2 inches deep
- Signs of stress: Wilting indicates under-watering; yellow leaves suggest over-watering issues
Nutrient Management
- Soil preparation: Amend planting area with 3 inches (7.5 cm) of compost before planting
- Fertilization schedule: Apply nitrogen-rich feed every 4-6 weeks during active growth periods
- Organic options: Use fish emulsion (1 tbsp per gallon) or compost tea as primary nutrients
- Deficiency signs: Pale leaves indicate nitrogen needs; purple tints suggest phosphorus lack
- Seasonal adjustment: Reduce feeding frequency during winter dormancy periods significantly
- Container feeding: Supplement monthly with liquid seaweed fertilizer for potted plants
Light Requirements
- Daily minimum: Ensure 4-6 hours of direct sunlight for proper photosynthesis and growth
- Partial shade: Tolerates 2-4 hours sun in hot climates but may reduce leaf production
- Leaf orientation: Rotate plants weekly for even light exposure on all foliage surfaces
- Artificial lighting: Supplement with LED grow lights providing 2000 lumens during short days
- Signs of deficiency: Leggy growth and small leaves indicate insufficient light conditions
- Seasonal adjustment: Move containers to maximize winter sun exposure angles
Soil Maintenance
- Aeration technique: Loosen top 2 inches of soil monthly to improve oxygen circulation
- Mulching benefits: Apply 2-inch straw layer to regulate temperature and moisture retention
- pH balancing: Test soil quarterly; add lime if below 6.0 or sulfur if above 7.5 pH
- Compost renewal: Top-dress with 1-inch compost every 8 weeks during growing season
- Container refresh: Replace top 3 inches of soil annually in permanent potted plants
- Drainage check: Ensure soil percolation rate of 1-2 inches per hour for root health
Growth Management
- Thinning practice: Space plants 12-18 inches apart for optimal air circulation
- Pruning method: Remove yellowing leaves weekly to redirect energy to new growth
- Bolting prevention: Harvest regularly and provide afternoon shade during heat waves
- Succession planting: Sow new seeds every 4 weeks for continuous harvest rotation
- Height control: Pinch growing tips when plants reach 18 inches to encourage bushiness
- Overwintering: Cut back to 6-inch height before first frost for spring regrowth
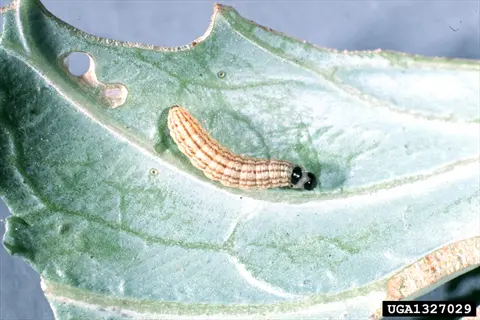
Cabbage Worms
- Identification: Green caterpillars that blend with leaves; leave irregular holes
- Prevention: Install floating row covers immediately after planting seedlings outdoors
- Organic control: Apply Bacillus thuringiensis (Bt) spray weekly during infestations
- Manual removal: Hand-pick worms during early morning hours daily
- Companion plants: Grow thyme or mint nearby to deter egg-laying moths
- Damage signs: Skeletonized leaves indicate severe infestation requiring intervention
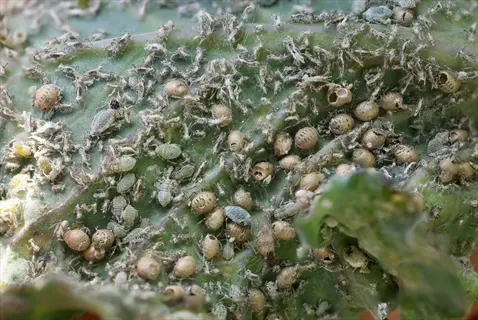
Aphids
- Identification: Small green/black insects clustered under leaves near stems
- Prevention: Encourage ladybugs and lacewings through companion planting systems
- Spray solution: Use water blast or insecticidal soap every 3 days
- Ant control: Apply sticky barriers around plant bases to block access
- Neem treatment: Apply neem oil mixture weekly during warm months
- Damage signs: Curled leaves with sticky honeydew residue on surfaces
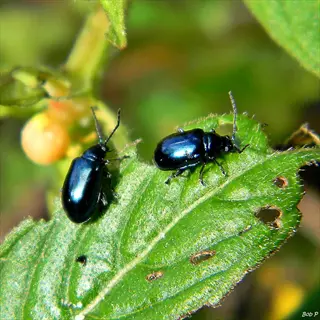
Flea Beetles
- Identification: Tiny jumping beetles creating shot-hole damage patterns
- Prevention: Use diatomaceous earth around plant bases as physical barrier
- Trap crops: Plant radishes nearby to lure beetles away from kale
- Spinosad spray: Apply organic insecticide during early infestation stages
- Row covers: Install immediately after transplanting seedlings outdoors
- Damage signs: Numerous small holes giving leaves sieved appearance
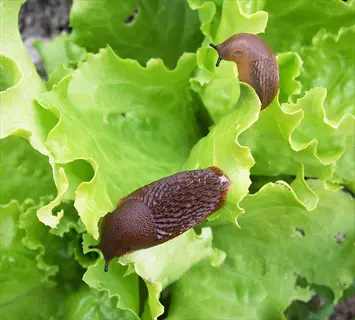
Slugs
- Identification: Slimy trails on leaves with irregular chewing damage
- Prevention: Apply copper tape around containers or raised bed edges
- Beer traps: Sink containers filled with beer to attract and drown
- Diatomaceous earth: Create perimeter barriers around planting areas
- Hand removal: Collect at night with flashlight using gloves
- Damage signs: Shredded young leaves with visible slime trails
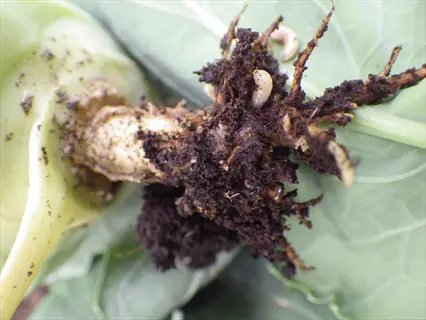
Cabbage Root Maggots
- Identification: White larvae feeding on roots; plants wilt suddenly
- Prevention: Use paper collar barriers around seedling stems at soil level
- Beneficial nematodes: Apply to soil to target larvae underground
- Crop rotation: Avoid planting brassicas in same location annually
- Floating covers: Install immediately after planting to block fly access
- Damage signs: Sudden wilting despite adequate watering conditions
Harvesting and Storing Kale
Kale is ready to be harvested 50-55 days after planting once the leaves are the size of your palm. The young leaves will be tender enough for salads, and leaving them to develop for longer allows the flavor to intensify more strongly. I check my plants during this stage, with timing being crucial to textural and taste quality.
To reap your rewards with regular harvesting, practice the cut-and-come-again technique. Start by harvesting the outer leaves first. Cut the plant 1 inch above the base while preserving the central bud. You should see new growth in only a few days. This method will enable you to harvest for months and significantly increase productivity. I usually harvest 2 times a week at the peak of production.
Follow these three fool-proof methods to store your kale. Refrigerate it in damp towels for 5-7 days. Freeze the leaves after blanching them for year-round use. Dehydrate it to enjoy kale chips or use it as a powder. Each method has different nutritional properties in mind. I freeze most of my harvest to use in soups in the winter.
Notice both stalks and leaves are sweeter after frost exposure. Chilling temperatures result in the conversion of starch into sugars. For improved flavor, elements should be harvested shortly after a light frost has occurred. My kale definitely tastes better in late fall. Upon delaying the harvest, the vegetables naturally become sweeter without any additional effort.
Timing and Frequency
- Initial harvest: Begin 50-55 days after transplanting seedlings to garden
- Leaf size: Harvest when leaves reach 6-8 inches (15-20 cm) length
- Frequency: Collect leaves 1-2 times weekly for continuous production
- Frost benefit: Flavor improves after light frosts; delay harvest for sweeter leaves
- Morning harvest: Pick leaves before 10am for maximum crispness and hydration
- Seasonal variation: Spring/fall leaves are tender; winter leaves are more robust
Proper Cutting Method
- Tool selection: Use sterilized scissors or garden shears for clean cuts
- Cut position: Snip leaves 1 inch (2.5 cm) above base near main stem
- Growth preservation: Always leave central bud intact for regrowth
- Quantity limit: Never remove more than ⅓ of plant foliage at once
- Baby leaves: Harvest at 3-4 inches (7-10 cm) for salad mixes
- Winter harvesting: Collect only outer leaves; protect central growth point
Plant Selection
- Healthy plants: Choose vibrant green plants without pest damage signs
- Maturity indicators: Plants should be 8-12 inches (20-30 cm) tall before harvesting
- Variety differences: Curly kale harvests leaf-by-leaf; Lacinato harvests whole stems
- Continuous producers: Identify plants with active new growth centers
- Disease avoidance: Skip plants with mildew spots or yellowed foliage
- Yield estimation: Expect 10-15 leaves per plant weekly during peak season
Post-Harvest Handling
- Immediate cooling: Place harvested leaves in shade immediately after cutting
- Cleaning process: Rinse under cool water within 30 minutes of harvest
- Drying technique: Use salad spinner then pat dry with clean towels
- Bruise prevention: Avoid stacking heavy weights on delicate leaves
- Temperature control: Keep at 32-36°F (0-2°C) until processing
- Quality check: Discard damaged or discolored leaves before storage
Seasonal Adjustments
- Spring harvest: Focus on tender baby leaves for salads and raw dishes
- Summer strategy: Harvest early morning to avoid heat stress on plants
- Fall abundance: Collect larger quantities for preservation methods
- Winter technique: Harvest during midday thaw periods in cold climates
- Rainy weather: Wait until foliage dries completely before harvesting
- Drought conditions: Reduce harvest frequency to maintain plant health
Freezing Process
- Blanching necessity: Preserves color and nutrients before freezing
- Ice bath: Immediately cool blanched leaves to stop cooking process
- Drying step: Use salad spinner then pat dry with towels thoroughly
- Portion packing: Freeze flat on trays before bagging to prevent clumping
- Vacuum sealing: Remove air completely to prevent freezer burn damage
- Labeling: Mark bags with harvest date for rotation management
Dehydration Techniques
- Preparation: Remove stems and ribs; tear leaves into chip-sized pieces
- Seasoning option: Lightly mist with olive oil and salt before drying
- Dehydrator setup: Arrange leaves in single layer with space between pieces
- Testing dryness: Leaves should crumble easily when fully dehydrated
- Powder making: Grind dried leaves in blender to fine green powder
- Storage containers: Use airtight jars with oxygen absorbers for longevity
Flavor Enhancement
- Post-frost harvest: Sugar content increases after light freezing temperatures
- Morning harvest: Higher water content before daytime evaporation occurs
- Mature leaves: Develop complex flavors compared to baby leaf varieties
- Red types: 'Redbor' develops richer taste in cool conditions specifically
- Storage maturation: Refrigerated leaves develop milder flavor over 2 days
- Cooking method: Sautéing frozen kale enhances natural sweetness remarkably
Refrigeration Systems
- Crisper drawer: Store in high-humidity compartment with ventilation
- Towel method: Wrap bunches in slightly damp paper towels for moisture control
- Bag selection: Use perforated plastic bags for optimal air circulation
- Temperature zone: Maintain 32-36°F (0-2°C) for maximum freshness
- Ethylene avoidance: Keep away from apples and bananas that accelerate spoilage
- Revival technique: Soak wilted leaves in ice water for 15 minutes to crisp
Long-Term Preservation
- Blanching variations: Steam blanching preserves more nutrients than boiling
- Freezing alternatives: Flash-freeze individual leaves before bagging
- Powder uses: Add to soups, smoothies, or baked goods for nutrition boost
- Oil preservation: Infuse olive oil with dehydrated kale for cooking uses
- Fermentation option: Make kale kimchi for probiotic-rich preservation
- Canning consideration: Pressure can kale for shelf-stable storage
How to Plant Kale: Seeds vs Seedlings
Starting kale from seeds takes 6-8 weeks indoors before transplanting the plants. If you want to start spring planting, begin in late winter. You can start from seedlings if you want more immediate results. You can plant seedlings directly after the danger of frost has passed. The difference in timeline is significant for the timing of your harvest. Be sure to plan so that you can maintain continuous harvests.
Each method requires a different soil preparation method. The seeds need a special seed-starting mix in trays. Use a 70% potting soil and 30% perlite mixture. For seedlings, amend the garden beds with compost. Mix compost into the soil to a depth of 3 inches before direct seeding or transplanting. You need good soil to avoid transplant shock.
Place seeds an inch apart in rows. Later thin them to 12-18 inches. Transplanted kale requires this spacing right away. I take the time to measure and space properly to prevent overcrowding. Air flow will minimize disease. Adequate spacing will allow the leaves to thrive.
Consider the cost versus time investment. Seeds are inexpensive (only a few pennies per plant) but require immediate indoor setup. Seedlings need a higher upfront investment but save weeks of growth. I do a yearly evaluation for both options. If I have huge plants, seeds tend to be more affordable. If I want a speedy start, seedlings are the easy winners.
Indoor Preparation
- Timing: Start 6-8 weeks before last frost date for spring planting
- Containers: Use seed trays with drainage holes and clear humidity dome
- Soil mix: Combine 70% seed starter mix with 30% perlite for drainage
- Planting depth: Sow seeds ¼ inch (0.6 cm) deep in moistened soil
- Spacing: Place seeds 1 inch (2.5 cm) apart to allow thinning later
- Germination care: Maintain 65-75°F (18-24°C) with grow lights 2 inches above
Germination to Transplant
- Watering: Mist soil surface daily to maintain consistent moisture
- Light duration: Provide 14-16 hours daily under LED grow lights
- Thinning: Remove weaker seedlings when first true leaves appear
- Fertilizing: Begin half-strength fish emulsion after second true leaves
- Hardening off: Gradually expose to outdoors over 7-10 days
- Transplant ready: When seedlings have 4-6 leaves and 3-4 inch height
Problem Solving
- Damping off: Prevent with air circulation and sterile soil mix
- Leggy seedlings: Lower lights to 1-2 inches above plant tops
- Slow growth: Increase temperature to 75°F (24°C) and check nutrients
- Pests indoors: Use yellow sticky traps for fungus gnats control
- Mold issues: Reduce humidity and improve ventilation immediately
- Nutrient deficiency: Apply kelp solution for micronutrient boost
Variety Selection
- Fast growers: 'Dwarf Blue Curled' ready in 55 days from seed
- Cold tolerant: 'Winterbor' survives frosts down to 10°F (-12°C)
- Container types: 'Prizm' hybrid bred specifically for small spaces
- Heat resistant: 'Lacinato' performs well in warmer conditions
- Color varieties: 'Redbor' provides ornamental purple foliage
- Baby leaf options: 'Dwarf Green Curled' for quick harvests
Advanced Techniques
- Soil blocking: Create seed starters without plastic containers
- Bottom heat: Use seedling heat mats for faster germination rates
- Light spectrum: Employ full-spectrum LEDs for optimal growth
- Water wicking: Set up self-watering system for consistent moisture
- Succession sowing: Start new batches every 2 weeks for continuity
- Record keeping: Track germination rates and growth milestones
Outdoor Preparation
- Soil timing: Wait until soil reaches 40°F (4°C) and is workable
- Bed preparation: Loosen top 6 inches (15 cm); mix in 2 inches (5 cm) compost
- Planting depth: Sow seeds ½ inch (1.25 cm) deep in moist soil
- Row spacing: Create rows 18-24 inches (45-60 cm) apart
- Initial spacing: Place seeds 1 inch (2.5 cm) apart in rows
- Covering: Use floating row covers for pest and frost protection
Seedling Care
- Thinning schedule: First thin to 4 inches (10 cm) at 2-inch height
- Final spacing: Thin to 12-18 inches (30-45 cm) when 4-6 leaves appear
- Watering: Keep soil consistently moist but not waterlogged
- Mulching: Apply straw mulch after second thinning to retain moisture
- Fertilizing: Side-dress with compost tea every 3 weeks
- Pest watch: Check daily for flea beetles and cabbage worms
Weather Protection
- Frost covers: Use cloches or fabric when temperatures drop below 32°F (0°C)
- Heat mitigation: Install 30% shade cloth during summer heat waves
- Wind barriers: Erect temporary fencing for exposed garden locations
- Rain shields: Use plastic sheeting during heavy downpours
- Drought response: Water deeply before expected dry spells
- Microclimates: Utilize walls and structures for temperature moderation
Succession Planting
- Timing intervals: Sow new rows every 2-3 weeks for continuous harvest
- Variety rotation: Alternate between quick-maturing and winter-hardy types
- Space utilization: Plant between established crops for efficient use
- Season extension: Use cold frames for late fall plantings
- Germination aids: Employ soil-warming cables for early spring starts
- Record tracking: Note planting dates and harvest windows
Troubleshooting
- Poor germination: Re-sow if no sprouts after 10 days; check soil temp
- Soil crusting: Gently break surface crust to help seedlings emerge
- Insect damage: Apply diatomaceous earth for flea beetle control
- Bird protection: Use netting or reflective tape to deter birds
- Overcrowding: Thin promptly to prevent competition for resources
- Disease prevention: Rotate crops annually to avoid soil-borne pathogens
Garden Preparation
- Timing: Plant after last frost when soil reaches 50°F (10°C)
- Spacing: Dig holes 12-18 inches (30-45 cm) apart depending on variety
- Hole depth: Match container depth; width twice as wide
- Soil amendment: Mix handful of compost into each planting hole
- Watering: Fill hole with water before planting; let absorb
- Timing: Transplant on cloudy days or late afternoon to reduce shock
Planting Technique
- Removal: Gently squeeze container sides; tap to release root ball
- Root handling: Tease outer roots if root-bound; avoid breaking stems
- Planting depth: Set so soil line matches nursery container level
- Backfilling: Firm soil gently around stem; create shallow watering basin
- Watering: Soak thoroughly after planting; add liquid seaweed solution
- Protection: Install cutworm collars; cover with row fabric for 1 week
Post-Planting Care
- Water schedule: Daily watering for first week; then taper off
- Fertilizing: Apply diluted fish emulsion after 7 days
- Mulching: Add 2-inch straw layer after soil settles
- Pest monitoring: Check daily for signs of insect damage
- Weather protection: Be ready to cover if unexpected frost occurs
- Growth check: New leaf growth indicates successful establishment
Acclimatization
- Wind exposure: Start with sheltered location before full exposure
- Sun hardening: Increase sun exposure gradually over 5-7 days
- Temperature adjustment: Avoid transplanting during heat advisories
- Night protection: Cover if temperatures drop below 40°F (4°C)
- Water management: Reduce frequency as roots establish in ground
- Stress signs: Wilting indicates need for temporary shade
Common Mistakes
- Root disturbance: Avoid breaking root balls during handling
- Planting depth: Never bury stem deeper than original level
- Water extremes: Prevent both drought stress and waterlogging
- Fertilizer burn: Wait 7 days before applying strong fertilizers
- Spacing error: Allow room for mature plant size development
- Timing issues: Avoid transplanting during midday heat
Best Times to Plant Kale by Region
Northern regions 3-5 necessitate spring planting 4-6 weeks before the final frost. Focus on soil work for 4-6 weeks in March and April, after the temperature reaches 40°F. Fall crops were started indoors during the heat of July and transplanted in August to create sweet, frost-kissed leaves. Choose 'Winterbor' for its extreme cold tolerance, which is rated at -7 °C or below.
Midwest Zones 6-7 also lend themselves to direct sowing in March-April once soil temperatures have reached 50°F. Avoid transplanting or seeding in May and July due to humidity stress. Alternatively, August seeding results in harvests from September to December, distance 'Lacinato' varieties 18 inches apart for airflow. Soil thermometers prevent you from wasting seed.
9-10 Southern zones benefit from fall planting from September to November before the return of heat. Soil temperatures should not exceed 75°F during germination. January plantings can give you spring harvests early. Place a shade cloth on 'Georgia Southern' varieties. May to August planting yields bolting.
Coastal zones 9-10 offer year-round planting, frost protection below 30°F. Focus on February-March and September-October windows. 'Dwarf Blue Curled' is suitable for soil temperatures ranging from 55°F to 70°F. Protect containers during summer heat waves. Cloches protect from rare chills.
Northern Zones (3-5)
- Spring planting: Direct sow 4-6 weeks before last frost (March-April)
- Fall planting: Start seeds indoors July; transplant August for fall harvest
- Soil temp: Minimum 40°F (4°C) for germination
- Frost tolerance: Established plants withstand 20°F (-7°C)
- Variety recommendation: 'Winterbor' and 'Siberian' for cold resistance
- Season extension: Use cold frames for November harvests
Midwest Zones (6-7)
- Spring planting: Direct sow 2-4 weeks before last frost (March-April)
- Fall planting: Direct sow August for September-December harvest
- Summer gap: Avoid planting May-July due to heat stress
- Soil temp: Ideal 50-65°F (10-18°C)
- Variety recommendation: 'Lacinato' and 'Red Russian' for humidity tolerance
- Succession planting: Sow every 3 weeks March-April
Southern Zones (8-9)
- Fall planting: Direct sow September-November for winter harvest
- Winter planting: Sow January for early spring harvest
- Heat avoidance: No planting May-August due to bolting risk
- Soil temp: Maximum 75°F (24°C) for germination
- Variety recommendation: 'Georgia Southern' and 'Vates' for heat tolerance
- Shade strategy: Use 40% shade cloth for late fall plantings
Coastal Zones (9-10)
- Year-round planting: Possible with frost protection in winter
- Optimal windows: September-October and February-March
- Summer caution: Plant in partial shade June-July
- Soil temp: Consistent 55-70°F (13-21°C) ideal
- Variety recommendation: 'Dwarf Blue Curled' for container flexibility
- Frost protection: Use cloches when temps drop below 30°F (-1°C)
Mountain Zones (4-6)
- Spring planting: Start indoors March; transplant after last frost
- Fall planting: Direct sow mid-July for September harvest
- Short season: Utilize quick-maturing varieties (<60 days)
- Soil temp: Requires 45°F (7°C) minimum for direct sow
- Variety recommendation: 'Red Russian' for quick maturity
- Wind protection: Use row covers as windbreaks
Frost Management
- Protection methods: Row covers, cloches, and cold frames
- Temperature threshold: Cover plants when below 25°F (-4°C)
- Hardening off: 7-day gradual exposure for seedlings
- Variety selection: Choose cold-tolerant types for early planting
- Soil warming: Use black plastic mulch in early spring
- Microclimates: Plant near south-facing walls for warmth
Heat Mitigation
- Shading techniques: 30-40% shade cloth installation
- Water management: Deep watering at dawn during heat waves
- Mulching: 3-inch straw layer to cool roots
- Bolting prevention: Harvest before temperatures exceed 80°F (27°C)
- Variety choice: Heat-resistant 'Georgia Southern' and 'Spartan'
- Planting timing: Schedule growth cycles before peak summer
Humidity Control
- Spacing: 18-24 inch spacing for air circulation
- Disease prevention: Morning watering to allow leaf drying
- Fungicide options: Organic copper sprays for mildew
- Pruning: Remove lower leaves touching soil
- Resistant varieties: 'Red Russian' and 'Lacinato'
- Soil drainage: Raised beds with compost amendment
Short Season Adaptation
- Transplant advantage: Start indoors 6 weeks early
- Quick varieties: 'Red Russian' (50 days) and 'Dwarf Blue' (55 days)
- Season extension: Low tunnels for 4-week longer season
- Succession planting: 2-week intervals during optimal window
- Soil warming: Use clear plastic mulch pre-planting
- Microclimate creation: Stone walls for thermal mass
Coastal Adjustments
- Salt tolerance: 'Sea Kale' varieties for shoreline gardens
- Wind protection: Burlap windbreaks and sturdy stakes
- Fog management: Morning sun exposure locations
- Soil salinity: Leach with fresh water monthly
- Container solution: Mobile pots for microclimate optimization
- Year-round care: Consistent moisture without waterlogging
5 Common Myths
Kale needs all day sunshine to develop and produce edible leaves.
Kale flourishes with only four to six hours of sunlight, all the while, you might even want to keep them mildly shaded in higher temperatures. For instance, the varieties 'Lacinato' and 'Red Russian' yield heavy harvests without full sun, and many gardeners report that sun exposure above 85⁰F (29C) makes kale bitter and bolting begins sooner. In home gardens, the most tender leaves come from morning sun and afternoon shade.
Kale can only be grown successfully in traditional garden beds with perfect soil conditions.
Kale performs exceptionally well in containers, raised beds, and imperfect soils when properly amended. Dwarf varieties like 'Dwarf Blue Curled' thrive in 12-inch (30 cm) pots, while heavy clay soils become productive with compost additions. Urban gardeners successfully grow kale on balconies using simple 70% potting mix and 30% compost blends without special soil requirements.
In all varieties, young kale leaves are consistently considered more bitter and generally undesirable than the mature leaves.
Baby kale leaves harvested at 3-4 inches (7-10 cm) are especially sweet and tender compared to the mature leaf stage, and baby leaves are perfect for salads. Varieties such as 'Prizm Hybrid' are developed specifically for their mild baby kale leaves, and experienced gardeners repeatedly noted that there were higher sugar levels in young growth versus older leaves in each growing season.
Kale will not survive summer heat and temps will cause it to bolt immediately.
There are some heat tolerant varieties of kale to reliably harvest through the summer - such as 'Georgia Southern' and 'Spartan' - while providing the plants afternoon shade and keeping an average moisture level. If you plant in dappled sunlight and maintain a watering schedule of 2- 3 inches of water (5- 7.5 cm) weekly, it can grow and produce until a temperature of 85°F (29C). This can delay bolting by a few weeks in most garden conditions.
Cooking kale reduces nutritional value, meaning it should be consumed raw.
Lightly steamed kale increases some nutrient bioavailability, like carotenoids, due to cell wall breakdown, according to reputable nutrition sources. Steamed kale is a better source of calcium and antioxidants than raw kale. Slightly sautéed kale maintains vitamin K better than raw, but cooking has a much smaller impact than boiling cooking styles.
Conclusion
Kale has the potential to be grown year-round in different climates, given some easy adjustments. Northern gardeners master the art of harvesting through snow using cold frames. Southern gardeners douse their plants with shade cloth during their sizzling heat waves. Coastal gardeners sustain harvests with minimal frost protection. Its flexibility provides a universal benefit to growing kale.
I want to highlight three key success factors from our journey together. Having the right timing avoids weather catastrophes. Containers' adaptability allows for out-of-the-box solutions. Frequent pest assessments eradicate infestations early. Repeat these three ideas with discipline. They have turned my harvests from a failure to an abundance over the years!
Play around with varieties and methods. Use 'Red Russian' for faster salad production. Consider 'Winterbor' for overwintered crops. Learn to use cut-and-come-again harvesting. Keep track in a garden journal. My trials revealed even surprising taste differences among varieties grown in the same way.
Kale's low resource requirements encourage sustainable gardening. It requires less water than lettuce. Requires fewer pesticides than most crops. It can be harvested throughout the seasons from the same plant. All of this means a more sustainable garden, and premium nutrition delivered straight to your table.
External Sources
Frequently Asked Questions
When is the optimal time to plant kale?
Plant kale when soil temperatures reach 40-75°F (4-24°C). For spring planting, sow 4-6 weeks before the last frost. Fall planting should occur in late summer for harvests after light frosts enhance sweetness. Regional variations apply based on USDA zones.
What are bad companion plants for kale?
Avoid planting kale near these vegetables:
- Tomatoes: Compete for nutrients and attract similar pests
- Strawberries: Increase vulnerability to fungal diseases
- Beans: Inhibit kale's growth through root interactions
- Other brassicas: Concentrate pest habitats when planted together
Does kale regrow after harvesting leaves?
Kale reliably regrows using the cut-and-come-again method. Harvest outer leaves 1-2 inches above the base while preserving the central bud. Plants produce new growth within days when properly watered and fertilized, yielding continuous harvests for months.
Can kale survive freezing winter temperatures?
Mature kale survives winters down to 20°F (-7°C) with proper protection. Cold-tolerant varieties like 'Winterbor' withstand colder conditions when mulched heavily. In zones 7+, kale often harvests fresh through winter with simple frost covers.
How much sunlight does kale require daily?
Kale thrives with 4-6 hours of sunlight but benefits from afternoon shade in hot climates. Morning sun prevents bolting while partial shade maintains leaf tenderness. In summer, use 30% shade cloth above 85°F (29°C) to protect plants.
What are the best companion plants for kale?
Ideal kale companions include:
- Aromatic herbs: Deters pests with strong scents
- Onions and garlic: Repel common insects naturally
- Nasturtiums: Trap aphids away from kale
- Beets: Complementary root depth avoids competition
What pests commonly attack kale plants?
Kale attracts several destructive pests:
- Cabbage worms: Green caterpillars skeletonize leaves
- Aphids: Cluster under leaves causing curling
- Flea beetles: Create shot-hole damage patterns
- Slugs: Chew irregular holes overnight
How often should kale be watered?
Water kale with 1-2 inches weekly through deep soaking. Increase to 3 inches during heat waves above 85°F (29°C). Check soil moisture daily in containers by inserting fingers 2 inches deep. Morning watering reduces evaporation losses significantly.
What fertilizer works best for kale?
Optimal kale fertilizers include:
- Nitrogen-rich options: Fish emulsion or compost tea
- Organic blends: Balanced 5-5-5 formulas monthly
- Compost: 2-inch top-dressing every 8 weeks
- Liquid seaweed: Provides micronutrients every 4 weeks
Can kale be grown in containers?
Kale excels in containers with dwarf varieties thriving in 12-inch pots. Use well-draining soil (70% potting mix + 30% compost). Container kale requires daily moisture checks and benefits from mobility during temperature extremes for optimal growth.