
Tomato plant diseases can wipe out your entire harvest overnight, ruining months of effort. I've seen healthy rows of plants, from blight, crash and burn in just a few days. Early detection of symptoms is the difference between salvaging your crop and losing it.
Being able to identify problems quickly is essential. Watch for specific symptoms such as yellowing leaves, dark spots, or wilting stems. The worst season I experienced was early blight, which began as small, brown circles and rapidly spread like wildfire after a heavy rain. Don't forget these warnings.
Good management involves a combination of both prevention and treatment. Disease-resistant varieties and proper spacing are always good starting points. When my own plants developed Septoria leaf spot, careful removal of infected leaves and the application of copper spray allowed the rest to survive. Regular scouting enables you to prevent small problems from escalating into larger ones.
This guide provides you with everything you need to protect your tomatoes. You'll learn to accurately diagnose common diseases and apply proven solutions. Follow these techniques to have healthy plants and a plentiful harvest, despite diseases.
Environmental Factors
Tomatoes don't do well when temperatures get over 90°F (32°C). Heat stress results in dead pollen and blossom drop. The opposite also happens when the temperature goes below 55°F (13°C): growth slows. I cover my plants with shade cloth for heat and row covers for cold.
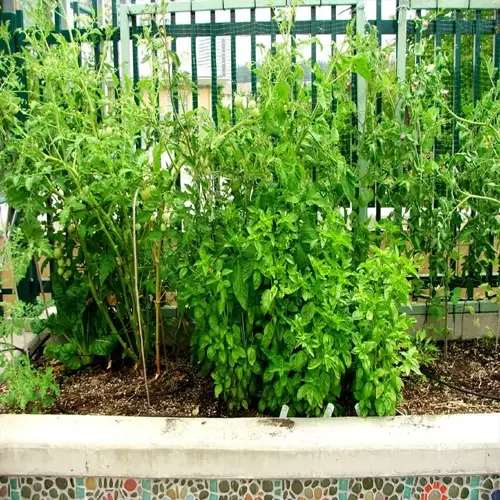
Managing humidity is a key to disease prevention. Fungal diseases like early blight thrive in moisture above 85%. During humid summers, I space plants at least 3 feet apart to facilitate airflow around the plants. I also try to water before 10 AM so that the leaves dry completely.
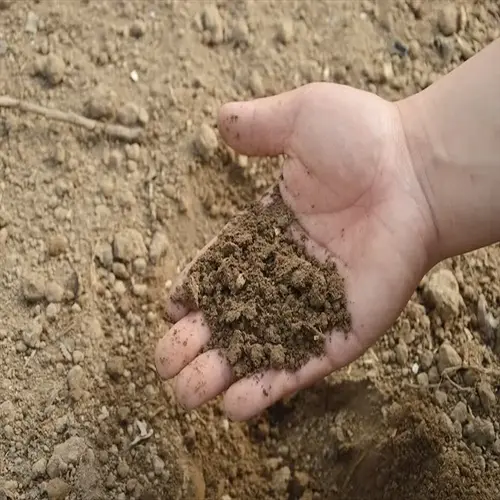
Soil amendments are crucial. You can increase calcium availability by adding 1 pound of gypsum per 100 square feet (0.45 kg per 9.3 square meters). Regarding clay soil, it is important to mix in 3 inches of coarse sand. That will help prevent blossom-end rot and root rot diseases.
Observe or monitor conditions every day. Use a simple moisture probe to check the soil at a depth of about 2 to 4 inches. Ensure the soil remains consistently moist, but not dripping wet or soggy. Consistent care prevents stress that invites diseases into your garden.
Temperature Management
- Tomatoes require consistent temperatures between 65°F (18°C) and 85°F (29°C) for optimal growth and fruit production
- When temperatures exceed 90°F (32°C), install 30%-40% shade cloth to prevent pollen sterility and sunscald damage
- Below 55°F (13°C), use floating row covers overnight to maintain warmth and prevent chilling injury to roots
- Monitor soil temperature with a probe thermometer; ideal root zone is 70°F-80°F (21°C-27°C)
Humidity Regulation
- Maintain relative humidity below 85% to inhibit fungal spore germination for diseases like early blight
- Prune lower leaves up to 12 inches from soil to improve airflow and reduce humidity around plants
- Water before 10 AM using drip irrigation to allow foliage to dry completely before evening humidity rises
- Space plants 3 feet apart in rows oriented north-south for maximum air circulation between tomatoes
Soil Optimization
- Test soil pH annually; tomatoes require 6.5-7.0 for proper calcium uptake to prevent blossom end rot
- Apply 3 inches of organic mulch (straw or grass clippings) to regulate moisture and suppress soil-borne pathogens
- Amend heavy clay soils with 2-3 inches of compost to improve drainage and reduce root rot risk
- Avoid compaction by using raised beds or designated pathways to protect root zones from foot traffic
Rain Protection
- Install plastic rain shelters during heavy storms to prevent waterlogged soil and splash-dispersed pathogens
- Position shelters 4 feet above plants to allow air movement while blocking 90% of rainfall
- Combine shelters with drip irrigation to maintain optimal moisture levels without wetting foliage
- Remove shelters after rainfall to prevent humidity buildup exceeding 85% RH
Wind Barriers
- Erect burlap screens on windward sides to reduce evaporation and physical plant damage
- Place barriers 2-3 feet from plants to deflect wind without creating turbulent microclimates
- Use permeable materials allowing 30-40% wind passage to prevent excessive humidity buildup
- Anchor barriers securely to withstand gusts exceeding 20 mph (32 km/h)
Disease Identification Guide
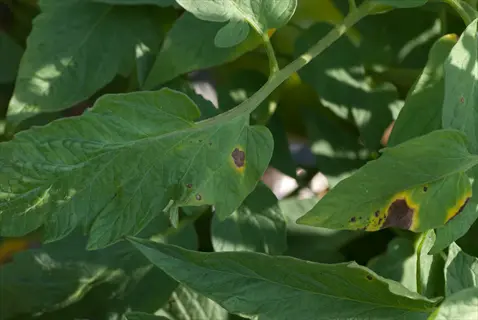
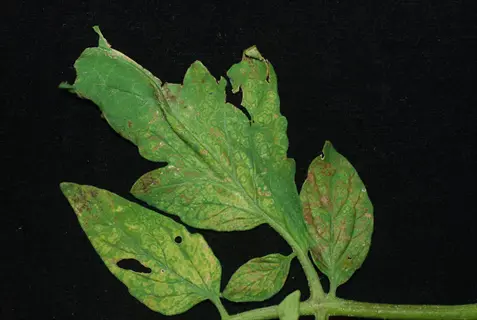
Fungal diseases such as early blight produce obvious early warning signs. Check for brown lesions with bullseye patterns on the lower leaves. These fungi flourish in warm, humid conditions above 75°F/24°C. In warm, wet summers, I have watched entire rows develop white mold in just a matter of days.
Small water-soaked spots show bacterial infections. The spots appear black with yellow edges after rain events at temperatures of 70-80°F/21-27°C. Unlike fungal problems, spots caused by bacteria do NOT exhibit any concentric rings. My plants became infected when soil splashed onto leaves after a thunderstorm.
Viral illness causes obvious bronze mottling of leaves, accompanied by curling edges. We notice tomato spotted wilt virus after thrips feed in 68-86°F/20-30°C conditions. Irregularity in fruit ripening is observed, indicating a potential viral problem. Blossom end rot is another physiological problem that causes leathery black areas at the base of affected fruit during drought situations.
Relate symptoms to weather triggers. A humidity greater than 85% means fungal spores are present. Drought conditions followed by excessive irrigation cause calcium transport failures. I keep track of all of these patterns daily. This information enables you to take action to alleviate the symptoms before the infection takes hold.
Early Blight (Fungal)
- Key sign: Brown lesions with concentric bullseye patterns on lower leaves
- Progression: Yellow halos around spots expand rapidly during warm humid weather above 75°F (24°C)
- Fruit impact: Leathery dark spots at stem end causing premature fruit drop
- Misidentification clue: Differs from Septoria by larger lesions with distinct rings
- Environmental trigger: Thrives when nighttime humidity exceeds 85% for 48+ hours
- Confirmation test: Lesions develop white mold in humidity chambers
Bacterial Spot
- Key sign: Tiny water-soaked spots turning black with yellow halos on leaves
- Progression: Spots coalesce into irregular dead patches during rainy periods at 70-80°F (21-27°C)
- Fruit impact: Scabby raised lesions making tomatoes unmarketable
- Misidentification clue: Lacks concentric rings seen in fungal diseases
- Environmental trigger: Spreads through splashing water during storms
- Confirmation test: Bacterial ooze visible under microscope
Tomato Spotted Wilt Virus
- Key sign: Bronze-purple leaf mottling with curled leaf edges
- Progression: Stunted growth with brown stem streaks developing after thrips feeding
- Fruit impact: Yellow rings or blotchy ripening patterns
- Misidentification clue: Distinct from nutrient issues by uneven distribution
- Environmental trigger: Thrips activity peaks at 68-86°F (20-30°C)
- Confirmation test: ELISA serological testing required

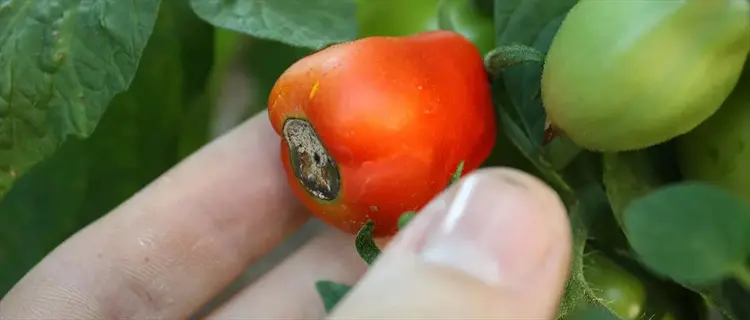
Blossom End Rot
- Key sign: Leathery sunken black patches at fruit blossom end
- Progression: Starts as water-soaked spot enlarging during fruit expansion phase
- Fruit impact: Affects developing fruit during rapid growth periods
- Misidentification clue: No pathogen present - strictly physiological disorder
- Environmental trigger: Drought stress followed by heavy watering
- Confirmation test: Calcium deficiency confirmed via leaf tissue analysis
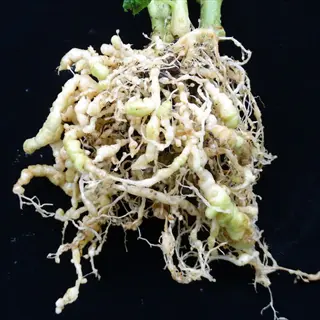
Root-Knot Nematodes
- Key sign: Swollen root galls resembling beads on string
- Progression: Gradual plant decline despite adequate watering and nutrition
- Fruit impact: Reduced size and yield due to impaired nutrient uptake
- Misidentification clue: Galls distinguish from fungal root rots
- Environmental trigger: Proliferates in sandy soils above 75°F (24°C)
- Confirmation test: Root examination reveals pearly white egg masses

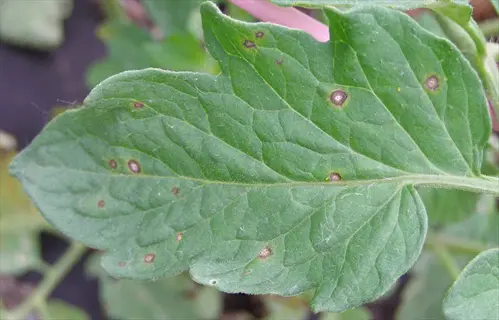
Septoria Leaf Spot
- Key sign: Numerous small gray spots with dark margins on lower foliage
- Progression: Centers develop black fungal fruiting bodies visible with hand lens
- Fruit impact: Indirect damage through severe defoliation exposing fruit
- Misidentification clue: Smaller spots than early blight without concentric rings
- Environmental trigger: Spreads during extended leaf wetness periods
- Confirmation test: Pycnidia visible under 10x magnification
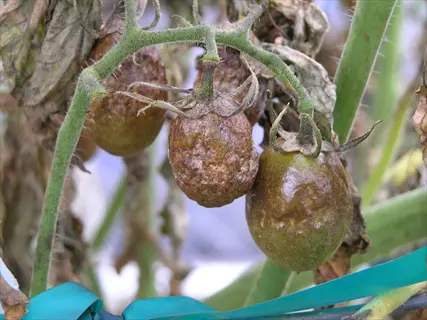
Late Blight
- Key sign: Olive-green water-soaked lesions with white fuzzy margins
- Progression: Rapid necrosis during cool rainy weather at 60-75°F (16-24°C)
- Fruit impact: Firm brown rot making tomatoes inedible
- Misidentification clue: Greasy appearance distinguishes from other blights
- Environmental trigger: Requires 90-100% relative humidity for sporulation
- Confirmation test: Sporangia production under high humidity
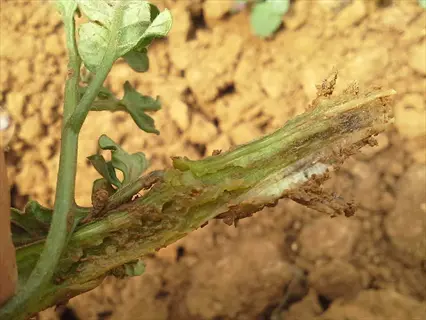
Fusarium Wilt
- Key sign: Yellowing lower leaves on one side of plant
- Progression: Vascular browning visible when stems are cut lengthwise
- Fruit impact: Reduced yield as plants collapse during fruiting
- Misidentification clue: Wilting during daytime heat distinguishes from drought
- Environmental trigger: Soil temperatures above 80°F (27°C) accelerate spread
- Confirmation test: Reddish vascular discoloration in cross-sections
Anthracnose
- Key sign: Sunken circular lesions with dark centers on ripe fruit
- Progression: Salmon-colored spore masses develop in humid conditions
- Fruit impact: Post-harvest fruit rot during storage at room temperature
- Misidentification clue: Concentric rings similar to blight but only on fruit
- Environmental trigger: Heavy rainfall during ripening phase
- Confirmation test: Acervuli with setae visible under microscope
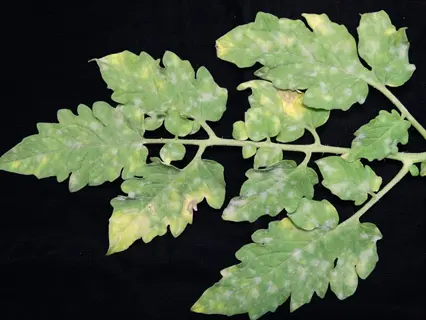
Powdery Mildew
- Key sign: White talcum-like powder on upper leaf surfaces
- Progression: Leaves yellow and crinkle under dense fungal growth
- Fruit impact: Rare direct infection but sunscald from defoliation
- Misidentification clue: Superficial growth distinguishes from downy mildew
- Environmental trigger: Develops in moderate temperatures 60-80°F (16-27°C)
- Confirmation test: Microscopic chains of conidia confirm diagnosis
Leaf Symptom Patterns
- Concentric rings: Bullseye patterns indicate fungal pathogens like early blight
- Water-soaked margins: Translucent edges suggest bacterial infections spreading through veins
- Uniform yellowing: Systemic issues like nitrogen deficiency or Fusarium wilt
- Mosaic patterns: Irregular light/dark areas signal viral infections like TSWV
- White powder: Surface growth confirms powdery mildew infection
Fruit Symptom Patterns
- Blossom-end collapse: Dark leathery patches show calcium-related blossom end rot
- Circular sunken spots: Anthracnose lesions with salmon-colored spores in humidity
- Green shoulders: Failure to ripen uniformly indicates physiological disorders
- Radial cracking: Rapid growth after drought causes fruit splitting
- Oily lesions: Greasy appearance distinguishes late blight from other rots
Stem & Root Indicators
- Vascular browning: Streaks in cut stems confirm Fusarium or Verticillium wilts
- Aerial roots: Excessive adventitious roots signal environmental stress factors
- Root galls: Beaded swellings indicate root-knot nematode infestation
- Cankers: Sunken lesions at soil line suggest Southern blight infection
- Hollow stems: Pith disintegration characterizes bacterial pith necrosis
Environmental Triggers
- High humidity (>85%): Favors fungal spore germination and bacterial ooze
- Temperature extremes: Below 55°F (13°C) slows growth; above 90°F (32°C) causes pollen death
- Water stress: Drought followed by heavy rain induces blossom end rot
- Soil compaction: Poor drainage promotes root rot pathogens
- Splash patterns: Lower leaf symptoms indicate soil-borne pathogen splash
Confirmation Methods
- Magnification: 10x hand lens reveals fungal structures like pycnidia
- Cutting tests: Vascular discoloration visible in stem cross-sections
- Tissue sampling: Laboratory PCR testing for viral/bacterial identification
- Soil assays: Nematode extraction tests quantify pest populations
- Moist chamber: Promotes sporulation for fungal disease confirmation
Prevention Protocols
Rotate the crops every three years to break the disease cycle, and refrain from planting tomatoes or any other nightshades in the same location in consecutive years. I lost two seasons to Fusarium wilt before I learned that! I move tomatoes into a new bed each year, and I do not follow the placement of any previous potato or pepper.
Sanitation controls the spread of disease. After each use, disinfect tools with a 10% bleach solution. I also wipe pruners with a disinfectant solution between plants during an outbreak. As soon as you see symptomatic plants, dispose of them off-site for good. Never compost infected material, as it will not decompose properly.
Look for resistant varieties such as 'Mountain Merit' for blight, or 'Defiant' for wilt. Look for plant labels bearing the VFN codes, which indicate resistance to the disease. In my coastal vegetable garden, resistant types produced 50% more than heirlooms in wet years. Select varieties based on your local disease pressures.
Maintain consistent moisture at a depth of 1-2 inches. Drip irrigation can help keep leaves from getting too wet. During a heat wave, I check the moisture level with a long probe twice a day. Checking moisture less often can lead to uneven watering, which will generally increase the likelihood of blossom end rot, rather than any calcium deficiency.
Soil Management
- Rotate tomatoes with non-solanaceous crops like corn or beans for 3 years to disrupt disease cycles
- Test soil pH biannually; maintain 6.5-7.0 using lime to optimize calcium availability
- Apply 3 inches of organic mulch (straw or compost) to regulate soil temperature and moisture
- Amend clay soils with 2-3 inches of coarse sand to improve drainage and prevent root rot
- Solarize soil for 4-6 weeks in summer by covering moist soil with clear plastic to kill pathogens
Plant Selection
- Choose certified disease-free transplants labeled for resistance: 'VF' (Fusarium), 'EB' (Early Blight)
- Select compact varieties like 'Bush Early Girl' for humid climates to improve airflow between plants
- Graft tomatoes onto resistant rootstocks like 'Maxifort' for soil-borne disease protection
- Prioritize regional cultivars: 'Mountain Merit' for humid Southeast, 'Oregon Spring' for cooler Northwest
- Avoid heirlooms in disease-prone areas unless grafted onto resistant root systems
Water Management
- Use drip irrigation exclusively to keep foliage dry; water before 10 AM for daytime drying
- Maintain consistent soil moisture: 1 inch per week measured by rain gauge or soil probe
- Install moisture sensors at 6-inch depth to trigger irrigation when levels drop below 30%
- Avoid overhead sprinkling which spreads fungal spores and bacterial pathogens through splash
- Group plants by water needs: Separate tomatoes from drought-tolerant crops like peppers
Sanitation
- Sterilize tools with 10% bleach solution for 30 seconds after each plant contact
- Remove diseased plants immediately; bag and dispose off-site to prevent spore dispersal
- Disinfect stakes annually with hydrogen peroxide solution (3%) to kill overwintering pathogens
- Clean harvest containers with quaternary ammonia weekly during fruiting season
- Control weeds like nightshade and jimsonweed that harbor tomato diseases
Environmental Control
- Space plants 3 feet apart in north-south rows for maximum sun exposure and airflow
- Prune lower leaves 12 inches above soil to reduce humidity and soil contact
- Install 30% shade cloth above 90°F (32°C) to reduce heat stress and sunscald
- Use floating row covers below 55°F (13°C) to maintain consistent temperatures
- Apply kaolin clay spray to repel insects that spread viral diseases
Organic Controls
- Apply copper fungicide at first sign of disease: Mix 2 oz per gallon every 7-10 days
- Use Bacillus subtilis spray for fungal prevention: Apply weekly during high humidity periods
- Release predatory nematodes (Steinernema feltiae) for soil-borne pest control
- Spray neem oil solution (2 tbsp/gallon) at dusk to avoid leaf burn during sun exposure
- Apply potassium bicarbonate for powdery mildew: 4 tsp/gallon at first visible signs
Chemical Controls
- Use chlorothalonil for severe fungal outbreaks: Apply at 1.5 oz/gallon with 7-day pre-harvest interval
- Rotate fungicide classes: Alternate copper and mancozeb to prevent pathogen resistance
- Inject phosphorous acid into drip systems for late blight suppression in wet seasons
- Apply streptomycin for bacterial spot: Follow label rates strictly to avoid phytotoxicity
- Use systemic fungicides like azoxystrobin only as last resort due to bee toxicity risks
Nutrient Correction
- Foliar spray calcium nitrate (2 tbsp/gallon) weekly to prevent blossom end rot
- Apply Epsom salt solution (1 tbsp/gallon) only if soil test confirms magnesium deficiency
- Inject chelated iron into irrigation for interveinal chlorosis at 0.5 oz per plant
- Side-dress with balanced 10-10-10 fertilizer at flowering stage for fruit development
- Correct nitrogen excess with potassium sulfate to harden cell walls against pathogens
Biological Controls
- Introduce Trichoderma fungi to soil: Mix 1 oz per plant to suppress root pathogens
- Release ladybugs and lacewings: 1000 per acre controls aphids spreading viruses
- Apply mycorrhizal inoculants at transplanting to enhance nutrient uptake and disease resistance
- Use Beauveria bassiana fungus: Spray spores to control whiteflies transmitting TYLCV
- Establish flowering borders to attract parasitic wasps that target caterpillar pests
Physical Barriers
- Install floating row covers immediately after transplanting to block insect vectors
- Apply reflective aluminum mulch: Repels thrips and aphids by 60-70% in field trials
- Erect insect netting with 0.6mm mesh around garden perimeter to exclude large pests
- Place copper tape around beds to deter slugs and snails carrying diseases
- Use sticky traps: Yellow cards placed every 10 feet monitor and reduce flying insects
Treatment Solutions
Begin with organic treatments, such as copper fungicide at a rate of 2 oz per gallon (approximately 15 mL per liter) for early blight control. Apply during cooler hours or when temperatures are below 85°F (29 °C) to prevent leaf burn. I start spraying every 7 days when I have an outbreak, then switch to every 14 days once I stop spraying, as the fruit starts to form.
Adhere to specific safety intervals for chemical applications. Chlorothalonil has a 7-day interval between application and harvest. For Streptomycin, not more than 3 applications are allowed in a single season. I record these time periods on my calendar so I know when the chemical residue time period has expired.
Be cautious about temperature limits. Neem oil is ineffective at temperatures below 60°F (16 °C) because it becomes waxy and loses its effectiveness. Bacillus subtilis functions optimally at temperatures above 70°F (21 °C). During chilly springs, I usually resort to hydrogen peroxide sprays until ambient temperatures rise.
Select organic alternatives first rather than chemical. Garlic oil spray suppresses bacterial spot and does not harm the bees. I mix for a spray: 2 tbsp garlic oil per gallon, spraying in the evening hours after the bees are asleep. Only use antibiotics like streptomycin if there is an extreme amount of bacteria that cannot be taken care of using natural means.
Fungal Disease Controls
- Apply copper fungicide at 2 oz per gallon every 7-10 days; reapply after heavy rain exceeding 0.5 inches
- Spray potassium bicarbonate solution: 4 tsp per gallon water at first sign of powdery mildew lesions
- Use Bacillus subtilis strain QST 713: Mix 1 oz per gallon weekly during high humidity periods above 70%
- Apply compost tea drench: Brew 1:5 compost/water ratio for 48 hours to boost soil microbiome against root rots
- Prune infected leaves with sterilized shears; dispose in sealed bags to prevent spore dispersal
Bacterial Disease Controls
- Spray streptomycin sulfate: 0.25 oz per gallon for bacterial spot, max 3 applications per season
- Apply hydrogen peroxide solution: 1% concentration (10 oz 3% H₂O₂ per gallon) to sanitize leaf surfaces
- Use garlic oil spray: 2 tbsp per gallon to disrupt bacterial cell membranes without harming beneficial insects
- Remove symptomatic plants immediately; solarize soil with clear plastic for 6 weeks to kill pathogens
- Introduce bacteriophages: Commercial products target specific pathogens like Pseudomonas syringae
Viral Disease Mitigation
- Release Amblyseius swirskii mites: 500 per 100 sq ft to control thrips spreading Tomato Spotted Wilt Virus
- Apply kaolin clay: 1 lb per gallon as physical barrier against insect vectors during peak activity periods
- Remove infected plants; disinfect tools with 10% bleach solution between each plant contact
- Install UV-reflective mulch: Repels aphids and whiteflies by 60-70% in field trials
- Use plant resistance inducers: Salicylic acid sprays boost antiviral defenses at 100 ppm concentration
Physiological Disorder Corrections
- Foliar calcium spray: Apply calcium nitrate at 2 tbsp per gallon weekly to correct blossom end rot
- Inject chelated iron: 0.5 oz per plant via drip system for interveinal chlorosis caused by high pH
- Balanced fertilization: Side-dress with 10-10-10 NPK at 1 lb per 100 sq ft during fruit set
- Regulate watering: Maintain consistent soil moisture at 1-2 inch depth to prevent radial fruit cracking
- Shade cloth application: Use 30% shade above 90°F (32°C) to reduce sunscald on exposed fruit
Beneficial Microbe Applications
- Inoculate with Trichoderma harzianum: Mix 2 oz per gallon water for soil drench against Fusarium wilt
- Apply mycorrhizal fungi: Powder formulation at transplanting enhances nutrient uptake and root resilience
- Release beneficial nematodes: Steinernema feltiae controls root-knot nematodes at 1 million per 100 sq ft
- Spray Lactobacillus serum: Fermented milk solution suppresses foliar pathogens at 1:20 dilution ratio
- Use compost extract: Strain liquid through 400-micron mesh for immediate disease-suppressing microbes
Fungicides
- Chlorothalonil: Apply at 1.5 oz per gallon for late blight; 7-day pre-harvest interval required
- Mancozeb rotation: Use 1.5 oz per gallon alternating with copper to prevent resistance development
- Azoxystrobin systemic: Restricted to 0.4 oz per gallon max twice per season due to bee toxicity risks
- Fosetyl-Al injections: Treat vascular wilts via trunk injection at 1 oz per inch of trunk diameter
- Penthiopyrad: Apply 0.5 oz per gallon for early blight in commercial settings only
Bactericides
- Oxytetracycline: Spray at 0.5 oz per gallon for bacterial spot; limit to 3 applications per crop cycle
- Copper hydroxide: Fixed-copper formulation at 1 oz per gallon for persistent infections in humid climates
- Acibenzolar-S-methyl: Activates plant defenses at 0.03 oz per gallon before disease onset
- Streptomycin sulfate: Reserved for severe outbreaks; incompatible with alkaline water above pH 7.0
- Kasugamycin: Apply at 0.25 oz per gallon against Pseudomonas infections in greenhouse settings
Application Guidelines
- Timing: Treat early morning when temperatures are below 85°F (29°C) to avoid phytotoxicity
- Coverage: Use fine mist sprayers achieving 90% leaf coverage without runoff for maximum efficacy
- Resistance management: Rotate chemical classes every 2-3 applications using FRAC codes
- Safety: Wear nitrile gloves, goggles, and respirator when handling concentrated formulations
- Record keeping: Log application dates, rates, and weather conditions for compliance monitoring
Insecticide Synergy
- Pyrethrin combinations: Mix with neem oil at 1:1 ratio for enhanced aphid and whitefly control
- Spinosad rotation: Alternate weekly with azadirachtin to prevent pest resistance development
- Add spreader-stickers: Include 0.25% non-ionic surfactant to improve coverage on waxy leaves
- Avoid tank-mixing: Certain combinations like copper + mancozeb cause precipitation and clog nozzles
- Buffer pH: Adjust spray solution to 5.5-6.5 using citric acid for optimal chemical stability
Soil Drenches
- Metalaxyl applications: 1 oz per gallon water drenched at root zone for Pythium root rot control
- Flood irrigation: Apply 1-2 inches water after oxamyl drench to move nematicide into root zone
- Myclobutanil systemic: Use 0.5 oz per plant for Fusarium wilt suppression in heavy soils
- Drench timing: Apply during cooler hours below 80°F (27°C) to reduce plant stress
- Post-application: Irrigate lightly to incorporate chemicals without leaching beyond root zone
Diagnostic Tools
Begin with the leaves to identify key indicators. Early blight patches appear brown with bullseye patterns, and their size ranges from 0.25 to 0.5 inches (0.6-1.3 cm). Late blight has greasy black lesions that are significantly larger in size. A 10x hand lens will help find small bacterial spots that have yellow halos around them.
Examine stems for vascular diseases. If there is a diagonal cut just at soil level, brown streaks identify Fusarium wilt. Soft, depressed cankers identify a bacterial infection. Root galls larger than 0.08 inches (2 mm) mean nematode infection. I carefully probe stems to minimize plant damage during examination.
Fruit symptoms indicate types of diseases. Black spots are leathery at blossom ends, suggesting a calcium problem. Concentric rings imply fungal disease. An oily surface of fruits with white fuzz on them signifies late blight of the fruit. Check that radial cracks show water stress, while concentric ones show rapid growth.
Begin your investigation using non-destructive methods. For example, test the soil pH and moisture levels before considering soil lab tests. I typically use sticky traps for insect identification and refractometers to test the sap sample. Try to send samples to the lab only if you have confirmed field diagnostics, to save yourself time and money in the process.
Leaf Symptoms
- Circular spots with concentric rings: Measure diameter >0.25 inches (6 mm) for early blight vs. smaller Septoria spots
- Water-soaked margins: Use hand lens to check for bacterial ooze under 10x magnification
- Yellowing patterns: Uniform yellowing indicates nutrient deficiency; mosaic suggests viral infection
- Powdery residues: Rub surface - fungal powder smears while dust doesn't
- Curling/distortion: Check for thrips or aphids on undersides with sticky tape test
Fruit Symptoms
- Blossom-end rot: Confirm leathery texture and absence of pathogen under microscope
- Sunken lesions: Measure depth >0.12 inches (3 mm) for anthracnose vs. surface scars
- Cracking patterns: Radial cracks indicate water stress; concentric cracks suggest rapid growth
- Color abnormalities: Cut fruit - internal browning distinguishes internal rot from surface issues
- Oily appearance: Late blight lesions feel greasy; wipe with paper towel to confirm moisture
Stem & Root Indicators
- Vascular discoloration: Cut stem diagonally - brown streaks confirm Fusarium wilt
- Root galls: Gently wash roots - spherical galls >0.08 inches (2 mm) indicate nematodes
- Cankers: Probe sunken areas - soft tissue signals bacterial canker
- Aerial roots: Count formations >0.4 inches (1 cm) long signaling environmental stress
- Pith disintegration: Split stems horizontally - hollow centers suggest bacterial pith necrosis
Progression Patterns
- Speed of spread: Document lesion expansion >0.8 inches (2 cm)/day for aggressive pathogens
- Directional movement: Bottom-up progression suggests soil-borne diseases; top-down indicates airborne
- Weather correlation: Note symptom flare-ups within 48 hours of rain >0.4 inches (10 mm)
- Temperature response: Symptoms worsening above 86°F (30°C) point to heat-sensitive pathogens
- Vector presence: Trap insects with yellow cards to correlate with viral symptoms
Field Diagnostic Kit
- Magnification: 10x hand lens for inspecting fungal structures and insect pests
- pH meter: Test soil pH at 6-inch (15 cm) depth near root zone
- Moisture probe: Check soil moisture at 2-4 inch (5-10 cm) depth for consistency
- Cutting tools: Sterilized pruners for stem cross-section analysis
- Sample bags: Sealable plastic bags for lab specimens with 70% alcohol wipes
5 Common Myths
Epsom salt eliminates blossom end rot because it introduces magnesium which aids plants in absorbing calcium better.
Epsom salt (magnesium sulfate) aggravates blossom end rot by competing with calcium uptake. Blossom end rot is first caused by moisture inconsistency which interferes with the transfer of calcium to the fruit, rather than magnesium deficiency. Instead of using Epsom salt, apply gypsum at 1 lb per 100 sq ft (0.45 kg per 9.3 m) and maintain your water consistency so that calcium can go to developing tomatoes.
Planting them deeper than their root ball will result in a stronger plant that will be better able to resist disease and tolerate drought conditions.
Planting tomatoes too deep can cause stem rot and allow soil-borne pathogens to enter plant tissue. Tomato plants develop adventitious roots only on the buried portion of the stem and if the plant is buried more than 2-3 inches (5-7.5 cm), the stem will go into an oxygen deprived condition and Fusarium wilt may occur. It is best to bury one-third of the stem and to not cover any of the lower leaves, which can also contribute to fungal infections at the soil line.
Eggshell fragments in planting holes add calcium to the soil as the shells decay, thus preventing blossom end rot.
Unfortunately, eggshells take too long to decompose (2+ years) to make calcium readily available at critical periods of fruit development. Blossom end rot requires soluble calcium to be taken into the xylem during periods of active fruit growth. Alternatively, use a foliar calcium nitrate solution at 2 tablespoons per gallon (30 ml per 4 liters) once per week. Calcium gypsum applied to the soil will dissolve far more rapidly than eggshells (weeks versus years) under typical garden conditions.
Every heirloom tomato type ages with an inbred resilience to disease as they have been developed without any modern chemical protection.
Most heirlooms lack the genetic disease-resistance traits that are bred into hybrid deep crops. For example, 'Brandywine' varieties consistently succumb to Fusarium wilt and late blight much faster than resistant hybrids like 'Mountain Merit.' After grafting on resistant root stocks, heirloom varieties will have the same amount of resilience as a resistant hybrid. Always check the resistant "codes" (e.g., VFN) when choosing a variety for a location known to have disease problems instead of simply assuming the heirloom will have more immunity.
Daily overhead watering moisturizes tomato crops while also providing some rain washing of fungal spores that cause leaf spot diseases.
Overhead watering disperses fungal spores and can lead to elongate leaf wetness, which is typically conducive for pathogens. Fungal diseases like early blight require 14+ hours of leaf wetness to germinate and spread. Whenever possible, utilize drip irrigation or water at soil level (with a hose) so that any moisture on the foliage will be dried before 10 AM. Consider using soaker hoses (1-1.5 inches/2.5-3.8 centimeters/week) that deliver moisture directly to the roots, rather than wetting the leaves, so that you disrupt the cycle of disease.
Conclusion
Catching tomato diseases early on using diagnostic tools saves the majority of the crops. Regularly checking leaves, stems, and fruit helps catch problems before they spread too far. I have prevented priceless harvests of tomatoes by removing infected plants immediately. This is a simple habit that can eliminate 80% of potential garden calamities.
For optimum results, combine environmental controls with treatment protocols. You can incorporate drip irrigation to keep the leaves dry while applying the targeted fungicides. In my own garden, shade cloth, in conjunction with copper sprays, effectively controlled outbreaks of white powdery mildew and leaf blight. By using both environmental controls and treatment protocols, one is ultimately more effective.
Prioritize prevention rather than reaction. Good sanitation, like sterilizing tools, interrupts disease cycles. Most infections arise from contaminated soil or equipment. I religiously bleach my shears after each use. Prevent the problem rather than trying to fix it later.
Regular monitoring results in better harvests. Take a walk through your garden daily with a hand lens and notepad. I record changes every morning. This scrutiny develops your expertise while preventing plant diseases. You will be confident to face any disease challenge.
External Sources
Frequently Asked Questions
What are common tomato plant disease symptoms?
Tomato diseases show distinct visual symptoms:
- Brown concentric rings on leaves (early blight)
- Greasy black lesions with white mold (late blight)
- Leathery black patches at fruit base (blossom end rot)
- Yellow mosaic patterns (viral infections)
- White powdery residue (powdery mildew)
How do you treat fungal diseases on tomatoes?
Treat fungal infections using organic and preventive methods:
- Apply copper fungicide every 7-10 days during humid periods
- Use potassium bicarbonate spray for powdery mildew
- Remove infected leaves with sterilized shears immediately
- Improve airflow through strategic pruning and plant spacing
- Apply Bacillus subtilis as a soil drench for root protection
Why do tomato leaves turn yellow and brown?
Yellowing and browning leaves indicate multiple potential issues:
- Fungal infections like early blight or Septoria leaf spot
- Bacterial diseases spreading through water splash
- Nutrient deficiencies (nitrogen or magnesium)
- Overwatering causing root suffocation
- Viral infections transmitted by insects
Can coffee grounds help tomato plants?
Coffee grounds provide limited benefits but pose risks:
- Acidify soil slightly - helpful only if pH is too alkaline
- Add minimal nitrogen during decomposition
- May create mold that harbors fungal pathogens
- Attract pests like fungus gnats in moist conditions
- Better alternatives include balanced fertilizers and compost tea
What causes tomato blossom end rot?
Blossom end rot stems from calcium transport issues:
- Inconsistent watering disrupting nutrient uptake
- Rapid growth periods creating calcium deficits
- Excessive potassium/magnesium competing with calcium
- Root damage from cultivation or nematodes
- Soil pH imbalances locking out calcium
Should I remove diseased tomato leaves?
Yes, but with critical precautions:
- Sterilize shears with bleach solution between each cut
- Remove only severely infected leaves during dry weather
- Bag and discard leaves immediately off-site
- Never compost diseased plant material
- Limit removal to 1/3 of foliage to avoid plant stress
What homemade fungicide works for tomatoes?
Effective DIY solutions include:
- Baking soda spray: 1 tbsp per gallon with horticultural oil
- Milk solution: 40% milk to water ratio for mildew
- Garlic or cinnamon oil sprays as antifungal agents
- Compost tea applications to boost beneficial microbes
- Always test on few leaves before full application
How to prevent tomato diseases naturally?
Implement these cultural prevention strategies:
- Rotate crops away from nightshades for 3 years
- Use drip irrigation instead of overhead watering
- Select disease-resistant varieties like 'Mountain Merit'
- Apply mulch to prevent soil splash on leaves
- Install 30% shade cloth during extreme heat
Why avoid hydrogen peroxide on tomatoes?
Hydrogen peroxide damages plants when misused:
- Burns foliage at concentrations over 1%
- Kills beneficial soil microorganisms indiscriminately
- Leaches essential nutrients from root zones
- Creates oxygen bubbles that block vascular tissues
- Safer alternatives include copper sprays and biological controls
What are the worst tomato diseases?
Most destructive tomato diseases include:
- Late blight: Destroy entire crops in days
- Fusarium wilt: Permanently soil-contaminating vascular disease
- Tomato spotted wilt virus: Incurable and insect-spread
- Bacterial canker: Seed-borne and systemic
- Root-knot nematodes: Cause irreversible root damage