
Spring garden preparation begins with early preparation of soil to mitigate nutrient voids in the summer. Waiting too long will result in the stunted growth of young seedlings. I've seen tomatoes struggle in July when their beds weren't prepped until mid-spring. Prepare your soil 6-8 weeks before your last frost date. This window allows the roots to establish before temperatures become increasingly warm.
Neglecting to clean out your raised bed is a recipe for disaster. A client of mine did just this last year, leaving old plant debris behind. By June, the aphids had overrun her lettuce. Decaying leaves attract pests. Be sure to dig your raised beds out thoroughly! Now, turn in compost to begin stimulating the microbial action in your beds so your plants can take up nutrients faster.
Frost dates differ greatly from region to region. In Zone 5, I typically begin prepping soil by April 15. In coastal Zone 9, you could be starting in February so you'll need to check your USDA zone map. Work back your starting time by at least a couple of weeks to apply amendments that need some time before planting, such as lime or sulfur.
It makes a difference to have that 6-week window. Soil testing can show pH issues this time of year. The sooner you fix those issues, the less you risk blossom-end rot in peppers or yellowing leaves on your squash plants. I would rather test than just guess. If you have even a balanced soil to start the season, you will have to do occasional sprays later in the season. Your back will appreciate it.
10 Essential Spring Preparation Tasks
Perennials expect a prompt focus in spring. Be sure to cut back roses and peonies as soon as you observe new growth. Annuals will have to hold off. First, it is important to clear out the mulch from your overwintered perennial beds. Last year, I put off my tomatoes while I prioritized my lavender, and found that I didn't have dieback from the moisture that had been retained. There is a sense of urgency in spring, driven by the type of the plant.
Soil tests are not uniform. Tomatoes prefer a pH of 6.5 and blueberries prefer 4.5. I would test beds that host the acidic and alkaline lovers separately. I forgot once and my beans grew up stunted. Make amendments that coincide with the crops on your list. Remember, lime takes a while to turn around - so plan.
Peas will not engage in guessing games. Just wait for the soil temperature to reach the 45°F (7°C) mark. At dawn, I stick a meat thermometer the recommended 3 inches deep in the soil. If you plant too early, the seed will rot. After the cold snap last spring, I learned I had to respect the soil and be patient. Warm soil will promote faster sprouting.
Deer density determines fence height. In the Midwest regions with herds, an 8-foot (2.4m) fence usually works. For one client, a 6-foot fence proved insufficient until I added angled extensions. Tracking local wildlife reports can be helpful. On my Vermont property, tall fencing (over 8 feet) prevents deer from munching on their lilacs as an evening snack.
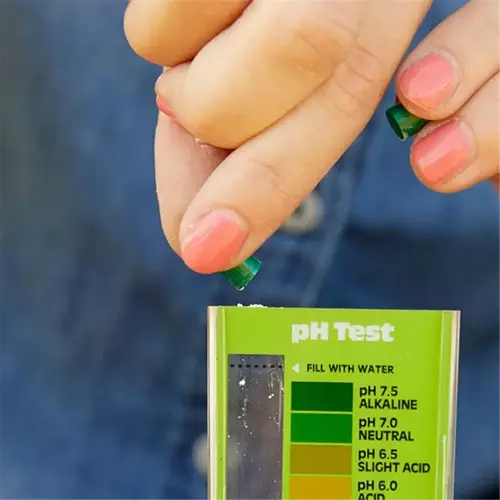
Soil Testing and Amendment Strategies
Vegetables require more fertile soil than do ornamentals. Tomatoes, for example, love being amended with 2 inches of compost per square yard, while a hydrangea would prefer to be amended with acidic materials such as pine needles. I ruined a rose bed last season with vegetable-grade fertilizer, which a hydrangea would have loved, but a rose would not. Be sure to understand the properties of your specific plants, as soil hunger levels fluctuate all over the place.
A pH that is not balanced may effectively lock nutrients away from crops. For example, at a 5.5 pH level, I had beans that could not absorb calcium, and blossom end rot occurred as a result. Ornamental grasses were yellow at 7.8 pH until I added sulfur. It is worth testing your pH once a year. Most crops are suitable in the range of 6.0-7.0. However, blueberries beg for a pH of 4.5-5.5. Don't neglect this and expect to get a crop.
Compost is not something to skip. Put on 1 to 2 inches per square meter for crops, and half that amount for perennials. I suggest measuring it out - looking at the pile will result in nitrogen burn. Mix it into a depth of six inches. If you apply far too much compost, you will have great green leaves, but zero fruit.
Gypsum temporarily ameliorates sodicity. At a client's site, we applied 20 lbs. per 100 square feet to improve drainage for eight months, but salts returned. It is best to apply gypsum along with compost for sustained effects. Apply gypsum in the fall. In spring rains will push it too deep.
Pruning Timing and Techniques
Bypass pruners cut cleanly through live stems, making them great for roses or green wood. Anvil pruners crush tender bark but work well on dead wood. Last spring, I botched a hydrangea by using an anvil on fresh growth. This is why it is important to match your tools to the type of wood. Dormant seasons are best suited for anvils, while summer dictates the precise uses of bypass pruners.
The angle of the cuts matters. Cut tree branches at a 45° angle so the rain can slide off, instead of resting on it. I have had clients with apple trees that rot away after making a flat cut. An angle slopes away from the buds, allowing the tree to start with outward growth, create airflow, and reduce the risk of decay by half.
Avoid removing more than 25% of a tree's canopy at a time. One client hacked her maple, she took out 40% of the tree's canopy and the tree was stunted for two years. Thin trees gradually, and start with crossed branches. Shrubs are more resilient than trees, but fruit trees in particular require gentle hands. The shock will lower yields.
Trim off a ¼-inch (6.35 mm) about the buds to encourage healthy regrowth. The cuts should be closer to the buds or else they will rot further down, but cutting them much farther will leave a stub up higher. My neighbor's lilacs were never flowering until we marked off a small ruler. You want to cut just beyond the bud collar. Roses must be maintained this way, if you just hack them they won't bloom.
Mulching for Weed Control
Organic mulches like wood chips decompose in 2-3 years, benefitting soil inhabitants in the process. Inorganic gravel may last longer than a decade, but it will rob the earth of nutrients. I used rubber mulch for a pathway by a client once but regretted it several years later when weeds started to push through, and via the compost edible garden, the physical force of nature prevailed. Ultimately, you should align expectations with longevity.
Weed control hinges on depth. Apply 3-4 inches (7.6-10 cm) of shredded bark to get rid of 90% of weeds. In spring, a client applied only a thin 1-inch layer, which allowed thistles to flourish. A ruler is best, eyeballing does not account for gaps. If the mulch is too thick, the roots will naturally suffocate from lack of oxygen. A depth of shredded bark of 3-4 will control the weeds and keep the roots healthy.
Mulch around a tree trunk can kill a tree. When you pile up material against the trunk, you can trap moisture and promote rot. I recently rescued a maple tree at a client's house by scraping back 6 inches of soil-compacted mulch. Keep mulch 6 inches (15 centimeters) away from the trunk of a tree. Roots need air, and not a soggy collar of mulch.
Fresh wood chips are nitrogen thieves. You'll want to offset this with 1 lb per 100 sq ft (0.5 kg/10 m²) of blood meal. Don't, and your beans will turn yellow in a matter of weeks. This I learned from a client's failed crop. Accordingly, you'll want to feed the soil any time you mulch.
Tool Maintenance Guide
Bypass pruners require a sharpening angle of 20° for clean cuts on live stems. A 25° angle is needed when using anvil pruners to effectively crush deadwood. I learned the hard way with a client who got ragged cuts which eventually led to disease on some rose stems. It was a mistake caused by using the incorrect angle. Always remember to match the bevel with the task you are doing. This ensures precision in cuts and minimizes stress on the plants.
70% alcohol works better than 90% for sanitizing tools. The higher concentrations evaporate too quickly to kill pathogens. Last season, the shears from the client caused a blight until we changed to 70%. Dip the blades for 30 seconds. Wipe off the residue so it does not get sticky in the pivots. You'll find that your pruners are sterilized, but not slippery.
Motor oil ruins wooden handles. Oil attracts grit and dries out wood fibers. A client of mine had a shovel that split after using oil on it for years. Linseed oil treats the wood without leaving residue behind. You can rub it on dry handles annually. Consider your tools to age like oak barrels, solid and not splintered.
The recommended PSI for wheelbarrow tires is 20 to 35 PSI (138 to 241 kPa). Under-inflated tires will strain you by dragging. Over-inflated tires could blow out along rocky paths. I check mine with a gauge each month. Being flat last spring taught me to always check. *Good pressure helps you keep your tools and your spine*.
5 Common Myths
Plants should all ideally be pruned early in the spring
Summer-flowering shrubs such as hydrangeas and roses should be pruned after they bloom, while dormant season pruning is only applicable to fruit trees, and deciduous ornamentals. When pruning too early in the spring, pruning the bud will affect flower production because of where the bud is on the growth form. Just cutting off a couple buds can result in 40-60% reductions in bloom.
Better mulch is always a benefit for plant welfare
More than 3 inches (7.6 cm) of mulch keeps root systems from getting oxygen and covers roots with moisture leading to potential crown rot. When mulch is correctly applied, that means applying in 2-3 inch (5-7.6 cm) layers and giving woody stems a 6 inch (15 cm) clearance so that mulch does not create habitats for fungi.
Compost fully eliminates the need for fertilizer
While compost does provide some organic matter with micronutrients, it does not provide enough nitrogen (N) for crops with high fertilizer needs like tomatoes. Balanced gardens need compost (2-4 inches per year) and the appropriate fertilizer for garden crops based on soil test results.
Native plants require no soil prep
Even native species need some pH-modified soil (6.0-7.0 range) and some drainage modification when growing in compacted urban soils. Testing indicates the need for amendments (gypsum for clay heavy native plant beds) and shatters the learnings of the plant and forget myth.
Rainwater harvesting needs no filtering
Bird poop and particulates clog rainwater irrigation systems in roof-collected rainwater. To use this rainwater properly, you'll need 100-micron mesh pre-filters (smaller than a human hair) and, also first-flush diverters that dump the first 10 gallons (38 litres) of contaminated runoff.
Conclusion
Preparing your garden in the spring is best accomplished starting 6 weeks before frost and disruption in the indoor soil temperature. In coastal regions of Zone 9, the season of preparation begins in January, while mountain zones typically start their pre-season preparation in March. I missed the latter, and my kale sewed early. Take the time to prepare according to your area. The roots need time to establish before experiencing the pressures of temperature excursions.
Prune according to the guide in your region. Coastal climates would generally prune roses in February, while Mountain areas would wait until April. A client in Colorado pruned her hydrangeas too soon- spring snow killed all the new buds. Know your last frost date. Adjust your shears to your microclimate, not the guidelines.
Mulching saves 30 percent of your water year's usage., 30 liters sured off of every 100 liters applied water. The client's tomato bed used 20 gallons weekly until we added a 3-inch mulch cover, and the weeds decreased by 90 percent. Maintain good mulch thickness, too thin and we will be attractive to invaders, too thick and the roots will become starved for air and moisture. Measure for purpose.
Clean tools bi-weekly. Sheared blades coated in 70% alcohol reduce disease spread by 75%. A client last summer had a blight outbreak detected back to dirty pruners. Scrubbed pivots, oiled hinges, and tire pressure checked to keep your tools working harder, and the garden more productive.
External Sources
Frequently Asked Questions
What are the essential steps for spring garden preparation?
Begin with soil testing to determine nutrient needs, prune dormant plants before new growth emerges, apply weed-suppressing mulch, inspect irrigation systems for leaks, and sanitize tools to prevent disease spread.
When is the ideal time to start planning a spring garden?
Start planning 6-8 weeks before your region's last frost date. This allows time for soil amendment, seed starting indoors, and tool maintenance. Coastal climates begin earlier than frost-prone inland areas.
What does the gardening 3-year rule involve?
This strategy rotates crops across three zones to:
- Prevent soil nutrient depletion
- Disrupt pest life cycles
- Allow sections to recover with cover crops
What mistakes should first-time gardeners avoid?
Common errors include:
- Over-pruning flowering shrubs too early
- Using fresh manure that burns plant roots
- Neglecting soil pH testing before planting
- Watering foliage instead of soil roots
How should beginners prepare their first garden?
Focus on these fundamentals:
- Start with easy crops like lettuce or radishes
- Use raised beds for better drainage
- Apply compost to improve soil structure
- Monitor sunlight patterns daily
Is it too late to start a garden in May?
May is ideal for warm-season crops in most regions. Plant fast-growing vegetables like bush beans, zucchini, or cucumbers. Avoid cool-weather crops that bolt in heat, and use starter plants instead of seeds for quicker harvests.
What vegetables thrive in spring planting?
Top spring vegetables include:
- Leafy greens (spinach, kale)
- Root vegetables (carrots, beets)
- Brassicas (broccoli, cauliflower)
- Peas and radishes for quick yields
Should garden soil be amended annually?
Yes. Replenish nutrients by:
- Adding 2-3 inches of compost
- Testing pH and adjusting with lime/sulfur
- Incorporating organic matter for microbial activity
- Avoiding synthetic fertilizers that harm beneficial organisms
How do I clear winter debris from my garden?
Remove dead plants to eliminate pest habitats. Rake fallen leaves to prevent mold, till only dry soil to avoid compaction, and dispose of diseased material offsite instead of composting it.
What soil additives boost vegetable growth?
Enhance soil with:
- Compost for organic matter
- Bone meal for phosphorus
- Kelp meal for micronutrients
- Worm castings for microbial diversity
- Avoid fresh manure near harvest time