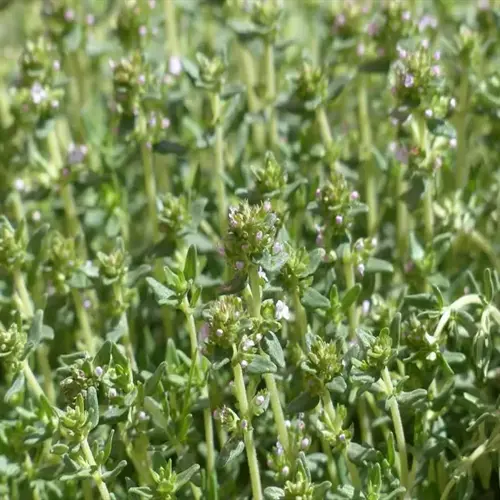

Understanding how to grow tarragon provides you with an adaptable herb for the kitchen garden. Tarragon is part of the sunflower family, and there are two main varieties. French tarragon has a distinct flavor, while Russian tarragon is easier to cultivate. Both types of tarragon impart a unique and different flavor to dishes.
You will absolutely love cooking with fresh tarragon leaves! It can completely change sauces like Béarnaise and elevate poultry or fish dishes to new levels. The anise taste enhances even the simplest ingredients. I like to keep a nearby plant by my kitchen door for last-minute recipes.
This herb is very flexible in growing conditions! Tarragon is drought tolerant once established and winter hardy with protection. One plant gives a lot of harvests. It's easy to grow in garden beds or in containers.
Troubleshooting Issues
When you see slow growth, it typically indicates a sunlight or soil issue. Tarragon requires 6 hours of direct sunlight every day and soil temperatures of 60-75°F (15-24°C) for optimal growth and development. So it is worth monitoring your soil temperature. Also, check your pH levels. The ideal pH for optimal nutrient absorption is between 6.5 and 7.5.
Yellow leaves typically indicate overwatering. This herb prefers not to have "wet feet." You can improve drainage by incorporating sand into heavy soil. I learned this lesson after losing my first tarragon plant. Now, I only water when the first 5 cm are dry.
There's no need to panic if your stems turn brown during the winter months. It's a natural time for dormancy in plant protection. You should cover plants with 4-6 inches (10-15 cm) of mulch for some insulation. You can wait. If you keep the roots protected, you should see new shoots in the spring.
Use terra cotta pots for container plants, as they help avoid overwatering problems. Pot placement in hot climates is areas with morning sun and afternoon shade. I personally pull mine under a tree when it is hotter than 90°F.
Drying and Storing
Harvest tarragon in the late summer mornings when the essential oils are at a high peak. Ideally, cut stems before the sun becomes too hot. This is when the leaves will have the most flavor concentration. I personally always harvest my tarragon when the dew is dried, but the heat is not blazing yet.
The microwave method will retain 90% of essential oils, resulting in the most volatile flavor. Place leaves in layers between two paper towels, and microwave in short increments. For a more traditional approach, air-drying is better suited for developing an earthy flavor that suits the use in soups. Both methods will last for one (1) year with proper storage.
Frozen tarragon retains its flavor and color for about 6 months. Make oil or water cubes for easy portion control during cooking. For instance, I freeze my chopped leaves in olive ice cubes, which I melt into whatever sauce I'm making. It saves time when you're fresh from a busy day making dinner.
Keep dry leaves in a dark, airtight container. Glass jars in a pantry work great! Check on them occasionally for moisture. Crumbled leaves will still smell good! I write my harvest dates on them so I can track freshness month by month all year.
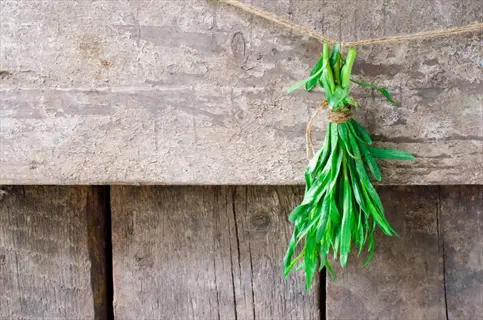
Air-Drying
- Preparation: Bundle 8-10 stems with twine; ensure spacing for airflow to prevent mold in humid conditions above 60% humidity
- Environment: Hang upside down in dark, dry areas like pantries with consistent 60-70°F (15-21°C) temperatures for 7-14 days
- Readiness Test: Leaves crumble easily when pressed; stems snap cleanly without bending when fully dehydrated
- Storage: Strip leaves into airtight glass jars; store in cool cabinets away from light to maintain flavor 12+ months
- Flavor Impact: Develops earthy notes ideal for soups and stews, though 15-20% oil loss occurs during drying

Microwave Method
- Setup: Single-layer leaves on microwave-safe paper towels; avoid overlap to ensure even dehydration without scorching
- Timing: Microwave on high for 60 seconds, stir leaves, then continue in 30-second intervals up to 3 minutes total
- Quality Control: Stop when leaves are crisp but still vibrant green; browning indicates flavor-compromising overheating
- Cooling: Rest 10 minutes post-drying; residual heat completes dehydration without requiring additional processing
- Advantage: Retains 90% essential oils for superior sauces like Béarnaise; use within 6 months for peak potency
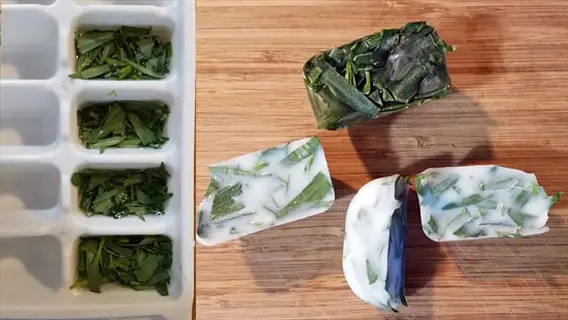
Freezing
- Prep: Rinse and pat-dry sprigs thoroughly; chop or leave whole based on future recipe requirements
- Flash-Freeze: Spread on parchment-lined trays; freeze 2 hours at 0°F (-18°C) before bagging to prevent ice clumping
- Alternative: Mix chopped leaves with water or olive oil in ice cube trays; freeze for portioned cooking use
- Storage: Airtight freezer bags with dated labels; remove air pockets to prevent freezer burn during storage
- Usage: Add directly to hot dishes without thawing; ideal for sauces and roasted meats with 6-month optimal freshness

Oven-Drying
- Temperature Control: Set oven to lowest temperature (typically 150-170°F/65-75°C) with door slightly open for moisture escape
- Preparation: Arrange stems on parchment-lined baking sheets without overlapping; turn every 30 minutes
- Duration: Dry for 2-4 hours until leaves become brittle but retain green coloration for best flavor preservation
- Monitoring: Check frequently after 90 minutes to prevent scorching; rotate trays for even heat distribution
- Storage: Crush dried leaves into jars immediately; store away from light and heat sources for 10-12 month shelf life
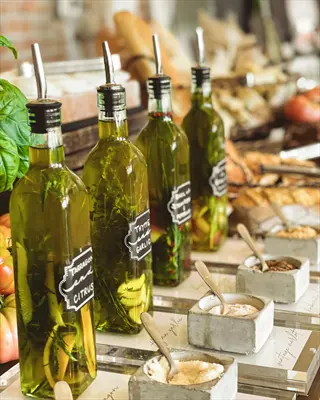
Herb-Infused Oils
- Sterilization: Sanitize glass bottles in boiling water for 10 minutes to prevent bacterial growth during infusion
- Infusion Process: Combine 1 cup fresh tarragon with 2 cups olive oil; simmer at 120°F (49°C) for 4-5 hours
- Straining: Filter through cheesecloth to remove plant material; bottle while warm to seal properly
- Storage: Keep refrigerated for up to 3 months; discard if cloudiness or off-odors develop indicating spoilage
- Usage: Ideal for salad dressings, marinades, and finishing oils; preserves authentic flavor without dehydration loss
Overwintering Strategies
Overwintering procedures are varied considerably by USDA zones. Zone 4 needs a thick layer of mulch as a protective barrier. Zone 7 requires little to no protection. I discovered this through trial and error; my plants were lost to an unanticipated frost in the Midwest.
Act when temperatures drop below 20°F (-7°C). Mulch plants in the ground with 6 inches of straw. For container plants, move them indoors when temperatures fall below 15°F (-9°C). A cold garage is a good place for them. During dormancy, check the soil's moisture once a month.
Vulnerability to freezing is increased with porous containers. Terra cotta pots can break when exposed to freezing temperatures. Wrap the pots with bubble wrap to provide insulation. If possible, raise the container on wooden pallets to prevent direct contact with frozen ground surfaces.
Undertake root divisions in late autumn, after the above-ground parts of the herb plant die. Store the divisions in moist sand at 35°-40°F, which should be replanted in the early spring. This is an effective way to rejuvenate old plants and increase your herb garden.
In-Ground Mulching
- Preparation: Cut stems to 2 inches after first frost; clear debris to prevent fungal diseases during damp winter conditions
- Mulch Application: Apply 4-6 inches (10-15 cm) straw or shredded leaves; extend coverage 12 inches beyond plant base for root zone insulation
- Spring Removal: Gradually reduce mulch when temperatures exceed 40°F (4°C); complete removal after last frost to avoid new growth shock
Container Relocation
- Site Selection: Move pots to unheated garages/sheds with consistent 30-40°F (-1°C to 4°C); avoid heated spaces that disrupt dormancy cycles
- Moisture Control: Water once monthly if soil dries completely; use moisture meters to maintain slight dampness without saturation
- Insulation Wrap: Bubble-wrap pot exteriors; place containers on wooden pallets to prevent ground freeze contact in sub-20°F (-7°C) climates
Indoor Transition
- Acclimation: Bring plants indoors before temperatures drop below 25°F (-4°C); place near south-facing windows for 6+ hours daily sunlight
- Watering Schedule: Reduce to bi-weekly watering; allow top 2 inches (5 cm) of soil to dry between sessions to mimic natural dormancy
- Pest Prevention: Inspect leaves/stems before moving; apply neem oil spray weekly for first month to control potential aphid infestations
Root Division Storage
- Harvest Timing: Dig roots after foliage dies back in late fall; select healthy segments with 2+ growth nodes for viability
- Storage Medium: Bury roots in damp sand/peat moss mix; store in perforated bags at 35-40°F (2-4°C) with 60% humidity
- Spring Planting: Replant divisions after last frost; soak roots in warm water for 1 hour before planting to rehydrate tissues
Cold Frame Protection
- Construction: Position frames over plants; angle southward for maximum winter sun exposure and automatic snow shedding capability
- Ventilation: Open on days above 45°F (7°C); close during sub-freezing nights to trap ground heat and maintain temperatures 5°F to 10°F (-15°C to -12°C) warmer than ambient
- Moisture Management: Water sparingly every 4-6 weeks; avoid condensation buildup by cracking lids slightly during sunny midday periods
Planting and Propagation
French tarragon does have an important propagation rule. Stems or divisions must be used as they will not produce viable seeds. I learned this the hard way, after a season wasted starting seeds from packets. True French tarragon loses its flavor when grown from seeds.
Only plant once soil temperatures are consistently above 50°F (10°C). Planting early runs a risk of rotting roots in cold, moist soil. It is best to angle plants at 18 - 24 inches (45-60 cm) apart for air circulation. Otherwise, it will increase the chances of powdery mildew, which wiped out my first herb bed when the plants were tightly packed.
Cuttings about 4-6 inches in length in late spring and dip them in rooting hormone before planting. They should be planted 2-3 inches deep. For divisions, 2-3 growth nodes should be on each part. I replant new plants every 3 years to keep them robust.
After planting, water new plants lightly until they are established, and refrain from adding fertilizer at this time; excessive nutrients can diminish the signature anise flavor. Compost is an option as well. My best tarragon came from poor soil, with decent drainage, and very little care.
Stem Cuttings
- Timing: Late spring to early summer when stems are young and flexible
- Preparation: Cut 4-6 inch (10-15 cm) stems below a node; remove lower leaves
- Rooting: Dip in hormone gel; plant in moist potting mix at 70-75°F (21-24°C)
- Transplant: Move outdoors after 6 weeks when roots establish
Root Divisions
- Timing: Early spring as new growth emerges or late fall after dormancy
- Division: Use sharp knife to separate roots with 2-3 growth nodes per section
- Planting Depth: Set divisions 2-3 inches (5-7.6 cm) deep in prepared soil
- Spacing: Maintain 18-24 inches (45-60 cm) between plants for mature growth
Seed Limitations
- French Variety: Sterile flowers produce no viable seeds; cuttings/divisions required
- Russian Alternative: Seeds germinate but yield inferior flavor; not culinary-grade
- Identification: Purchase certified plants from nurseries to ensure authenticity
Soil Preparation
- pH Balance: Test and adjust to 6.5-7.5 using lime (raise) or sulfur (lower)
- Drainage: Mix 2-3 inches (5-7.6 cm) sand into clay soils to prevent waterlogging
- Nutrients: Add 1/2 tbsp balanced fertilizer per sq ft (15g per sq m) before planting
Climate Adaptation
- Hot Regions: Provide afternoon shade when temperatures exceed 90°F (32°C)
- Cold Zones: Plant near south-facing walls for radiant heat in spring
- Containers: Use terracotta pots for breathability in humid climates
Ideal Growing Conditions
Tarragon is a good choice in areas with 6+ hours of sunlight a day for cooler regions, since this increases the essential oil production in the leaves. For hot areas above 90°F (32°C), give the plant afternoon shade to avoid scorching. I place my plants to get morning light, but keep them protected from the afternoon heat under a tree.
Craft the ideal soil base! Combine sandy loam with 2-3 inches of organic compost to establish drainage. Steer clear of heavy clay, which can lead to root rot. Test the pH, too. The ideal pH range is between 6.5 and 7.5. My plants thrived after I added lime to adjust the soil's acidity.
To promote healthy growth, keep the temperatures between 60-75°F (15-24°C) in the herb bed. This is ideal for stimulating rapid leaf production and development. Growth stops at below 50°F, and above 90°F causes heat stress. I also make sure to use shade cloth in the summer during hot weather. I have an inexpensive thermometer next to my herb bed to monitor temperatures.
Keep humidity at 40-60% to avoid fungal diseases. Space plants 18-24 inches apart to allow for adequate airflow. If you're in a humid environment, opt for terra cotta pots over plastic. They breathe better. For mine, I was able to stop the development of mildew once I incorporated this method of ventilation.
Sunlight Exposure
- Cool Climates: Full sun (6+ hours daily) maximizes essential oil production in leaves
- Hot Regions: Morning sun with afternoon shade prevents leaf scorch above 90°F (32°C)
- Indoor Growth: South-facing windows or grow lights for 12-14 hours daily supplement
Soil Composition
- Texture: Sandy loam with 2-3 inches (5-7.6 cm) compost for drainage; avoid heavy clay
- pH Range: 6.5-7.5; add lime if below 6.0 or sulfur if above 7.8 for nutrient uptake
- Nutrient Level: Low fertility preferred; excess nitrogen reduces flavor intensity
Temperature Ranges
- Optimal Growth: 60-75°F (15-24°C) daytime; night temperatures above 50°F (10°C)
- Survival Limits: Withstands brief dips to 20°F (-7°C) when mulched; dies at 10°F (-12°C)
- Heat Stress: Growth stalls above 90°F (32°C); use shade cloth or relocation
Water Management
- Frequency: Deep watering when top 2 inches (5 cm) soil dries; reduce to bi-weekly in cool weather
- Drainage: Required slope or raised beds in heavy soils; root rot occurs in waterlogged conditions
- Signs of Stress: Wilting indicates thirst; yellow leaves signal overwatering
Airflow & Humidity
- Spacing: 18-24 inches (45-60 cm) between plants prevents powdery mildew in humid zones
- Container Tip: Use terra cotta pots for breathability; avoid plastic in >70% humidity
- Ventilation: Oscillating fans indoors reduce fungal risk during winter storage
5 Common Myths
In gardens, tarragon needs constant fertilization for its best growth and flavor.
Ironically, tarragon grows the best flavor under low fertility conditions. Over-fertilizing tarragon, especially with nitrogen fertilizers, will promote more leaf growth with less essential oil concentration. To grow the best tarragon, supply the minimum amount of fertilizer at planting, and then supplement with compost for constant nutrition. This will give you smaller leaves with great aroma and more essential oil concentrations for your cooking, great for applications such as Barnaise sauce which needs concentrated flavor compounds.
You can grow French tarragon from purchased seeds at garden centers or online.
This is biologically not possible, as French tarragon (Artemisia dracunculus var. sativa) produces flowers that are sterile, so viable seeds will never form. What are sold publicly as 'French tarragon seeds' are usually actually Russian tarragon or a lesser substitute. The only way to get true French tarragon is to propagate it through cuttings or root divisions of a true plant, to retain the typical characteristic flavor of anise and growth habit.
Tarragon flourishes in rich, constantly moist soil similar to basil or mint cultivation requirements.
However, unlike moisture-loving herbs, tarragon in wet conditions suffers from root rot due to heavy soils. Its Mediterranean heritage provides it adaptation to well-drained, sandy soils where the water quickly drains. For optimal tarragon health, plant in raised beds or containers that have added grit, and let the top 2 inches of soil dry in between watering to avoid fungal disease and skip flavor dilution.
Tarragon should always have full sun for growth to be successful all day, every day.
Even though tarragon prefers full sun in cooler climates, it will suffer scorching and grow poorly if maximum temperatures exceed 90° F (32C). Crawley regions should provide afternoon shade in the summer. Container plants will especially need protection from intense midday sun because their roots heat up rapidly during intense sun exposure compared to plants growing in-ground. Change the position of container-grown plants on a seasonal basis to help balance the light selection with temperature-induced stress.
Brown stems observed in late autumn mean that the tarragon plant is dead and should be disposed of.
Those brown stems indicate it is naturally dormant, not a dead plant, as it prepares for the winter. This perennial herb means it will go underneath the ground when temperatures get cold and conserve energy in its root system. After a good layer of mulch protection, the tarragon plants will regenerate new green shoots in the spring. It is a waste of time to remove established plants in the fall. Just cut back the dead stems and wait until spring!
Conclusion
Harvesting tarragon can be a low-maintenance reward for any gardener. Its hardiness and strong flavor are enough to make it a must-have in the kitchen. It only takes a little care to have a plentiful harvest of leaves year after year. I find it less finicky than many herbs I grow.
Let's not forget the three care pillars: adequate sunlight, soil that drains well, and seasonal protection. These are all components of success. They need to be modified as temperatures change throughout the year. When I make adjustments to these factors, my plants prosper.
Use those myth-busting insights we covered earlier. Realize you can't start French tarragon from seeds. Appreciate that winter dormancy isn't death. These reminders help you avoid unnecessary frustrations. I wish someone had reminded me of them when I started my herb adventures years ago.
Plan a tarragon bed today. New gardeners can begin with a single container. Experienced gardeners can create divisions. Let fellow gardeners and herb enthusiasts know your progress. I'd enjoy hearing about your dishes featuring your tarragon.
External Sources
Frequently Asked Questions
Why is tarragon difficult to grow successfully?
Tarragon requires precise conditions: well-draining soil, careful watering to prevent root rot, and protection from temperature extremes. Its Mediterranean origins make it sensitive to humidity and poor drainage, while French varieties can't be grown from seeds.
Can tarragon be propagated from cuttings?
Yes, stem cuttings are the primary propagation method for French tarragon since it produces sterile seeds. Take 4-6 inch cuttings in late spring, remove lower leaves, dip in rooting hormone, and plant in moist potting mix at 70-75°F until roots develop.
What plants should never be grown near tarragon?
Avoid planting moisture-loving herbs and vegetables nearby, as they create humidity that encourages fungal diseases. Particularly incompatible plants include:
- Mint (competes aggressively for space and nutrients)
- Basil (requires wetter soil conditions)
- Cucumbers (attract pests that target tarragon)
- Plants needing heavy fertilization (alters soil chemistry)
How do you harvest tarragon without killing the plant?
Harvest in late summer mornings when essential oils peak. Cut stems 4-6 inches from the top using sterilized shears, taking no more than ⅓ of the plant. Leave at least two sets of leaves on each stem to enable regrowth.
Is tarragon toxic to dogs?
While not highly toxic, tarragon contains estragole which can cause digestive issues in dogs. Symptoms of mild toxicity include vomiting or diarrhea. For safety, prevent pets from consuming large quantities and consult a vet if ingestion occurs.
What's the optimal time for planting tarragon?
Plant after the last frost when soil temperatures exceed 50°F (10°C). This typically falls between April and June in most climates. For fall planting, complete at least 8 weeks before first frost to establish roots.
How can I make my tarragon plant bushier?
Encourage bushiness through strategic pruning and proper light management:
- Pinch off stem tips regularly during active growth
- Ensure 6+ hours of sunlight daily for compact growth
- Avoid nitrogen-heavy fertilizers that cause legginess
- Rotate container plants for even light exposure
Does tarragon repel garden pests naturally?
Its strong aroma deters certain insects but attracts others. Effective against:
- Aphids (repelled by volatile oils)
- Spider mites (avoid aromatic leaves)
- Deer (dislike pungent fragrance)
Should I remove tarragon flowers?
Yes, promptly remove flowers to redirect energy toward leaf production. Flowering signals stress from heat or inadequate pruning. Pinch buds as they appear to maintain flavor concentration in leaves and prevent premature dormancy.
How to preserve excess fresh tarragon?
Preserve harvests using these effective methods:
- Air-drying: Bundle stems and hang in dark, dry areas
- Freezing: Chop leaves into oil/water ice cubes
- Infusing: Create tarragon vinegar or oil
- Dehydrating: Use oven or microwave on low heat