
There is nothing that brings down the heart of a gardener more than watching calcium-deficient tomatoes spoil your season. I have tossed countless beautiful fruits only to see a dark sunken area at the blossom end. The sorrow is due to a calcium imbalance - not something related to a pest or disease.
Don't waste time with folk remedies like pouring milk or adding eggshells to your garden or beds. Real solutions require an understanding of plant physiology. We'll discuss three proven methods: correction of soil chemistry, consistency in water management, and thoughtful variety selection. These methods are rooted in science and actually work.
My initiation into the world of tomato disasters revealed to me that calcium moves more slowly and differently than other nutrients in the plant. Calcium is transported in the xylem (the plant's plumbing system) with the movement of water. If there is any disruption in moisture, developing fruit will suffer localized calcium deficiency. This makes blossom end rot and other fruit disorders feasible even in soil tests showing sufficient calcium levels to resolve the disorder.
Symptoms of Calcium Deficiency
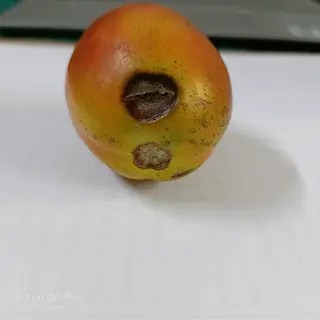
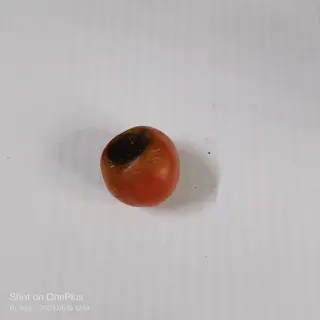
The first indication of an issue manifests as small, water-soaked patches at the blossom end of young tomatoes. The spots darken to a deep brown and feel like rough leather. Within days, they will expand to cover roughly half of the fruit surface.
If you cut open a tomato that's affected, the inside will have some dark decayed tissue. It might just look like surface damage, but it's more likely not. The internal decay provides openings for secondary fungal infections that rot the entire fruit.
Look for signs throughout the plant, not just on the fruits. You'll notice the new leaves turning upward, like little umbrellas. The plant's growth is significantly reduced compared to healthy plants. The stems are brittle. All of these signs indicate that calcium deficiency is affecting the whole plant system.
I found out how to detect early signs the hard way after losing forty tomatoes in one season. Now I check on every fruit every day, especially during peak growth. If I catch the water-soaked stage, I can hopefully do something before permanent damage occurs.
Early Fruit Symptoms
- Initial Appearance: Small water-soaked spots resembling bruises develop exclusively at the blossom end of tomatoes, typically on the first fruits formed during early growing season.
- Progression Pattern: These lesions expand rapidly over 48 hours, turning from light brown to dark brown or black while developing a distinctive sunken appearance.
- Texture Changes: Affected areas become leathery and dry to the touch, contrasting sharply with the smooth skin of healthy tomato fruit nearby.
- Size Development: Spots can grow to cover 30-50% of the fruit surface, often forming concentric rings as they enlarge outward from the blossom end.
- Internal Damage: Cutting reveals discolored, shrunken tissue beneath apparently unaffected skin, showing damage extends beyond surface symptoms.
- Secondary Issues: Opportunistic fungi like Alternaria often colonize damaged tissue, causing additional decay beyond the initial physiological disorder.
Advanced Plant Symptoms
- Leaf Manifestations: Young leaves exhibit upward curling margins and stunted growth, indicating systemic calcium deprivation affecting new plant development.
- Growth Impact: Overall plant growth slows significantly with shorter internodes and reduced flowering as calcium deficiency persists through the season.
- Fruit Cracking: Tomatoes develop radial cracks around the stem end when calcium shortage combines with irregular watering patterns.
- Multiple Fruit Sets: Later fruit clusters show accelerated symptom progression with larger lesions appearing faster than initial occurrences.
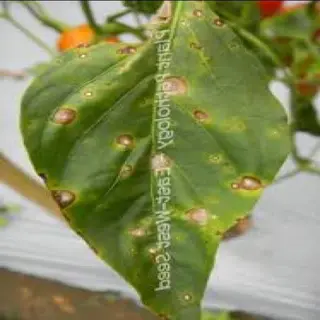
- Pepper/Eggplant Signs: Related plants display similar symptoms but with spots often appearing on fruit sides near blossom ends.
- Root Observations: Limited root development reduces nutrient uptake capacity, exacerbating calcium deficiency symptoms throughout the plant system.
Cross-Plant Symptom Comparison
- Symptom Variation: Pepper fruits show irregular tan lesions rather than concentric rings, often appearing on sides near the blossom end instead of the base.
- Eggplant Signs: Eggplants develop large, sunken brown patches that spread faster than in tomatoes, sometimes covering the entire fruit within a week.
- Cucurbit Vulnerability: Watermelons and squash exhibit leathery, dark brown areas at blossom ends, but with less pronounced sinking compared to tomatoes.
- Timing Differences: Symptoms appear earlier in peppers (within 3 weeks of flowering) than in tomatoes (4-5 weeks), indicating varied calcium demand cycles.
- Internal Damage Scope: Cutting affected peppers reveals internal decay extending upward from the blossom end, unlike tomatoes' localized tissue collapse.
- Secondary Pathogens: All affected plants attract fungi, but eggplants show higher susceptibility to soft rot bacteria invading damaged areas.
Causes of Calcium Imbalance
Variability in moisture is responsible for the majority of cases with calcium-deficient tomatoes. If the soil is dry, the movement of water and calcium is prevented from moving to the developing fruit. Once that interruption of "delivery" happens, if you water heavily, this cannot be remedied later. There will be localized deficiencies in plants during specific periods of rapid growth. Fluctuations in humidity further exacerbate this issue of delivery failure.
The chemistry of the soil creates a competition for nutrients present. When plants are exposed to excess potassium or magnesium, they absorb calcium in areas where it may be deficient. Ammonium fertilizers will acidify the surrounding soil around the roots and block uptake. Alkaline conditions would bind calcium to carbonates. I will pH before planting after I have lost plants due to locked calcium.
When plant roots become damaged, they can have trouble. When soils are shallowly cultivated, important fibrous, feeder roots become severed. If the soil is saturated and waterlogged, the roots are unable to absorb water. Fast-growing tomato varieties require more calcium than the root system can deliver. My Roma plants performed better than my beefsteak plants in high heat.
Extreme environmental changes will disrupt calcium pathways. Root metabolism slows when temperatures drop below 55°F. When temperatures rise above 90°F, fruits begin to grow above the supply of the plant. Wind exposure will increase leaf transpiration and draw moisture away from the fruits. It is important to protect plants from variable weather conditions.
Moisture Fluctuations
- Drought Stress: Extended dry periods reduce water uptake, limiting calcium transport to developing fruits where it's needed most for cell wall formation.
- Waterlogging Impact: Saturated soils suffocate roots, decreasing their ability to absorb available calcium even when soil levels are adequate.
- Irregular Patterns: Alternating dry/wet cycles disrupt steady calcium flow to fruits, causing localized deficiencies during critical growth stages.
- Transpiration Reduction: Low humidity reduces leaf transpiration rates, diminishing the passive water flow that carries calcium to fruit tissues.
Soil Chemistry Factors
- pH Extremes: Acidic soils (pH<6.0) lock calcium in insoluble forms while alkaline soils (pH>7.5) promote calcium binding to carbonates.
- Nutrient Competition: Excess potassium and magnesium ions compete with calcium for root absorption sites, reducing uptake efficiency.
- Ammonium Toxicity: High ammonium-based fertilizers acidify rhizosphere and directly inhibit calcium transport mechanisms in root cells.
- Sodium Accumulation: Saline soils create osmotic stress that hinders passive calcium movement into plant vascular systems.
Plant Physiological Factors
- Rapid Growth Rates: During heat waves, accelerated fruit expansion outpaces calcium delivery capacity, creating temporary deficiencies.
- Root System Damage: Shallow cultivation severs feeder roots, reducing total absorptive surface area for calcium uptake.
- Vascular Limitations: Calcium moves passively with water flow and cannot redistribute from leaves to fruits once deposited.
- Genetic Variability: Some tomato varieties have naturally slower xylem transport rates to developing fruits.
Environmental Stressors
- Temperature Extremes: Soil temperatures below 55°F (13°C) or above 90°F (32°C) reduce root metabolic activity and calcium absorption.
- High Humidity: Reduces transpiration pull, slowing calcium movement to fruits even when soil moisture is abundant.
- Wind Exposure: Increases evapotranspiration from leaves, diverting water flow away from developing fruits.
- Light Intensity: Sudden increases after cloudy periods accelerate fruit growth beyond calcium supply capacity.
Cultural Practice Errors
- Over-Fertilization Impact: Excessive nitrogen application promotes rapid vegetative growth that diverts calcium away from developing fruits.
- Improper Liming: Applying lime without soil testing can overshoot pH targets, locking calcium in unavailable forms.
- Cultivation Timing: Deep hoeing during dry periods damages roots precisely when calcium uptake is most critical.
- Mulch Misapplication: Organic mulches applied too thickly create anaerobic conditions that reduce root function.
Prevention Fundamentals
Begin prevention well before planting. Test soil pH every two years, with a target of 6.5 to 7.0. If the soil is acidic, apply dolomitic lime at a rate of 5 pounds per 100 square feet. If the soil is clay, gypsum is often more effective at a rate of two pounds per acre. Amendments should be made three months before planting.
Water management helps with most calcium-deficient tomatoes. Provide plants with 1 inch of water every week with a drip system. I set automatic timers to begin watering at dawn. For heat waves above 85°F, increase to 1.5 inches of water. Mulching with straw will help stabilize moisture levels.
Treat roots like fragile plumbing systems. Hand weed as close to the stems as six inches. When applying fertilizer, keep it at least six inches away from the main stem of the plant. Place windbreaks when the wind is above fifteen miles per hour. My plants would excel if only I would not disturb them by deep cultivation.
Fertilize smart - 4-12-4 NPK ratios. Use calcium nitrate, ¼ pound, once a month during the fruiting phase. Avoid ammonium-based nitrogen fertilization altogether. I lost a few tomatoes before I discovered this nutrient balance trick.
Soil Preparation
- Testing Frequency: Conduct comprehensive soil tests every 2-3 years to measure calcium levels and pH balance before planting season begins.
- pH Adjustment: Maintain optimal pH range of 6.5-7.0 using dolomitic lime for acidic soils or elemental sulfur for alkaline conditions, applied 3 months pre-planting.
- Calcium Amendment: Incorporate gypsum at 1-2 pounds per 100 square feet in calcium-deficient soils, or bone meal at 5 pounds per 100 square feet for organic gardens.
- Organic Matter: Mix 3-4 inches of compost into topsoil to improve water retention and nutrient availability throughout growing season.
Irrigation Management
- Consistent Schedule: Provide 1 inch (2.5 cm) of water weekly through drip systems or soaker hoses to maintain even soil moisture at root depth.
- Monitoring Technique: Check soil moisture 3 inches deep using finger test - soil should form ball without crumbling when squeezed.
- Drought Response: Increase watering to 1.5 inches during temperatures above 85°F (29°C) while avoiding foliage wetting to prevent disease.
- Rainfall Adjustment: Reduce irrigation by 50% after 0.5 inch rainfall and suspend after 1 inch precipitation events.
Root Zone Protection
- Mulching Method: Apply 3-inch layer of straw or shredded leaves in 12-inch diameter around plants after soil warms to 60°F (16°C).
- Weed Control: Hand-pull weeds within 6 inches of stems; use hoe only for shallow (1-inch deep) cultivation beyond this zone.
- Fertilizer Placement: Side-dress fertilizers 6 inches from stems to prevent root burn, incorporating lightly into topsoil.
- Drainage Improvement: Create raised beds in poorly draining areas to maintain oxygenated root environment critical for calcium uptake.
Fertilization Protocol
- NPK Balance: Use fertilizers with 4-12-4 NPK ratio at planting, avoiding high-nitrogen formulations that promote excessive foliage growth.
- Calcium Sources: Apply calcium nitrate at 1/4 pound per 100 square feet as side-dressing during early fruit development phase.
- Application Timing: Fertilize only when plants show pale green leaves, never during drought conditions or temperature extremes.
- Ammonium Avoidance: Select nitrate-based nitrogen sources instead of ammonium sulfate to prevent rhizosphere acidification.
Environmental Protection
- Windbreaks: Install 50% shade cloth barriers on windward side when sustained winds exceed 15 mph (24 km/h) to reduce evaporation.
- Temperature Control: Use floating row covers during cold snaps below 55°F (13°C) and shade cloth during heat waves above 90°F (32°C).
- Humidity Management: Space plants 24-36 inches apart in humid regions to promote airflow and reduce fungal pressure on compromised tissues.
- Proactive Monitoring: Check soil temperature daily at 4-inch depth using probe thermometer, adjusting practices when readings fall outside 60-85°F (16-29°C) range.
Emergency Treatments
As soon as you see symptoms, mix two tablespoons of calcium chloride per gallon of water. Spray the leaves and fruit to remove any excess. Do this early in the morning when the plant's pores are at their widest. Do not fail to reapply every seven days for three weeks.
When you see lesions on affected tomatoes, cut the fruit from the plant immediately. Cut the fruit one inch above the calyx, using sterilized shears. This will help direct any calcium in the plant to healthy fruit, preserving the harvest. I saved 80 percent of my crop for eight consecutive seasons after implementing this quick procedure.
For application, dilute gypsum at one cup per plant in two gallons of water and drench the soil in the root zone. Do not do this treatment if the soil pH is above 7.2. For growers using organic methods, substitute a plant-based liquid bone meal for the gypsum, applied at a rate of 1/4 cup per gallon.
Never spray when temperatures are above 85°F during mid-day heat. The solution burns or injures leaves when in full sunlight. Never increase concentrations in the hope of achieving fast results. Excess salt will hurt the roots! I learned this from burnt tomato plants.
Foliar Spray Application
- Formula Preparation: Mix 2 tablespoons (30 ml) calcium chloride per 1 gallon (3.8 L) water at room temperature 68°F (20°C) for optimal absorption.
- Application Technique: Spray thoroughly on both leaf surfaces and fruits until runoff, using fine mist nozzle for even coverage without dripping.
- Frequency Protocol: Apply three times at 7-day intervals, preferably early morning when stomata are open for maximum absorption efficiency.
- Safety Precautions: Wear gloves and eye protection; avoid applications in direct sunlight above 85°F (29°C) to prevent leaf scorch damage.
Soil Amendment Boost
- Gypsum Treatment: Apply 1 cup (240 ml) gypsum per plant dissolved in 2 gallons (7.6 L) water as soil drench around root zone perimeter.
- Absorption Timeline: Reapply after 14 days if symptoms persist; visible improvement typically occurs within 5-7 days after initial treatment.
- pH Monitoring: Test soil pH before application; avoid if pH exceeds 7.2 as gypsum doesn't alter alkalinity but improves soil structure.
- Organic Alternative: For immediate organic option, use liquid bone meal at 1/4 cup (60 ml) per gallon following same application method.
Plant Management
- Fruit Removal: Prune affected tomatoes immediately using sterilized shears, cutting 1 inch (2.5 cm) above calyx to redirect calcium to healthy fruit.
- Water Adjustment: Implement daily deep watering for 3 days post-treatment to ensure consistent moisture at 6-inch (15 cm) depth.
- Nutrient Balancing: Suspend all nitrogen fertilization during treatment period to prevent competitive uptake interference with calcium.
- Root Inspection: Gently excavate soil near stem to check for root damage; apply rooting hormone if feeder roots appear compromised.
Environmental Control
- Temperature Regulation: Install 30% shade cloth during heat waves above 90°F (32°C) to reduce transpiration stress on plants.
- Wind Protection: Erect burlap barriers 18 inches (46 cm) high on windward side when winds exceed 10 mph (16 km/h).
- Humidity Management: Mist air around plants (not foliage) during low humidity under 40% to support calcium translocation.
- Recovery Timeline: Maintain modified environment for minimum 10 days after last calcium application for full recovery.
Post-Treatment Monitoring
- Symptom Tracking: Document new fruit development daily; healthy fruit should show no lesions 4 days after treatment initiation.
- Soil Verification: Test soil moisture at 9 AM daily using probe; maintain consistent 40-60% moisture at 4-inch (10 cm) depth.
- Growth Observation: Measure new leaf expansion; normal growth resumes within 5 days if treatment is effective.
- Contingency Plan: If no improvement after 10 days, retest soil pH and calcium levels before considering plant replacement.
Long-Term Solutions
Dolomitic lime is a superior option compared to gypsum when you want to improve acidic soils that require pH management and adjustment. In the autumn application, you would apply five pounds per hundred square feet. In comparison, gypsum can be safely used at a half-rate for heavy clay soils, at two pounds per area, with no pH adjustment. Both of these materials have a three-month activation period before the planting season occurs.
It is advisable to begin applying calcium nitrate two weeks after transplanting. During the fruiting period, use 1/4 pound of calcium nitrate per 100 square feet monthly. Overall, ammonium-based fertilizers should be completely avoided. For example, resistant varieties such as Roma tomatoes manage calcium better than beefsteak tomatoes. Additionally, Mountain Pride provides moderate resistance.
Before transplanting, install your drip irrigation system with 1 gallon of water per plant per day, and place moisture sensors at a depth of 6 inches in the soil. When the soil temperature reaches 60 degrees, apply 3 inches of straw as mulch and refresh it every 8 weeks to maintain consistent soil moisture.
Assess soil pH and calcium every 60 days during growth. I use a log to capture amendments. Treatments should reflect the assessment. This diligent attention prevents calcium deficiency in tomatoes better than any quick fix. Consistency will always prevail over time.
5 Common Myths
Using Epsom salts for tomato plants will help with calcium deficiency problems like blossom end rot.
Epsom salts contain magnesium sulfate to address magnesium deficiency, but they won't provide the tomato plants with calcium. If added in excess, this can create a nutrient imbalance by raising the soil magnesium level, which can compete with calcium uptake, therefore building on deficiencies due to excess magnesium. When correcting for calcium use targeted amendments like gypsum or calcium nitrate instead.
Blossom end rot spreads among plants like disease, and affected specimens must be isolated so that healthy specimens can survive.
Blossom end rot is a physiological disorder that starts with the internal transport of calcium in each plant, so it cannot be "infected" onto other neighbors. It is caused by environmental and cultural requirements like irregular watering and is not caused by pathogens. Removing affected fruit is enough and no plant isolation measure needs to take place.
Crushed eggshells added directly to planting holes provide immediate calcium to tomato plants during critical growth stages.
Eggshells require 6-24 months of soil decomposition to release plant-available calcium ions. Their insoluble calcium carbonate form remains inaccessible to roots during a single growing season. For immediate correction, use water-soluble calcium sources like calcium chloride foliar sprays instead.
Tomatoes are the only garden possibilities that can get blossom end rot from calcium deficiency.
Because peppers, eggplants, zucchini, and watermelon experience the same physiologic disorders associated with calcium imbalance. All of these have vascular limits, where in these plants calcium moves passively with water to developing fruit, and when they spray with water, they are equally subject to moisture inconstancy that can alter calcium delivery.
More fertilizer quantity assists travelers in overcome blossom end rot, by adding calcium to the plant to compensate for deficiencies.
Excess fertilizer salts can dehydrate roots and disrupt osmotic potential between soil moisture and plant root level, making it more difficult for the plant to absorb calcium fertilizer. Quite likely, the major problem is not an absence of calcium, it is a disruption in calcium transport, and the solution is to optimize soil water and pH for better uptake, not merely to increase the quantity of fertilizer.
Conclusion
Prevent blossom end rot by following three non-negotiable strategies. Consistent watering is paramount, at a rate of one inch weekly, through drip systems, or otherwise. Periodically check the soil pH and maintain it between 6.5 and 7.0. It's best to select resistant varieties, such as Roma tomatoes, from the outset.
Please complete these actions in advance of your next planting season. My garden underwent a drastic change when I committed to following these principles. You won't be dealing with rotten bottom tomatoes; instead, you'll receive perfect tomatoes. The science works when applied consistently year after year.
Do you recall your first moment of disappointment when you discovered your fruit was damaged? All of that frustration can be avoided with proper calcium management. You have your answer to harvest perfect tomatoes. Make sure you have your soil test kits and get those irrigation timers ready.
External Sources
Frequently Asked Questions
How do I quickly treat calcium deficiency in tomatoes?
Apply calcium chloride foliar spray immediately when symptoms appear: Mix 2 tablespoons per gallon of water and spray leaves/fruits thoroughly. Reapply every 7 days for 3 weeks while ensuring consistent soil moisture to support absorption.
What fertilizer provides the best calcium for tomatoes?
Calcium nitrate is the most effective fertilizer, applied as side-dressing during fruiting. For organic options, use gypsum or liquid bone meal. Avoid high-nitrogen fertilizers that disrupt calcium uptake. Key application rates:
- Calcium nitrate: ¼ lb per 100 sq ft monthly
- Gypsum: 2 lbs per 100 sq ft for clay soils
- Liquid bone meal: ¼ cup per gallon water
Can milk supply adequate calcium for tomato plants?
While milk contains calcium, it's inefficient for deficiency correction. The calcium in milk isn't readily plant-available and can attract pests. For rapid absorption, use targeted calcium amendments like foliar sprays instead of dairy products.
Does Epsom salt help tomato calcium deficiency?
Epsom salt worsens calcium deficiency despite popular belief. Its magnesium content creates nutrient competition, reducing calcium uptake. For actual calcium issues, use calcium-specific supplements rather than magnesium-based solutions like Epsom salt.
How to naturally increase soil calcium for tomatoes?
Incorporate these organic calcium sources during soil preparation:
- Crushed eggshells (requires 6+ months decomposition)
- Gypsum for immediate availability without pH alteration
- Bone meal at 5 lbs per 100 sq ft
- Dolomitic lime for acidic soils (adjusts pH)
Can too much calcium harm tomato plants?
Excessive calcium causes nutrient lockout by raising soil pH unnaturally. Symptoms include iron/magnesium deficiencies showing as yellow leaves with green veins. Always test soil before amending and maintain pH between 6.5-7.0 for optimal nutrient balance.
Do commercial fertilizers like Miracle-Gro contain calcium?
Most standard formulas lack sufficient calcium. While some specialized blends include it, they often contain high nitrogen which inhibits calcium absorption. For deficiency correction, use dedicated calcium supplements rather than all-purpose fertilizers.
How to identify calcium deficiency in tomatoes?
Look for these specific symptoms:
- Blossom end rot: Dark, sunken spots on fruit bottoms
- Young leaves curling upward with stunted growth
- Fruit cracking near stem ends
- Brown lesions expanding rapidly on developing tomatoes
What's the optimal timing for calcium applications?
Apply foliar sprays early morning when stomata are open. Soil amendments should be added:
- Lime/gypsum: Fall before spring planting
- Calcium nitrate: 2 weeks after transplanting
- Foliar sprays: At first fruit set and symptom appearance
- Maintenance doses: Every 60 days during growing season
Why aren't crushed eggshells fixing my tomato calcium issues?
Eggshells decompose too slowly for immediate correction. Their calcium carbonate requires 6-24 months to become plant-available. For active deficiency, use fast-acting solutions like calcium chloride sprays while reserving eggshells for long-term soil enrichment.