
Knowing how to store seeds correctly will save you money and make sure your garden flourishes next year. Often, gardeners find leftover packets and lose their ability to germinate. You may even put all your effort into planting your favorite tomatoes, only to find that half the seeds didn't work. That agony ends here with better, smarter storage.
I have been a gardener for over twenty years and have observed seeds rebound beautifully when properly cared for. Small spaces, such as an urban balcony or backyard plot, usually produce extra seeds. Those little gems deserve to be kept safe. We will discuss five essential practices to keep them strong, without going into too many specifics.
Ideal Storage Locations in Your Home
The right place for seed storage starts with humidity control. Basements typically have a relative humidity of under 40% and are considered ideal for dry conditions. Bathrooms are often over 60% RH and have the potential for mold that can ruin seeds. I learned that the hard way after destroying some prized pepper seeds due to moisture in the bathroom many years ago.
Temperature stability is equally important as well. North-facing rooms have a fairly stable temperature range of 50-70°F (10-21°C) and suitable humidity levels throughout the year. Do not transfer seeds from freezer storage directly to room temperature. Temperature shock can cause dangerous condensation to develop inside containers. When harvesting frozen seeds, toast them slowly in a refrigerator first.
Cabinets in kitchens near ovens or windows create heat spikes. Try interior closets or pantry shelves that don't receive sunlight and won't fluctuate in temperature. Use a simple thermometer-hygrometer combo tool in the chosen area to see the difference stable conditions make.
Organizing Your Seed Collection
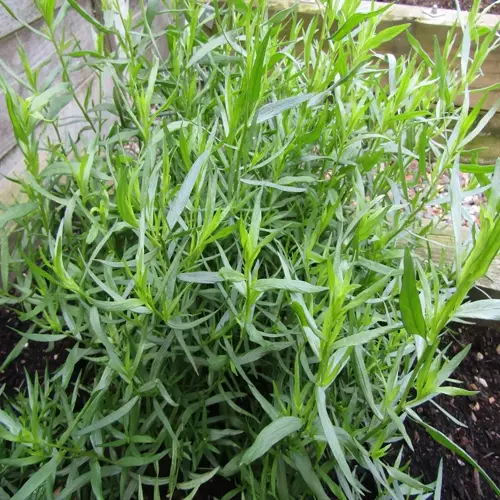
Arranging seeds by lifespan prevents short-lived species, such as onions and parsley, from being planted last. These nuggets lose viability within 1-2 years, so put them right at the front of your storage. I do mine every January- learned from history with old carrots.
Use colored labels to create visual cues that correspond to different seasons. Blue = cool-season peas and spinach; red = warm-season tomatoes and peppers. Then, as planting windows open, you have the proper seeds right away. My spring planting is a lot quicker now that I did color-coding.
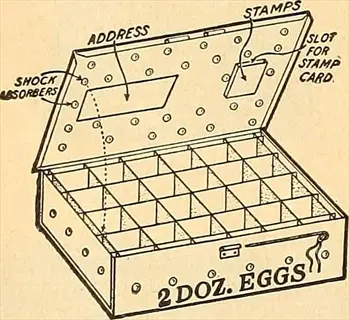
Utilize cramped quarters by flattening seed packets in a photo storage box or card catalog. Standing them up in a vertical manner, like files, lets you see every varietal all together. That's how I reclaimed half my garden shelf space in the process, putting all my beans and lettuces together.
Organize your seeds by size to aid in garden planning. Keep compact radishes and bush beans together for small garden beds; use separate areas for vining cucumbers and melons. This tip saved me hours of work in laying out my raised beds the previous year.
By Longevity
- Short-lived seeds (1-2 years): Onions, parsley, parsnips - store near front
- Intermediate seeds (3-4 years): Beans, carrots, tomatoes - middle section
- Long-lived seeds (5+ years): Cucumbers, lettuce, radishes - back section
By Plant Type
- Leafy greens: Lettuce, kale, spinach - all salad components together
- Root vegetables: Carrots, beets, radishes - similar soil requirements
- Fruiting plants: Tomatoes, peppers, squash - need full sun grouping
By Growing Season
- Cool season crops: Peas, spinach, broccoli - plant early spring/late fall
- Warm season crops: Beans, corn, cucumbers - plant after last frost
- Hot season crops: Okra, sweet potatoes - plant in peak summer heat
By Space Efficiency
- Compact plants: Radishes, bush beans - group for small garden beds
- Vertical growers: Pole beans, peas - store near trellis supplies
- Spreading vines: Pumpkins, melons - separate for large-space needs
By Pest Resistance
- Insect-resistant varieties: Marigolds, garlic - store as natural pest controls
- Disease-resistant types: Hybrid tomatoes - keep separate for problem areas
- Deer-resistant selections: Lavender, sage - group for vulnerable garden edges
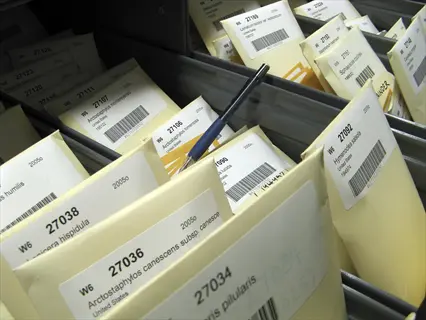
Card Catalog Boxes
- Capacity: Holds 50-100 standard seed packets vertically
- Organization: Use dividers for seasons or plant types
- Portability: Easy to carry to garden; fits under beds
- Best for: Small to medium collections; visual organizers
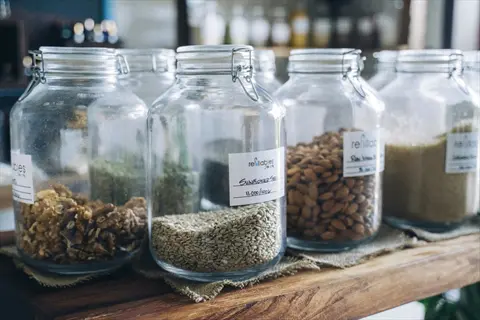
Mason Jar Systems
- Capacity: 1-quart jar holds 15-20 seed packets
- Organization: Group by theme (salsa garden, salad greens)
- Preservation: Airtight seal keeps moisture out
- Best for: Long-term storage; moisture-prone climates
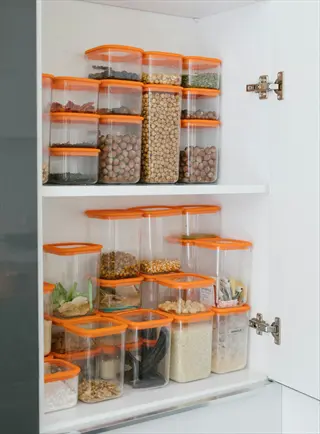
Plastic Storage Cases
- Capacity: Stackable cases hold 30-50 packets per tray
- Organization: Clear lids show contents; color-coded bins
- Durability: Weather-resistant for garage/shed storage
- Best for: Large collections; humid environments
Binder Systems
- Capacity: 3-ring binder holds 20-30 pages of seeds
- Organization: Sheet protectors with labeled pockets
- Accessibility: Flip-through design for quick reference
- Best for: Small-space dwellers; urban gardeners
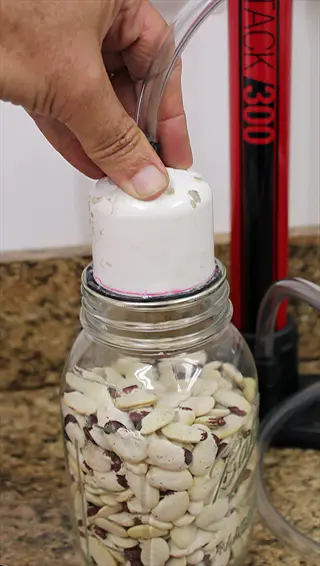
Vacuum-Sealed Bags
- Capacity: Customizable sizes from 4x6 to 8x10 inches
- Organization: Label bags with planting dates/varieties
- Preservation: Removes air to prevent oxidation damage
- Best for: Rare seeds; decade-long preservation
Preparing Seeds and Choosing Containers
Seed preparation begins with good drying. Check moisture content using the snap test. Take a seed and bend it. If it snaps clean like a dry twig, it is ready. I learned this from personal experience. Many years ago, I lost basil seeds to mold because I didn't properly dry them first.
Be cautious while selecting containers. Glass jars prevent moisture entry but are fragile. Metal tins are pest-resistant but allow for temperature change. Plastic boxes are easy, lightweight, and cheap, but leach chemicals. For my heirloom seeds, I always use dark glass mason jars with tight seals.
Desiccants are a game-changer. For long-term storage, silica gel is the best option. For quarter storage, I used powdered milk in a cloth pouch, which will absorb moisture for 6 months. For the most economical option, dry rice is a good choice that only needs to be replaced every month. I actually saved silica packets from shoe boxes and use them.
Don't ever forget thorough labeling. Label each container with the harvest date, variety, and source. My 2023 tomato seeds are still germinating because I logged that I needed to allow extra time for drying. This easy rule of thumb will prevent mistakes in your future plantings.
Screen Drying
- Process: Spread seeds thinly on mesh screens allowing airflow from all sides
- Duration: 1-3 weeks depending on seed size and humidity
- Best for: Large seeds like beans and squash
- Tip: Use fan circulation to accelerate drying in humid climates
Paper Towel Method
- Process: Layer seeds between absorbent paper towels; replace daily
- Duration: 3-7 days for small seeds like lettuce or carrots
- Best for: Seeds with high initial moisture content
- Tip: Avoid direct sunlight which may trigger premature germination
Hanging in Bags
- Process: Place seed heads in breathable cotton bags; hang in dry area
- Duration: 2-4 weeks for flower seeds like marigolds
- Best for: Seed pods that shatter easily when dry
- Tip: Shake bags daily to separate seeds from chaff
Silica Gel Desiccation
- Process: Bury seeds in silica gel crystals in airtight container
- Duration: 24-48 hours to reach optimal 8% moisture content
- Best for: Long-term storage; rare seeds
- Warning: Over-drying can damage seed embryos; monitor closely
Oven Drying (Low Heat)
- Process: Spread seeds on baking sheet at 95°F (35°C) with door ajar
- Duration: 4-8 hours with frequent stirring
- Best for: Emergency drying in humid regions
- Caution: Temperatures above 100°F (38°C) kill seed viability
The Golden Rules of Seed Storage
For seeds to be successfully stored, cool, dry, and dark conditions must work in concert. Disregard one rule, and the others are compromised. I found this out the hard way when I stored my seeds in a cool basement, and they still molded since the humidity crept over 60%. All three elements protect seeds in an equal manner.
Maintain consistent temperatures within a 10°F (5.5°C) range. Fluctuations lead to condensation, which can result in mold or early sprouting. For me, the most successful were north-facing closets at 50-60°F (10-15°C) year-round, with no daily temperature spikes.
Strictly monitor humidity. Desiccants (silica gel) will help. Maintain storage areas below 40% relative humidity.At higher levels, enzymes activate to break down the seeds. I use a hygrometer to check mine at least once a month. This care preserved my lettuce seeds for five seasons.
The duration of light exposure is more damaging to seeds than intensity. Even if exposure is brief for part of a day, it can be damaging when it adds up over months. An opaque container, not transparent, should be used. My seeds lasted twice as long once I switched from glass jars to metal tins, shielding them from all light.
Cool Conditions
- Ideal range: 32-41°F (0-5°C) for long-term preservation
- Acceptable range: Up to 70°F (21°C) for 1-2 year storage
- Critical note: Avoid locations with >10°F (5.5°C) daily temperature swings
- Why: Heat accelerates seed aging enzymes; consistency prevents condensation
Dry Environment
- Optimal humidity: Below 40% relative humidity (RH)
- Danger zone: >60% RH risks mold and premature germination
- Moisture content: Seeds must be dried to 8-10% before storage
- Why: Water activates metabolic processes ending dormancy
Dark Storage
- Light exposure: Zero direct sunlight; minimal artificial light
- Container solution: Use opaque or light-blocking containers
- Duration impact: Even brief light exposure accumulates damage
- Why: Light triggers phytochrome responses initiating germination
Consistent Conditions
- Stability requirement: <10°F (5.5°C) temperature variation
- Humidity stability: Maintain <10% RH fluctuation
- Location strategy: Choose naturally stable areas (interior walls)
- Why: Fluctuations cause repeated condensation/evaporation cycles
Pest Prevention
- Sealing requirement: Airtight containers block insects/rodents
- Natural deterrents: Add bay leaves or diatomaceous earth to storage
- Inspection: Check seeds monthly for signs of infestation
- Why: Pests destroy entire collections in weeks if undetected
Testing Viability and Understanding Longevity
Perform germination tests before planting. Take 10 seeds and place them on a wet paper towel, then put them into a sealed bag. Hold at 70-85°F (21-29°C) for 7-14 days. I learned this after wasting a whole garden space because I planted a bunch of seeds that were no longer alive one spring.
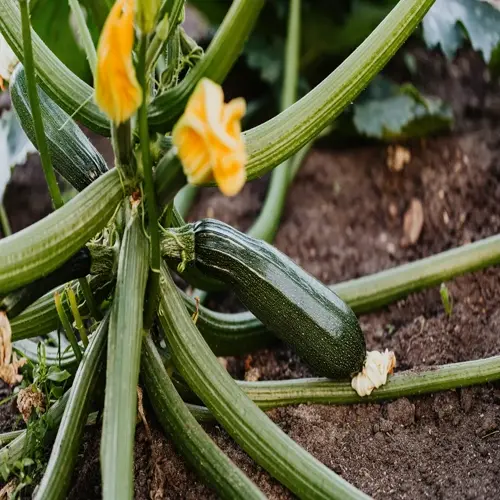
Calculating germination rate is simple. Divide the number of sprouted seeds by the total number you have tested and multiply by 100. Seven sprouted out of ten seeds, resulting in a 70% viability rate. If over 50% this should probably be replaced or planted more. My zucchini seeds showed 60% last year, so I planted more than I needed.
Be aware of your seeds' longevity categories. Onions and parsley typically last only 1-2 years, while cucumbers and lettuce can last for 5 years or more. Tomatoes fall in the middle 3-4 year category. I plan my planting in each season by prioritizing short-lived carrots first, and long-lived beans last.
Storage conditions supersede natural duration. Storing seeds in a cool, dry place can double their lifespan. My broccoli seeds lasted five years instead of the usual three, because I sealed them in airtight jars with silica gel. Bad storage shortcuts even the longest-lived types in no time.
Preparation
- Materials needed: 10 seeds of one variety, damp paper towel, plastic bag
- Conditions: Maintain 70-85°F (21-29°C) warm location
- Timing: Best done 2-3 months before planting season
- Purpose: Determines actual viability percentage for planting
Setup
- Step 1: Arrange seeds on damp paper towel without overlapping
- Step 2: Roll towel loosely and place in sealed plastic bag
- Step 3: Label bag with seed variety and start date
- Step 4: Store in dark, warm spot like a cupboard
Monitoring
- Check daily: Ensure towel remains damp but not soaked
- First inspection: Look for sprouts after 5-7 days
- Final count: Record sprouted seeds after 10-14 days
- Discard: Remove moldy seeds immediately
Calculation
- Formula: (Number sprouted ÷ 10) x 100 = Germination %
- Example: 7 sprouts = 70% germination rate
- Adjustment: For large seeds like beans, use 5 seeds instead
- Interpretation: <50% = replace seeds; 50-70% = plant extra
Transplanting Sprouts
- When: Only if sprouts are healthy and growing conditions are ideal
- Method: Carefully plant germinated seeds in seed-starting mix
- Success rate: Higher for large-seeded plants like beans and squash
- Caution: Fragile roots can break easily during transplantation
5 Common Myths
When you freeze seeds, you certainly destroy the seeds' capacity for germination, and you can never use the seeds for planting again.
Freezing seeds, when it's done right, preserves dry seeds and stops metabolic activity. In order to freeze seeds, a seed must be dried until it is 8-10% moisture content and then it must be frozen to 0ºF (-18C) in tight containers to stop metabolic activity. This is very similar to what happens in winter for dormant seeds; the process extends the seeds' viability for many decades and keeps them from damage in cold temperatures, as demonstrated with rare species in seed banks.
As long as they remain in their original paper packets and are stored in a regular drawer, seeds can actually last indefinitely.
All seeds will inevitably lose viability as a result of cellular respiration and the degradation of enzymes; this will happen under the best conditions imaginable. Paper packets provide no protection against humidity changes or insect infestations, meaning they could deteriorate relatively quickly. To realistically prolong the life of seeds, they should be transferred to an airtight container with desiccants and stored at stable temperatures below 70° F (21C).
Purchasing costly refrigeration units and vacuum sealers is critical for fulfilling proper seed storage conditions.
Establishing proper storage relies upon fundamental principles rather than an array of costly equipment. Simple household items, such as mason jars, used with silica gel packets, are effective in keeping the contents dry. Storing seeds in a cool tree or basement, in a closet, can indeed induce stable temperatures. Vacuum sealing adds minor benefits, but it is not required as proper 'time vacuuming' tub containers will keep moisture out and prevent damage from exposure to oxygen at very little expense.
All seeds need to be stored under the same conditions no matter the plant type or where the seeds were originally collected.
Seeds have specific biological requirements based on evolutionary adaptations. For instance, tropical seeds such as tomatoes can withstand warmer storage conditions, while alpine species thrive in cooler storage conditions. Some seeds are short-lived, such as onions, and are not ideal for long-term use, while other seeds, such as lettuce, are long-lived and can withstand storage longer than other seeds. Having specific storing conditions based on seed type serves to prevent seeds from becoming viable before appropriate use.
Testing seed viability requires elaborate procedures with laboratory testing for equipment not available to gardeners.
A simple germination test with readily available items can accurately assess seed viability without any special tools. You can collect ten seeds and put them in a damp paper towel inside of a sealed plastic bag. Keep the sample at 70-85F (21-29C) for 7-14 days, then calculate the percentage of seeds that sprouted to determine a reasonable planting density to assess seed quality. A practical approach for all gardeners to assess seed viability.
Conclusion
Storing seeds properly saves money and promotes plant diversity, which is important for future generations to enjoy. Each seed packet stored correctly means no need to buy new varieties of seeds every spring. For example, I added heirloom beans to my collection once a year over the course of eight years. Doing this saved me some money, and I was able to decrease half of my gardening expenses.
Your storage habits are the key to successful gardening. Seeds stored in a cool, dry environment will produce a stronger plant and yield better results. The proof - I doubled my tomato harvest when I improved the temperature and moisture. Try one thing today and add silica packets to your containers.
Implement one technique now. It can be as simple as drying your seeds effectively before storage or using non-transparent containers. Small changes lead to great outcomes over time. The first action I took was writing down the harvest date on the jars, which changed my method of seed organization in just a few weeks!
Visualize flourishing gardens grown completely from seeds that you saved. Visualize succulent tomatoes and crunchy heads of lettuce, all from varieties you've stored. That future starts with what you do now. My garden feeds my family through the seasons, and I know that will be a result of these storage methods.
External Sources
Frequently Asked Questions
Is refrigerator storage effective for seeds?
Refrigeration works well for properly dried seeds when stored in airtight containers. It extends viability by slowing metabolic activity, but seeds must first reach 8-10% moisture content. Avoid refrigeration for humid climates unless using desiccants.
Do seeds require airtight containers?
Yes, airtight containers prevent moisture intrusion and oxygen exposure that degrade seeds. Essential options include:
- Mason jars with tight-sealing lids
- Vacuum-sealed bags with oxygen absorbers
- Metal tins with rubber gaskets
- Plastic containers rated for freezer storage
How long do seeds last in mason jars?
With proper drying and storage conditions, seeds in mason jars remain viable for 3-10 years. Lifespan depends on:
- Seed type (long-lived vs short-lived varieties)
- Consistent cool temperatures below 70°F
- Humidity maintained under 40%
- Complete darkness during storage
Are plastic or paper bags better for seed storage?
Plastic bags outperform paper for long-term storage when made airtight. Paper envelopes permit humidity damage and pest access, requiring secondary containers. Use freezer-grade plastic bags with desiccant packets for reliable protection against moisture and oxidation.
Can Ziploc bags preserve seeds effectively?
Freezer-grade Ziploc bags work temporarily if supplemented with desiccant packets. They block light and reduce air exposure but aren't fully airtight for decades-long storage. Monitor regularly for condensation and replace bags annually for best results.
Which seeds have the shortest storage life?
Short-lived seeds lose viability rapidly and include:
- Onions and parsley (1-2 years max)
- Carrots and parsnips (decline after 18 months)
- Delicate flowers like larkspur
- Seeds with high oil content like walnuts
Why does seed saving face legal restrictions?
Patented hybrid seeds are legally protected to prevent unauthorized propagation. Heirloom and open-pollinated varieties generally have no restrictions. Always verify seed type before saving to comply with plant variety protection laws.
What temperature destroys seed viability?
Temperatures above 100°F (38°C) rapidly degrade seeds by denaturing proteins. Even brief exposure during drying or storage causes irreversible damage. Maintain storage below 70°F for longevity, using basements or climate-controlled spaces.
Does refrigeration improve germination rates?
Refrigeration preserves viability but doesn't directly enhance germination. Some seeds like lettuce require cold stratification to break dormancy. For most varieties, germination success depends on post-storage conditions like soil temperature and moisture during planting.
How do I test if seeds are still good?
Conduct a germination test:
- Place 10 seeds on a damp paper towel
- Seal in plastic bag for 7-14 days at 70-85°F
- Calculate sprout percentage
- Discard if under 50% viability