

Getting drainage correct in raised beds prevents root rot before it starts happening. Without good drainage, the water suffocates plant roots and washes away the nutrients your vegetables need. I have seen beds fail from neglecting this important detail. Healthy plants need oxygen in their root zone. Drainage allows air pockets in the soil, enabling the roots to breathe and access essential nutrients.
These drainage solutions work whether your beds are made of wood, metal, or plastic. They are suitable for both small herb boxes and large vegetable gardens. We discuss eight basic fixes, including slope engineering and spacing holes. Proper drainage helps prevent soils from hardening up and becoming compacted. Your plants develop more vigorous roots and yield better produce.
Testing Drainage Efficiency
Utilize the trench test to evaluate your soil drainage. Dig a hole that is ten inches (25 centimeters) deep. Fill it with water and time how long it takes to drain completely. This simple test will show whether your soil holds too much water. This is what I have used for years to evaluate drainage problems before the planting season starts.
The 10-hour drainage marker exists because the roots need oxygen. If the water stands longer than 10 hours, the roots die and rot. This time is based on agricultural research of the rates of respiration of plants. The more rapid drainage has the effect of preventing the development of the anaerobic condition that is fatal to beneficial soil bacteria.
While moisture meters provide immediate readings, manual checks offer more. The meter does not show depths of moisture but presents surface moisture conditions. The measurements taken by the trench test tell you the actual moisture movement through the beds. My suggestion is that new beds should be tested manually. Still, the moisture meter should be employed for readings to see moisture movement in the older, established gardens.
If your trench test is unsuccessful, use coarse sand for clay soils. For sandy soils that are too well-drained, topdress turf with compost to help retain growing moisture. Install French drains around the edge of the bed if water tends to stand. These corrections address specific areas identified as needing corrective action in the test.
Site Preparation
- Select a representative area in your raised bed away from edges
- Clear surface debris to ensure accurate hole depth measurement
- Use standard garden tools: shovel, measuring tape, and timer
Excavation Standards
- Dig hole measuring 10 inches deep by 12 inches wide (25x30 cm)
- Maintain vertical walls to prevent soil collapse during testing
- Record soil texture observations at different depth layers
Water Infiltration Test
- Fill hole completely with water using calibrated container
- Start timer immediately when water reaches ground level
- Measure drainage rate at 60-minute intervals for precision
Result Interpretation
- Optimal drainage: Complete emptying within 4-10 hours
- Moderate issues: 10-24 hours requires soil amendments
- Severe problems: Over 24 hours needs structural interventions
Troubleshooting Common Issues
- For clay soils: Add 20% coarse sand if drainage exceeds 10 hours
- In compacted beds: Aerate with broadfork before retesting
- During drought: Pre-moisten soil to simulate normal conditions
Material Impact on Drainage
Wood naturally absorbs and releases moisture through its grain. Cedar and redwood contain rootlets between the fibers, which allow moisture to escape, working in conjunction with the natural drainage system of the wood and preventing waterlogging without the need for extra drainage holes. I have seen many wooden beds last for years if the owner allows their drainage to work out naturally.
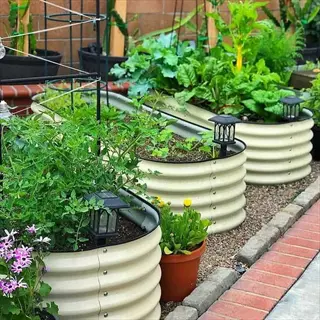
Drilled holes are essential for metal beds, as natural drainage is impeded by stagnation caused by rust. The rust that forms on galvanized steel seals holes as it produces. Due to thorough drainage, ½-inch drilled holes should be placed every 12 inches in the jungles and inspected in the spring, fall, and winter for potential clogging.
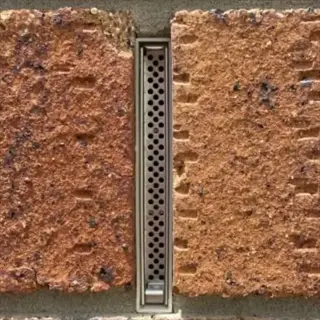
Mortar gaps in stone and brick beds are prerequisites. If there are no openings in the mortar, water will be trapped behind the walls, resulting in structural damage. Leave 1-inch openings in the mortar every third course for drainage. This simple precaution will save expensive repairs later on.
Plastic beds struggle to tolerate temperature extremes. Because heat in summer causes them to expand, they develop micro-cracks, which help with drainage. The cold in winter makes them brittle, which reduces drainage. Use UV-stabilized plastic and additional holes for reliability throughout the year.
Wood Bed Enhancement
- Install horizontal gaps between boards measuring 1 inch (2.5 cm)
- Add gravel-filled drainage trenches along interior bed perimeter
- Use wood preservatives that don't clog natural grain pathways
- Layer landscape fabric behind boards to contain soil while permitting drainage
Metal Bed Modification
- Drill ½-inch diameter holes every 12 inches (30 cm) along base
- Apply rust-converter primer to raw edges after drilling
- Install geotextile-lined gravel channels beneath bed corners
- Use rubber grommets in holes to prevent soil erosion
Masonry Drainage Systems
- Create 1-inch (2.5 cm) mortar gaps every third brick course
- Install perforated drainage pipes behind lower wall sections
- Backfill with 4 inches (10 cm) of crushed granite behind walls
- Position weep holes directly above gravel drainage layers
Plastic Bed Optimization
- Clear factory drainage slots monthly during growing season
- Add supplemental holes using hole saw where water pools
- Elevate beds 2 inches (5 cm) on gravel-filled drainage trays
- Install mesh screens under pre-molded drainage slots
Composite Adjustments
- Drill extra drainage holes along bottom seam where panels join
- Apply silicone sealant to prevent swelling at connection points
- Install interior corner drainage columns filled with coarse gravel
- Use breathable ground cloth instead of solid plastic liners
Natural Wood
- Cedar and redwood contain natural tannins that resist water absorption
- Air circulates between wood grain patterns creating passive drainage
- Requires minimum 1 inch (2.5 cm) gaps between boards for airflow
- Avoid treated lumber containing copper compounds that hinder drainage
Galvanized Metal
- Aluzinc coating prevents rust but blocks natural drainage pathways
- Essential to drill ½-inch holes every 12 inches (30 cm) along base
- Corrosion risk increases drainage efficiency over time as holes enlarge
- Metal conducts heat accelerating evaporation in summer months
Stone/Brick Masonry
- Mortar must include drainage gaps every 18 inches (45 cm)
- Capillary action draws moisture through porous stone materials
- Requires 4-inch (10 cm) gravel backfill behind walls for drainage
- Weeps holes should align with gravel layer for water escape
Recycled Plastic
- Pre-molded drainage slots prevent soil loss better than drilled holes
- UV-stabilized versions maintain drainage efficiency for 10+ years
- Thermal expansion creates micro-drainage channels in summer heat
- Avoid non-porous types that cause water pooling in corners
Composite Timber
- Wood-plastic blend requires 50% more drainage holes than natural wood
- Material swelling in rain reduces drainage efficiency over time
- Best for moderate climates without freeze-thaw cycle damage
- Hollow core designs provide internal drainage pathways
Hard-Surface Bed Strategies
Concrete surfaces require gravel backfill under your bed. Place crushed stone 2-4 inches deep to open the area for drainage and stop capillary action. Pavers require joint sand between the rocks that is permeable, allowing water to escape through it. I use polymeric sand, which hardens and provides drainage.
The type of soil you have determines how deep your drainage layer should be. Heavy clays require 4-6 inches of gravel while sandy soils require only 1-2 inches of gravel. Before you start construction, it's a good idea to examine the composition of your native soil. This way, if we have heavy rains, we will not get any flooding underneath the bed.
Select a geotextile that is both root-blocking and water-permeable. The best for paving is non-woven polypropylene. It will prevent roots from damaging pavers and allow moisture to drain. I've seen beds fail when cheap landscape fabric was clogged.
The needed vegetable depth varies greatly. Lettuce flourishes in 6 inches of soil, but a tomato needs 18 inches. If you plan to grow root crops like carrots, you will need to provide a soil depth of at least 24 inches. For optimal drainage and plant growth, it is essential to match the soil volume to the plant's root system.
Concrete Base Preparation
- Pressure wash surface to remove debris and improve adhesion
- Apply liquid membrane to prevent alkaline leaching into soil
- Install 2-inch (5 cm) gravel layer for thermal insulation
- Position drainage pipes at 1% slope toward runoff areas
Paver/Patio Surfaces
- Fill joints between pavers with permeable polymeric sand
- Create drainage channels using spacer pegs every 24 inches (60 cm)
- Elevate bed frame ½-inch (1.25 cm) above surface using shims
- Apply root barrier fabric to prevent paver displacement
Asphalt/Tarmac Adjustment
- Install reflective foil layer to reduce heat absorption
- Drill ¾-inch (2 cm) drainage holes through bed bottom every 16 inches (40 cm)
- Add 3-inch (7.5 cm) perlite layer for moisture regulation
- Use rubber matting to prevent bitumen contamination
Balcony/Rooftop Solutions
- Verify weight capacity (minimum 50 lb/sq ft or 244 kg/m²)
- Install waterproof tray with 1-inch (2.5 cm) reservoir depth
- Use lightweight soil mix: 40% coconut coir, 30% perlite, 30% compost
- Include overflow pipes connected to building drainage
Sloped Surface Adaptation
- Build terraced beds with maximum 10-degree incline per tier
- Anchor beds using concrete footings for slopes over 15 degrees
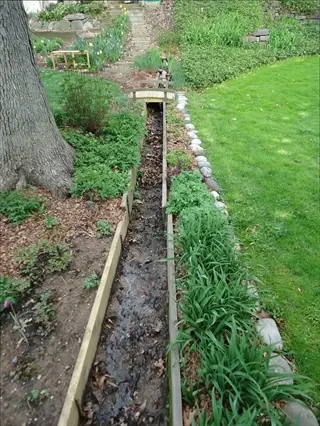
- Install French drain system parallel to contour lines
- Use erosion-control fabric beneath gravel drainage layer
Creating Drainage Solutions
Calculate the slope based on the length of your bed. For beds under 4 feet, there should be a total drop of approximately 0.5 inches from one end to the other. For beds longer than 4 feet, allow for a drop of 1 to 2 inches for every 4 feet. I use a laser level for precision, but a simple string level works great for smaller projects.
The spacing of the holes is entirely dependent on your type of soil. In heavy clay, place ½-inch holes 12 inches apart. Sandy soil can be spaced 18 inches apart. The holes should be slanted 15 degrees downward towards the center of the valley, so that the rain will not wash the soil out but will drain away through the construction of the valleys.
The layering of soil differs between annual plants and perennials. For annuals, mix the compost through the top 12 inches of soil. For perennials, deep layers are required, with coarse branches at the bottom of the soil bed to provide aeration over a long period. The thick bed of soil will not compact when it is used for several seasons.
Root depth impacts your minimum soil requirements. Shallow herbs, such as basil, require 6-8 inches of soil; tomatoes, on the other hand, need 18 inches to allow for strong root development. Deep-rooted carrots and potatoes need a 24-inch depth. Choose plants that your bed can accommodate.
Slope Engineering
- Calculate 2% slope: 0.24 inch drop per linear foot (2 cm per meter)
- Use laser level for precision on beds longer than 8 feet (2.4 m)
- Create crown slopes (center high) for wide beds over 4 feet (1.2 m)
- Install French drains along slope base for heavy clay soils
Drainage Hole Drilling
- Space ½-inch (1.25 cm) holes every 12 inches (30 cm) for clay soils
- Increase spacing to 18 inches (45 cm) for sandy soil compositions
- Angle holes downward at 15 degrees to prevent soil washout
- Install mesh screens behind holes to contain soil particles
Strategic Layering
- Base layer: 6 inches (15 cm) of coarse branches for aeration
- Middle layer: 4 inches (10 cm) compost for nutrient retention
- Top layer: 12+ inches (30+ cm) soil mix for root development
- Separate layers with permeable landscape fabric
Depth Optimization
- Shallow beds: 12 inches (30 cm) for lettuce/herbs like basil
- Medium beds: 18 inches (45 cm) for tomatoes/peppers
- Deep beds: 24+ inches (60+ cm) for carrots/potatoes
- Increase depth by 20% for compacted soil conditions
Integrated Systems
- Connect bed drainage to rain barrel collection systems
- Install overflow pipes with 2-inch (5 cm) diameter minimum
- Use sump pumps for below-grade installations
- Combine French drains with dry creek bed aesthetics
Perfect Soil Mix Formula
Plant types demand specific soil ratios. Vegetables need 60% topsoil, 30% compost, and 10% drainage amendments. Herbs thrive in a mixture of 50% sandy soil, 40% compost, and 10% perlite. Root crops require extra depth with 50% soil, 30% sand, 20% organic matter.
Clay and sandy soils require opposite amendments. For heavy clay, add 40% volume of coarse sand to break its density. Sandy soils should be amended with coconut coir at a rate of 30% to retain moisture. Both require compost to be added for optimal nutrient balance.
Acidic soils respond to crushed eggshells at a rate of 1 cup per sq ft. Each cup of shells is pounded to dust. Alkaline soils use either pine needles or coffee grounds. Check the pH about once a month, as plants absorb nutrients most efficiently within ranges suitable for them.
To balance moisture and drainage, apply layered amendments. Perlite creates air pockets to provide drainage, while vermiculite retains moisture. In wet areas, a 20% perlite mix is recommended, and in dry regions, a 20% vermiculite mix is suggested. Monitor soil moisture after heavy rains to make proportionate adjustments.
Base Topsoil
- Provides mineral content and soil structure foundation
- Use screened topsoil free of weeds and contaminants
- Ideal composition: 45-50% sand, 25-30% silt, 20-30% clay
- Pasteurize at 180°F (82°C) to eliminate pathogens
Organic Matter
- Compost: Enhances nutrient retention and microbial activity
- Well-rotted manure: Provides slow-release nitrogen
- Coconut coir: Improves water retention in sandy soils
- Leaf mold: Increases cation exchange capacity
Drainage Amendments
- Perlite: Volcanic glass that aerates without decomposing
- Coarse sand: Improves drainage in heavy clay soils
- Vermiculite: Retains moisture while preventing compaction
- Rice hulls: Sustainable alternative to perlite
Nutrient Boosters
- Bone meal: Slow-release phosphorus source
- Kelp meal: Provides trace minerals and growth hormones
- Biochar: Enhances nutrient retention long-term
- Rock dust: Replenishes micronutrients
pH Regulators
- Agricultural lime: Raises pH in acidic soils
- Sulfur pellets: Lowers pH in alkaline conditions
- Pine needles: Natural acidifier for blueberries
- Wood ash: Quick pH boost with potassium content
5 Common Myths
Adding gravel layers at the bottom of raised beds improves drainage and prevents waterlogging in plant roots.
Gravel creates a perched water table that traps moisture above it due to the hydraulic conductivity difference between soil textures. This phenomenon forces water to accumulate in the soil layer directly above the gravel, increasing saturation precisely where roots grow. Instead, use uniform soil composition throughout the bed depth and ensure proper drainage holes to allow consistent water movement without creating problematic saturation zones that promote root rot.
Wood chips incorporated into garden beds will always deplete nitrogen levels and starve plants of essential nutrients.
While fresh wood chips temporarily immobilize nitrogen during decomposition, this effect is restricted to the immediate decomposition zone and doesn't significantly impact established plants. When used as a surface mulch rather than mixed into soil, wood chips conserve moisture, regulate temperature, and gradually release nutrients without nitrogen depletion. For direct soil incorporation, use aged chips or supplement with nitrogen-rich amendments to maintain balanced fertility for healthy plant growth.
Drainage holes are optional considerations in the garden-bed construction, since, after all, soil naturally drains readily enough.
Drainage holes, however, are important engineering features required to prevent the accumulation of water in the beds during heavy rains or irrigation. Otherwise, even soils that are well drained may in time become saturated, producing anaerobic conditions that suffocate roots and produce pathogenic fungi. Holes should be made at intervals of 12 to 18 inches, along the base of the bed, be of a minimum size of inch or more, angled downwards, to properly allow a natural drainage of all water and yet protect the soil against escape through the mesh protection.
The solution to all drainage problems consists in making the garden beds deeper, no matter what the soil or conditions of the site.
While depth may be advantageous for root growth, it does not take the place of good soil structure and site preparation. Deep beds with heavy clay soil do not drain satisfactorily, while shallow beds having good soil mixtures do of course succeed. The solution to the problem of proper drainage is to put in sufficient depth of soil, with the addition of proper facilities for the improvement of the soil, such as perlite or sand. It is further necessary to make the surface drainage adjustments and the underground structure arrangements such as are required in accordance with the character of the site and the plants used.
Permanent structures that are maintenance free are raised garden beds that never require soil replacement or structural updates.
All raised beds will deteriorate over time as soil compaction and other forms of nutrient loss occur from the soil being robbed of its nutrients and organic matter decaying. The soil should be refreshed and amended with new compost every 3-5 years by removing the top even though the raised beds are structurally sound. Wooden beds will need to be replaced every 7-10 years and metal and masonry need to be resealed for joints. Annual inspections for drainage adequacy and appropriate soil pH balance must be maintained in order to have proper growing conditions and not suffer from the diminishing yields.
Conclusion
Effective drainage is necessary for healthy plants since it allows roots to breathe. A soil that is too wet chokes off and starves plants of the oxygen the roots must have to breathe. Proper drainage prevents the washing away of nutrients. These principles can be applied to gardens of all sizes and materials. Employ them and observe the result in more vigorous growth.
Drainage quality is one of the key indicators of your garden's vitality. A well-drained soil allows for deeper rooting and a significantly better harvest. I have observed sickly gardens transform into healthy ones after improving the drainage. Less disease equates to less work for you from season to season. All healthy plants require a good foundation.
Save time with smart drainage solutions. Having good drainage prevents the need for weeding and soil replacement. You spend less time fixing things and more enjoying your garden. Good design prevents compaction, eliminating the need for seasonal digging. It's an investment that "pays back."
Improving drainage has some simple steps. Look at the slope of your bed. If it slopes toward the house, install drain holes to prevent water from accumulating. Determine the nature of your soil using the trench method discussed. Small changes produce big immediate results. Your plants will appreciate improved growth next season.
External Sources
Frequently Asked Questions
Does a raised bed need drainage?
Yes, drainage is essential to prevent root rot and soil compaction. Without proper drainage, water accumulates and creates anaerobic conditions that suffocate plant roots and promote fungal diseases. Raised beds require intentional drainage systems like holes, slope engineering, and layered substrates.
What should you put at the bottom of a planter for drainage?
Avoid gravel or rocks, which create perched water tables. Instead, use these effective materials:
- Coarse branches or twigs for aeration base
- Permeable landscape fabric to separate soil layers
- Drainage holes drilled directly into the bed structure
How do you fix poor drainage in an existing raised bed?
Improve drainage by retrofitting these solutions:
- Add supplemental drainage holes angled downward
- Incorporate coarse sand or perlite into soil
- Install French drains around the bed perimeter
- Create slope by raising one end of the bed
Can you use garden soil in raised beds?
Garden soil often compacts and drains poorly in raised beds. Instead, blend these components: screened topsoil for structure, compost for nutrients, and drainage amendments like perlite or rice hulls. Always pasteurize soil to eliminate pathogens before use.
Do drainage holes prevent wood rot in raised beds?
Drainage holes reduce wood rot by preventing constant moisture exposure. Additional protection methods include:
- Applying wood preservatives that don't clog grain
- Elevating beds slightly above ground level
- Using rot-resistant woods like cedar or redwood
How often should raised bed soil be replaced?
Refresh soil every 3-5 years by removing the top third and amending with compost. Complete replacement is rarely needed if you:
- Prevent compaction through proper drainage
- Rotate crops annually
- Add organic matter each planting season
Does adding sand improve soil drainage?
Coarse sand enhances drainage in clay soils but worsens sandy soils. For optimal results: blend sand with organic matter at a 1:1 ratio, ensure particles are larger than fine sand, and always combine with structural amendments like compost.
What plants suffer most from poor drainage?
Plants vulnerable to drainage issues include:
- Root vegetables like carrots that rot in waterlogged soil
- Mediterranean herbs such as lavender and rosemary
- Fruit-bearing plants including tomatoes and peppers
Can too many drainage holes cause problems?
Excessive holes lead to rapid soil drying and nutrient leaching. Maintain balance by spacing holes every 12-18 inches, installing mesh screens behind them, and monitoring soil moisture levels to adjust watering frequency accordingly.
How do you test raised bed drainage efficiency?
Conduct a trench test:
- Dig a 10-inch deep hole and fill with water
- Time how long it takes to drain completely
- Optimal drainage occurs within 4-10 hours
- Longer times indicate necessary amendments